
- Home
- Protocols

-

Live-cell imaging
Last updated date: Dec 16, 2019 Views: 1267 Forks: 0
Live Cell Imaging of Meiotic Budding Yeast with the CellASIC Onix2 System
NOTE: This protocol is written for a Deltavision Elite wide-field fluorescence microscope.
Preparation of CellASIC Plate
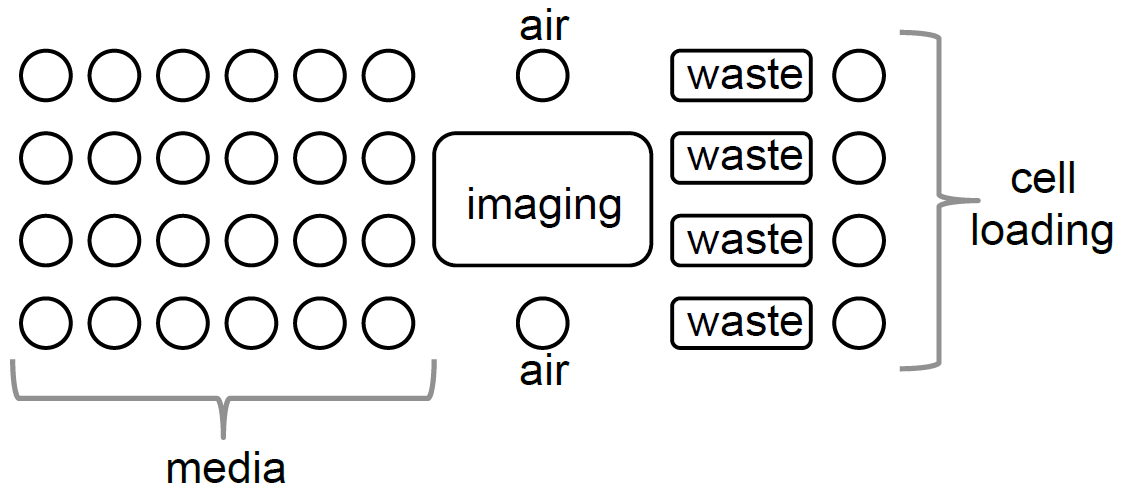
1. Obtain an Y04E CellASICS plate (NOTE: The manufacturer recently changed the diploid plate ID from Y04D to Y04E). Layout depicted below.
2. Aspirate PBS from the wells.
3. Wash wells 1x with 250 μL of sporulation media (SPO).
NOTE: Our sporulation recipe is 2% potassium acetate supplemented with 40 mg/L adenine, 40 mg/L uracil, 10 mg/L histidine, 10 mg/L leucine and 10 mg/L tryptophan and 0.02% raffinose. The media’s pH was adjusted to pH7 with acetic acid.
4. Fill media wells with 250 μL of conditioned sporulation media (SPO).
NOTE: Conditioned sporulation media is prepared by allowing diploid cells to progress through meiosis in Spo for 5 hours and then filter sterilizing.
5. Dilute cell culture to 1.85 OD600 units/mL. [OPTIONAL] For clumpy samples, sonicate with three pulses at 50% amplitude).
6. Load 250 μL of the cells from step 5 into cell loading wells. NOTE: Each well can be used to image a different strain.
7. Switch to the 60X objective, and make sure the objective setting in the DeltaVision software is matched to 60X.
8. Turn on the CellAsic computer and control system.
9. To seal the CellAsic, push the four corners of the lid against the device, then turn on the seal button on the lid. The seal light should remain blue if properly sealed.
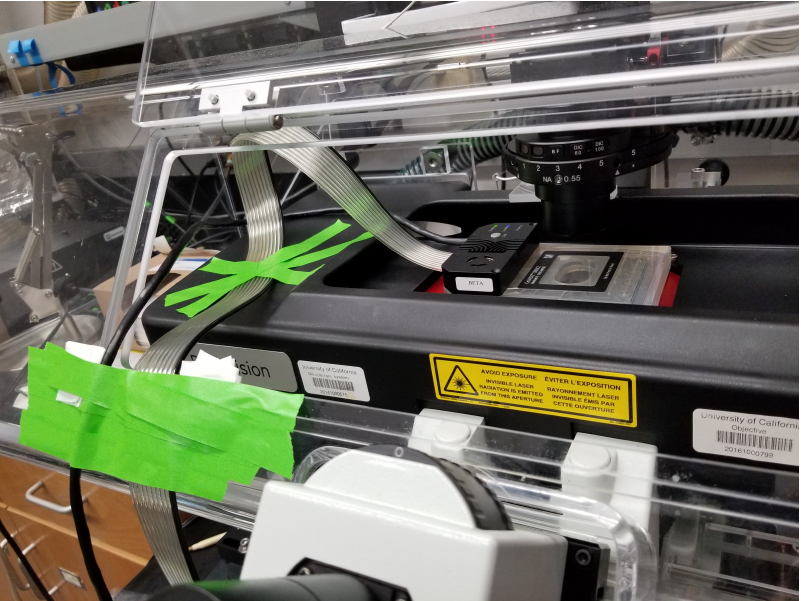
10. Tape the pneumatic tubes to the DeltaVision platform, ensuring appropriate slack (see Picture below for one appropriate conformation).
10. In the CellASIC software (ONIX2), click on “Create New Experiment”. Select “Y04D- 02”. Click “OK”.
12. To ensure proper aeration, check that the air regulator reads 10-30 psi. Avoid adjusting the air tap for the duration of the experiment
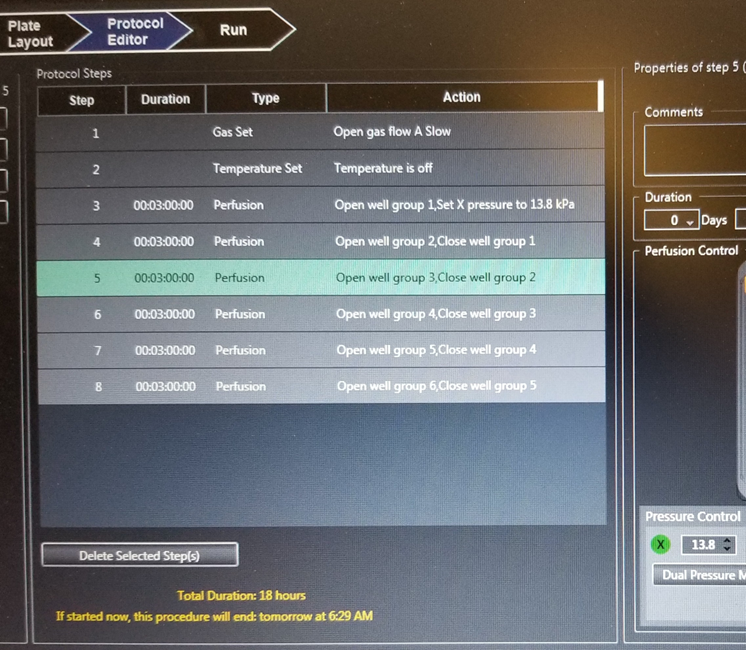
13. Click “Protocol Editor”. Flow media from each column for 3-4 h at 13.8 kPa (2 psi). Set the Gas Flow source to appropriate input and select the flow setting “Slow” (see picture below).
14. Click “Manual Mode”. Load cells by clicking on “Run cell loading sequence” at 55.1 kPa (8 psi). Check on the DeltaVision that cells have loaded to the desired density. If necessary, repeat the loading procedure to obtain higher confluency.
15. Run the CellASIC protocol by clicking “Run” tab. Then click “Start Run”
Setting up the DeltaVision
1. Ensure that the objective is set to 60X, and that the correct filter set is in place and entered in the software (under Misc settings [gear icon]).
2. Open up the experiment settings [flask icon] and set desired parameter in “Design”
a. In the “Sectioning” tab, specify the number and spacing of z-slices. Our default is 8 z-slices of 1 micron each.
b. In the “Channels” tab, select the desired channels and specify both percent transmission and exposure time. Our default is 10%T/0.025s for FITC and 32%/0.025s for mCherry. Take a reference image at every time point (POL, 32%T and 0.1s).
NOTE: We do not recommend using the DAPI channel for long term imaging due to photo-toxicity.
c. In the “Time-lapse” tab, specify the desired time interval between image acquisitions and the total duration of the movie. Our default is acquiring every 15 minute intervals for 18 hours.
d. In the “Points” tab, choose Maintain Focus With Ultimate Focus.
3. In “Run,” specify desired folder and name the files appropriately.
4. Begin marking points in the first imaging area. Once you begin marking points, only adjust Z in the software. DO NOT use the manual focus, or everything will be off!
5. Mark a few points in imaging area 1. Then visit imaging area 4. Use the software to return to the imaging area 1 points. If the focus drifts substantially, try adjusting the tape. If air bubbles appear, try reapplying oil.
6. Mark the rest of the points (~10-12 points per imaging area). You can save the point list.
7. In the Point List window, click Calibrate All. SAY NO to Software AF.
8. Revisit every point using the software. Replace any out-of-focus points with the proper middle of the Z, using the software to move through Z planes—NOT the manual focus. A significant shift in focus is common after points are first selected.
9. In the Point List window, click Optimize List to visit points in the most efficient order. (The software will not renumber the points).
10. Under Points Settings, turn ON Visit All Points. Make sure to turn on Maintain Focus with Ultimate Focus. (Do NOT turn on the other focus adjustment).
11. Start the experiment!
NOTE: After imaging, make sure to dab the CellAsics lid dry and keep on a surface that prevents dust accumulation (we use a lint roller sheet). Post-acquisition deconvolution of movies is recommended.
Live Imaging with a glass-bottom 96-well Plate
NOTE: This protocol is written for a Deltavision Elite wide-field fluorescence microscope.
Preparation of 96 Well Plate
IMPORTANT: For all steps, touch the pipette tip to the glass bottom to ensure that the liquid is deposited without air bubbles. Tilting the plate enhances view while working.
- Treat each well with 20 µL of 1X ConA (see recipe below) for 10 min.
- OPTIONAL: Right before loading cells, sonicate using three pulses at 50% amplitude. Recommended for clumpy samples.
- Remove 1X ConA using a pipette (can be saved for re-use).
- Deposit 20 µL of cells (in sporulation media, 1.85 OD600 units/mL) onto the ConA-treated glass wells. Allow media to sit for 3 minutes to ensure cells settle.
- Remove the media containing cells, taking from the side of the well to avoid disturbing the newly deposited cell layer.
- Deposit 100 µL of conditioned sporulation media.
Setting up the DeltaVision
1. Ensure that the objective is set to 60X, and that the correct filter set is in place and entered in the software (under Misc settings [gear icon]).
2. Open up the experiment settings [flask icon] and set desired parameter in “Design”
a. In the “Sectioning” tab, specify the number and spacing of z-slices. Our default is 8 z-slices of 1 micron each.
b. In the “Channels” tab, select the desired channels and specify both percent transmission and exposure time. Our default is 10%T/0.025s for FITC and 32%/0.025s for mCherry. Take a reference image at every time point (POL, 32%T and 0.1s).
NOTE: We do not recommend using the DAPI channel for long term imaging due to photo-toxicity.
c. In the “Time-lapse” tab, specify the desired time interval between image acquisitions and the total duration of the movie. Our default is acquiring every 15 minute intervals for 18 hours.
d. In the “Points” tab, choose Maintain Focus With Ultimate Focus.
3. In “Run,” specify desired folder and name the files appropriately.
4. Begin marking points in the first imaging area. Once you begin marking points, only adjust Z in the software. DO NOT use the manual focus, or everything will be off!
5. Mark a few points in imaging area 1. Then visit imaging area 4. Use the software to return to the imaging area 1 points. If the focus drifts substantially, try adjusting the tape. If air bubbles appear, try reapplying oil.
6. Mark the rest of the points (~10-12 points per imaging area). You can save the point list.
7. In the Point List window, click Calibrate All. SAY NO to Software AF.
8. Revisit every point using the software. Replace any out-of-focus points with the proper middle of the Z, using the software to move through Z planes— NOT the manual focus. A significant shift in focus is common after points are first selected.
9. In the Point List window, click Optimize List to visit points in the most efficient order. (The software will not renumber the points).
10. Under Points Settings, turn ON Visit All Points. Make sure to turn on Maintain Focus with Ultimate Focus. (Do NOT turn on the other focus adjustment).
11. Start the experiment!
NOTE: After imaging, make sure to dab the CellAsics lid dry and keep on a surface that prevents dust accumulation (we use a lint roller sheet). Post- acquisition deconvolution of movies is recommended.
ConA recipe for mounting yeast cells
1 M CaCl2
14.7 g CaCl2·2H2O 100 mL total volume
1 M MnCl2
19.8 g MnCl2·4H2O 100 mL total volume
10X PBS pH 6.8
Dissolving solution
5 mL 10X PBS pH 6.8
2.5 mL 1 M CaCl2
2.5 mL 1 M MnCl2 40 mL water
Add ConA to dissolving solution
Stock solution: 10X ConA = 20 mg/mL
- Ünal, E(2019). Live-cell imaging. Bio-protocol Preprint. bio-protocol.org/prep145.
- King, G. A., Goodman, J. S., Schick, J. G., Chetlapalli, K., Jorgens, D. M., McDonald, K. L. and Ünal, E.(2019). Meiotic cellular rejuvenation is coupled to nuclear remodeling in budding yeast. eLife. DOI: 10.7554/eLife.47156
Category
Do you have any questions about this protocol?
Post your question to gather feedback from the community. We will also invite the authors of this article to respond.