
- Home
- Protocols

-

Fabrication of 3D-bioprinted vascularized tumor model
Last updated date: Oct 13, 2021 Views: 720 Forks: 0
A. Bioink preparation:
Preparation of fibrin 3D-bioink
The fibrin bioink is based on fibrinogen and gelatin. This protocol describes the concentrations that were used Neufeld et al., Sci Adv 2021.
Materials background:
Fibrinogen is a glycoprotein that has an important role in the formation of blood clots in vertebrates; it forms a fibrin gel when mixed with thrombin (Th). We combined fibrinogen with the hydrolyzed form of collagen, gelatin, a low-cost, abundant and biocompatible material, and the major component of the ECM in most tissues. We allowed slow crosslinking to the fibrin gel by transglutaminase (TG), a natural, non-toxic enzyme. TG can catalyze intra- and inter- molecular covalent bonds between glutamine and lysine residues of gelatin.
Gelatin is a denatured collagen and had cell binding motifs, such as RGD (Arg-Gly-Asp) and matrix metalloproteinases (MMP)-sensitive degradation site making gelatin a suitable candidate for a wide range of bio-applications, like 3D models, tissue engineering and drug delivery. The presence of these motifs are necessary for cell binding, spreading, and enhancing cells ability of proliferation, migration and organization into higher order structures.
Shortly, gelatin (Type A, 300 bloom from porcine skin) purchased from Sigma-Aldrich (Rehovot, Israel) solutions at 15% w/v and 30% w/v were dissolved in phosphate-buffered saline (PBS) without calcium and magnesium at 70°C for 12 h under vigorous stirring. Then, the pH was adjusted dropwise to 7.5 using 1 M NaOH. The solution was filtered through 0.2 µm filter and stored at 4°C.
Detailed gelatin stock solution preparation:
Comes in a plastic vial. Keep sterile - open only in a biological hood.
1. Clean 250 ml nodule, stopper and oval stirrer with water, liquinox and 70% Ethanol. Dry.
2. Warm sterile PBS to 37°C in water bath.
3. Spray 70% Ethanol on oil bath and magnetic stirrer plate and insert them to the biological hood.
4. Warm the oil bath to 70°C.
5. Transfer some gelatin powder from the stock plastic vial to an empty falcon (which was weighed in advance) in the biological hood.
6. Weigh the falcon tube containing the gelatin powder.
7. Transfer the gelatin powder to the nodule and weigh the falcon again.
8. Calculate the amount of gelatin powder. Repeat steps 5-7 until you reach the desired amount of gelatin. For example, for 15% w/v solution – weigh 7.5 g for a final volume of 50 ml. We have created 30% w/v and 45% w/v.
9. Spray 70% Ethanol on the nodule and insert it to the hood. Place it safely with the thermocouple inside the bath.
10. Add the warm PBS and magnetic stirrer to the nodule.
11. Stir on a magnetic plate at 1000 rpm at 70°C for 12-14 h until the gelatin is completely dissolved. Make sure the stirrer did not stick at the bottom of the jelly as an un-soluble mixture!
12. Spray 70% Ethanol on pH meter, sterile pH solutions, 1M NaOH, glass beaker and autoclaved DDW for pH calibration.
13. Gently tilt sideways the nodule and insert the pH meter electrode in a manner that the stirring bar (300 rpm) won't touch the electrode as shown in the photo. Very important to protect the electrode. The starting pH of 15%w/v solution should be around 5.7. The starting pH of 30% w/v solution should be around 5.5.
14. Add 100 µl 1M NaOH dropwise. Avoid adding the solution on the walls of the nodule. For example, the total 1M NaOH volume to a 50 ml 15% gelatin solution was 1.1 ml. For example, the total 1M NaOH volume to a 166 ml 30% gelatin solution was 6.5 ml.
15. Create aliquots, wrap them tightly with parafilm and store at 4°C.
16. Clean the nodule with warm water and liquinox.

Figure 1. Gelatin pH calibration. *Image was taken during the formation of an Un-sterile batch. In order to create a sterile batch, pH calibration is done inside a biological hood as described above.
Shortly, fibrinogen was purchased from Merck Millipore (Burlington, Massachusetts, USA). A stock solution (50 mg/ml) was produced by dissolving the lyophilized human blood plasma protein at 37°C in sterile PBS without calcium and magnesium for 45 min. The pH was adjusted dropwise to 7.5 using 0.5 M NaOH and the solution was stored at -80°C.
Detailed fibrinogen stock solution preparation:
Comes in a glass vial. 1000 mg can be dissolved MAXIMUM in 20 ml DDW. Do NOT try to dissolve in a higher concentration. Please see vial label for lot-specific reconstitution volume.
1. Warm autoclaved DDW to 37°C in water bath.
2. Warm the vial to 37°C in water bath / incubator.
3. Spray 70% Ethanol on vial, DDW and magnetic stirrer – the biggest you can insert into the vial. Dry.
4. Add 19 ml warm DDW and magnetic stirrer.
5. Stir on a magnetic plate at 200 rpm at 37°C for 1-2 h until fibrinogen completely dissolved. this mixture should remain at 37°C until the fibrinogen is completely solubilized.
6. Spray 70% Ethanol on pH meter, sterile pH calibration solutions, 0.5 M NaOH, glass beaker and autoclaved DDW for pH calibration.
7. Gently tilt sideways the vial and insert the pH meter electrode in a manner that the stirring bar (100 rpm) won't touch the electrode. Very important to protect the electrode. The starting pH of the solution should be around 6.
8. Add 100 µl 0.5M NaOH dropwise. Avoid adding the solution on the walls of the vial.
9. Add DDW to achieve a final fibrinogen concentration of 50 mg/ml.
10. Create aliquots and store in -80°C.
If the vial is disturbed before the fibrinogen is completely dissolved, the fibrinogen will precipitate.
Reconstitution problems could be due to:
- not the right reconstitution volume (as indicated on the label and which is lot-specific)
- reconstitution at 37°C but with a solution which was not at 37°C itself
- remove the reconstituted fibronectin from 37°C whereas it was not completely dissolved yet
- store the reconstituted fibrinogen at 4°C or on ice, and not at -80°C directly.
-The solutions should at no point be stored on ice. For short term storage they should remain at room temperature.
-You should be very careful not to disturb the mixture until it is fully dissolved.
-Incubating overnight at 37°C is not recommended. 1 h should be the maximum time.
Transglutaminase (TG) was purchased from Moo Glue (Modernist Pantry, Eliot Maine, USA). Stock solution at 100 mg/ml was created freshly by dissolving TG powder in PBS without calcium and magnesium, gently mixing for 20 min at 37°C and sterile-filtering.
Stock solution of 250 mM CaCl2 was prepared by dissolving CaCl2 powder in PBS without calcium and magnesium, sterile-filtering and stored at 4°C.
To prepare stock solution of thrombin (purchased from Merck Millipore (Burlington, Massachusetts, USA)), lyophilized thrombin was reconstituted at 2000 U/ml using sterile PBS without calcium and magnesium, aliquoted and stored at −80°C.
Preparation of the vascular bioink
Material background:
Pluronic F127 is a biologically inert triblock co-polymer based on poly-ethylene oxide (PEO) and poly-propylene oxide (PPO), which exhibits reversible thermal gelation and a lower critical solution temperature (LCST) behavior. At lower temperatures, Pluronic F127 solution is liquid, and upon heating to room temperature it transforms into a gel.
Shortly, 40% w/v Pluronic F127 was purchased from Sigma-Aldrich (Rehovot, Israel) and dissolved in double distilled water (DDW) using an overhead mechanical stirrer at 4°C. The solution was stored at 4°C.
Detailed Pluronic F127 stock solution preparation:
Comes in a plastic vial. Keep sterile - open only in a biological hood.
1. Clean 500 ml 3 headed nodule and 2 stoppers with water, liquinox and 70% Ethanol. Dry.
2. Spray 70% Ethanol on a cryogenic Dewar flask, an overhead mechanical stirrer, a stirrer and a stend. Insert them to the biological hood.
3. Add the total DDW volume and cool to 4°C with ice inside the Dewar.
4. Transfer some Pluronic F127 powder from the stock plastic vial to an empty falcon (which was weighed in advance) in the biological hood.
5. Weigh the falcon tube containing the Pluronic F127 powder.
6. Transfer some of the Pluronic F127 powder to the nodule and weigh the falcon again. First, transfer no more than half of the desired amount.
7. Calculate the amount of Pluronic F127 powder you have added.
8. Gently mix the solution with an overhead mechanical stirrer.
9. Keep adding more Pluronic powder in sections (once in 2-3 h) until you reach to the desired concentration of 40% w/v.
10. Keep the solution cold by replacing the ice every few hours. If you haven't reached the desired concentration, turn off the mechanical stirrer for the night and continue at the day after, with new ice. Don't stir at room temp.
11. After reaching 40% w/v, create aliquots, wrap them tightly with parafilm and store at 4°C.
12. Clean the nodule with warm water and liquinox.

Figure 2. Pluronic F127 solution formation.
B. Fabrication of 3D-bioprinted vascularized tumor model
To prepare printing formulation of fibrin 3D-bioink:
1. Thaw fibrinogen stock solution by worming it to 37°C.
2. Warm gelatin stock solution to 37°C.
3. Harvest cells of interest and centrifuge.
4. Mix fibrinogen and gelatin stock solutions to a final 1% w/v and 6% w/v final concentration, respectively.
5. Add cells to the mixing solution according to your desired concentration with the remain volume. We used 1x10⁶ cells/ml in most cases.
6. Load the fibrin into a syringe (Nordson, California, USA) and taper with a luer-lock stopper.
7. Cool the formulation to 4°C for 15 min.
8. Load the syringe into the 3D printer's cartridge. Set the temperature to 24°C and hold for 15 min prior to 3D-bioprinting initiation.
9. Use a needle tip (Nordson) of varying size with a luer-lock to print using a 3D-Bioplotter® (Manufacturer series, EnvisionTEC®, Gladbeck, Germany) equipped with five independent ink cartridges.
10. Before each 3D-bioprinting, calibrate the nozzles to determine their respective X, Y and Z offsets.
11. Print 6 to 8 layers on a thin coverslip according to the desired height.
12. Frame by a polydimethylsiloxane (PDMS) (SylgardTM 184, Dow®, Michigan, USA) gasket, creating the bottom platform onto which vasculature structure could be printed.
13. Insert connectors (Darwin microfluidics, Paris, France) to the inlet and outlet positions of the PDMS gasket to allow future flow by peristaltic pump.
14. Cell-laden bioinks should be printed within a time period up to 2 h to prevent cell death.
15. Leave the printed fibrinogen layers to dry for up to 1 h, covered with a thin glass slide at room temp.
To prepare casting formulation of fibrin 3D-bioink:
1. Thaw fibrinogen stock solution by worming it to 37°C.
2. Warm gelatin stock solution to 37°C.
3. Harvest cells of interest and centrifuge.
4. Mix fibrinogen and gelatin stock solutions to a final 1% w/v and 6% w/v (or 12% w/v) final concentration, respectively.
5. Add cells to the mixing solution according to your desired concentration with the remain volume. We used 1x10⁶ cells/ml in most cases.
6. Add CaCl2 and TG stock solutions to a 2.5 mM and 3% final concentration, respectively.
7. Mix thoroughly.
8. Add Th stock solution to a 0.5 U/ml concentration and mix rapidly.
9. Immediately, cast on the thin coverslip, framed in advance with a PDMS gasket, creating the bottom platform onto which vasculature structure could be printed.
10. Insert connectors (Darwin microfluidics, Paris, France) to the inlet and outlet positions of the PDMS gasket to allow future flow by peristaltic pump.
11. Leave the cell-laden fibrin 3D-bioink constructs to fully crosslink for up to 2 h, covered with a thin glass slide at room temp.
We have designed a special printing stage adjusted on top of the existing stage of the printer to achieve accurate printing.
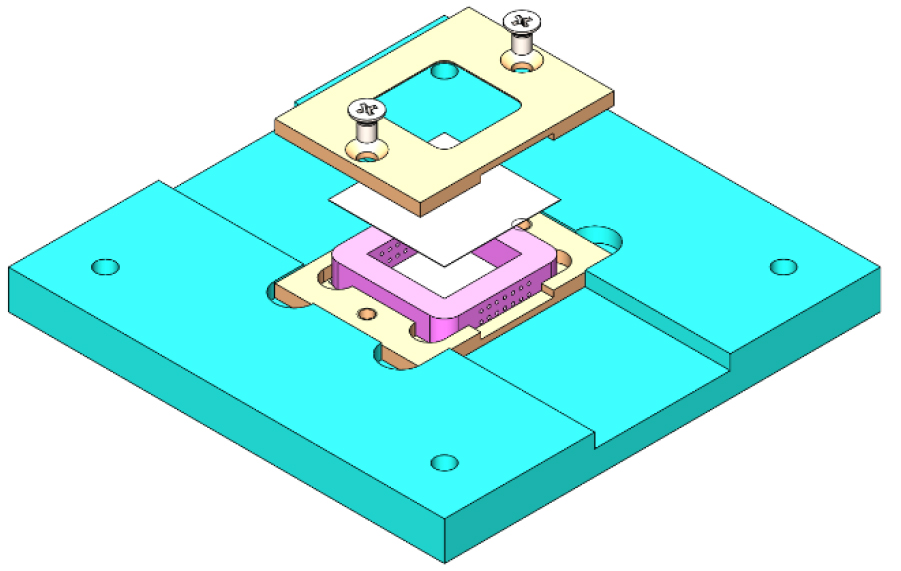
Figure 3. An assembly of the self-designed perfusion chip mounted on a self-designed 3D- bioprinting stage.
To prepare the fugitive vascular bioink:
1. Thaw 2000 U/ml thrombin solution on ice.
2. Mix thrombin and Pluronic F127 stock solutions to a final 100 U/ml and 38% w/v final concentration, respectively.
3. Load the vascular bioink into a 30 ml syringe at 4°C.
4. Centrifuge 5 min at 2000 rpm to remove air bubbles.
5. Set the cartridge temperature to 29°C.
6. Connect the desired needle tip via a luer-lock.
7. Before each 3D-bioprinting, calibrate the nozzles to determine their respective X, Y and Z offsets.
8. Print the vasculature structure on top of the printed/casted fibrin bioink.
After the printing of the vascular structures:
1. Immediately after the vascular bioink 3D-bioprinting was completed, cast fresh formulation of the fibrin 3D-bioink (with the same cell composition as the lower fibrin layers have) to cover the printed vasculature and fill the PDMS frame completely.
2. Cover the sample with additional coverslip glass and seal with a metal frame (creating the perfusable chip).
3. Incubate at 37°C for a minimum of 3 h until complete crosslinking is achieved, reaching the desired physiological stiffness.
4. To liquefy the fugitive Pluronic F127 bioink, cool the sample was to 4°C for 15 min.
5. Inject cold PBS into the mold's inlet by applying positive pressure, while applying negative pressure through the outlet leaving the model with the desired 3D-bioprinted lumens.
6. Following Pluronic F127 wash, inject fibronectin (100 µg/ml, diluted with EGM-2) into the lumens' inlet and incubated in rotation for 3 h at 37°C to prime the vasculature wall and create an adherable interface.
7. Inject a mixture of mCherry-labeled HUVEC (8x10⁶ cells/ml) and iRFP-labeled human microvascular brain pericytes (2x10⁶ cells/ml) at 4:1 ratio.
8. Incubated for 2 h.
9. Repeat cell seeding steps 4 times, and each time incubate the sample position rotated by 90 degrees to maximize cell attachment area.
10. Incubated in rotation overnight at 37°C to allow cell attachment to the lumens' walls with a full coverage of the lumen.
11. Connect the sample to a peristaltic pump (EBERS, Zaragoza, Spain), incubate at 37°C and perfuse with medium mixture of all the cells in the samples at a 1:1:1:1:1 ratio (DMEM, astrocyte medium, microglia medium, pericyte medium and EGM-2) for 5 days.
12. Confirm a confluent cover was created by confocal imaging.
Optional: Perfuse 1 or 0.1 mg/ml 70 kDa dextran-FITC through the vasculature using a syringe pump (Braintree scientific, Braintree, Massachusetts, USA) at a flow rate of 25 µl/min. Monitor by EVOS FL Auto cell imaging system at 20 sec intervals.
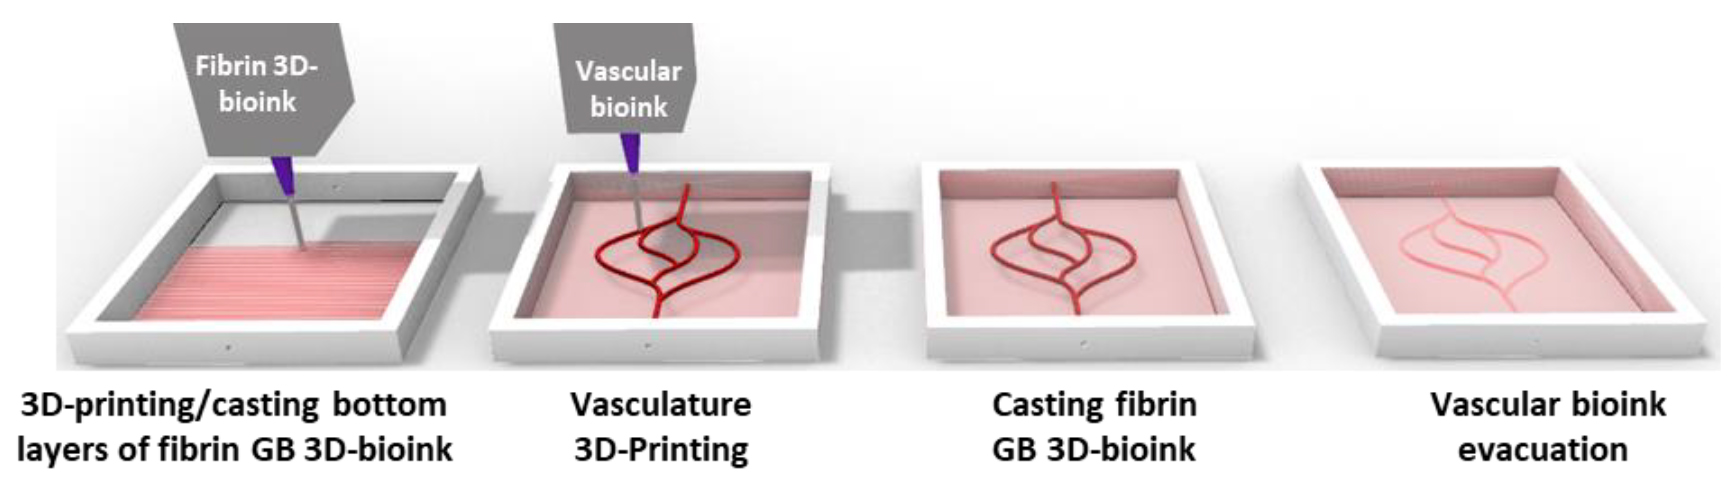
Figure 4. Schematic illustration of the 3D-bioprinting model multi-stage process.
- Neufeld, L and Satchi-Fainaro, R(2021). Fabrication of 3D-bioprinted vascularized tumor model. Bio-protocol Preprint. bio-protocol.org/prep1404.
- Neufeld, L., Yeini, E., Reisman, N., Shtilerman, Y., Ben-Shushan, D., Pozzi, S., Madi, A., Tiram, G., Eldar-Boock, A., Ferber, S., Grossman, R., Ram, Z. and Satchi-Fainaro, R.(2021). Microengineered perfusable 3D-bioprinted glioblastoma model for in vivo mimicry of tumor microenvironment. Science Advances 7(34). DOI: 10.1126/sciadv.abi9119
Do you have any questions about this protocol?
Post your question to gather feedback from the community. We will also invite the authors of this article to respond.