
- Home
- Protocols

-

Microdevice fabrication
Last updated date: Jun 14, 2021 Views: 807 Forks: 0
Tumor-on-a-chip microdevice preparation
Kathryn M Denecke, Jose M Ayuso
I. SU8 Silicon Wafer Fabrication
- Clean silicon wafer with acetone and IPA, rinse with DI water and dry wafer using N2 gun
- Pre-bake silicon wafer at 65 °C for 30 minutes to ensure no water on surface (improves photoresist adhesion)
- Pour a quarter sized drop of SU8 (i.e., 3-5 mL) onto the wafer and spin to the desired thickness (SU8-100 can be spun at 1000 rpm for 60 seconds to create a 250 um layer) (see: kayakuam.com/wp-content/uploads/2020/09/KAM-SU-8-50-100-Datasheet-9.3.20-Final.pdf)
- After spinning, soft bake SU8 at the needed parameters for the type and thickness (95 °C for 2 hours for 250 um SU8-100)
- Using a UV meter, calibrate exposure dose (650 mW/cm2 ) on the raised UV stage based on distance and location.
- Place wafer on stage, align photolithography mask and place clear glass plate on top to bring mask and SU8 into firm contact
- Expose SU8 with proper dose based on type and thickness (~700 mj/cm2 or 25-30 seconds)
- Immediately after exposure, perform post-exposure bake 1 (bake at 65 °C for 1 minute) and 2 (95 °C for 20 minutes for 250 um SU8-100)
- After post-exposure bake 2, in a chemical hood, place wafer on stirring plate and submerge wafer in SU8 developer (~30 minutes for 250 um)
- When checking development, rinse wafer with old SU8 developer to rinse away SU8 residue, then rinse with IPA. If a white residue is present, development is not complete and wafer should be returned to developer
- Once development is complete, rinse with SU8 developer, IPA, and DI water. Dry with N2 gun
II. PDMS Fabrication Protocol
- PDMS device
- Create a 10:1 ratio of base polymer to curing agent (16gr:1.6gr is sufficient for 150 mm wafers) in plastic container
- Stir vigorously for 1-2 minutes until solution is homogenous and contains no large bubbles
- Place in vacuum for one hour or until solution is contains no air bubbles
- Set SU-8 cleaned wafer on plastic transparency sheet (CG7033S) and slowly pour PDMS solution on top of wafer to minimize air bubbles
- Place second plastic transparency on top of freshly poured PDMS and using an object with a flat surface (e.g., tongue depressor) scrape top of second transparency so that PDMS reaches all edges of wafer
- Repeat steps 4 and 5 for second wafer
- Place both wafers on hot plate, cover with one inch rubber insulating material and place 30-40 lbs. on rubber protective material
- Set hot plate to 80 °C for 4 hours
- Carefully extract PDMS from wafer using tweezers and place PDMS on plastic transparency (cover with PDMS with additional transparency to minimize dust collection)
- Under a microscope use tweezers to remove excess PDMS from small and large loading ports and side ports of PDMS layer 1 (top layer)
- Under a microscope use tweezers to remove excess PDMS from side ports and bottom chamber of PDMS layer 2 (bottom layer)
- Place cleaned PDMS into container of ethanol for storage
- PDMS Rods
- Create a 10:1 ratio of base polymer to curing agent (4:0.4 is sufficient) in plastic container
- Stir vigorously for 1-2 minutes until solution is homogenous and contains no large bubbles
- Place in vacuum for one hour or until solution is contains no air bubbles
- Unpackage 23 gauge needles, leaving needle cover on
- Use 1mL grooved syringe to aspirate PDMS solution (aim to minimize bubbles)
- Screw needle onto syringe and push PDMS though, stopping when a small bubble of PDMS is visible at the tip of needle
- Place needle on plastic transparency
- Repeat process for each needle
- Place rods on hot plate set at 80 °C for a minimum of 2 hours
- Cut rods to size of PDMS device channel length (approximately 5 mm)
- Place rods into ethanol container for storage
- Assembly
- Place PDMS device on plastic transparency so that large center port creates a cavity
- Insert rod into PDMS device channel using tweezers (rod should be accessible from both loading ports)
- Repeat process until all PDMS devices have rods inserted
- Cut PDMS devices with razor to ensure they fit onto 60-mm glass bottom petri dish (typically two rows of three)
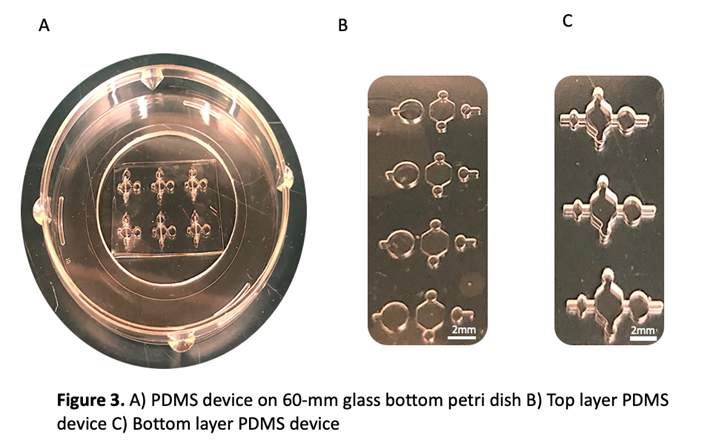
5. Plasma bond PDMS devices for a duration of 30 seconds (place devices onto glass so that a cavity is created between large center port and glass dish)
III. PDMS Lumening- Part 1: Collagen hydrogel polymerization in the microdevice
- Add 20 uL PEI to 1 mL DI (solution is viscous, so use special 200 uL pipette tips for addition and mixing of chemical)
- Add 4 uL GA to 1 mL DI
- 3 mL DI on its own.
- Using micropipette, add PEI solution to device side ports and wait for 10 minutes
- Aspirate PEI from the side channels and fill side ports with GA; wait for 30 minutes. While waiting, collagen solutions can be made.
- On ice, mix dH2O water, PBS 10x (do not keep in ice or it may form precipitates), NaOH 0.5 M.
- Add collagen with special 200 µl pipette tips.
- Mix thoroughly and let sit for 1 minute.
- Using strips, test that pH is between 6.3 and 7.8, the closest to 7.2 the better.
- After 30 minutes, aspirate solution and wash 3 times with DI water.
- Add water to dish to minimize microfluidic evaporation. Fluid can be pipetted into the side of the dish or held within caps.
- Add collagen solution to side ports and wait 10 minutes (collagen beginning to become opaque) at room temperature. Let incubate on top of a plastic tip box, to avoid contact with a conducting solution.
- After that, move to the incubator (37ºC) for 10 minutes.
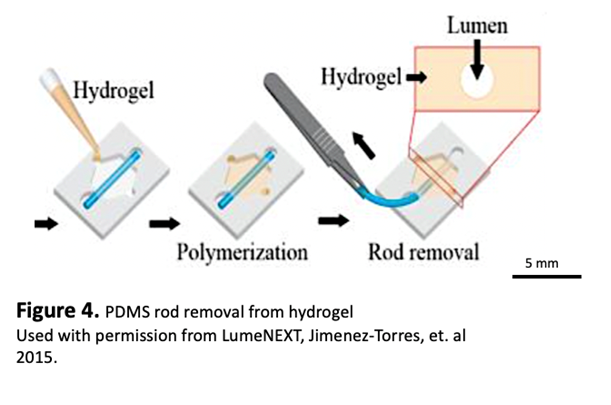
- Add 5-10ul of any desired media to the ports and using sterile tweezers, gently pull rod from device via the small inlet port
15. Incubate for 30 min to overnight.
16. Take the time to aspirate extra collagen from the ports, very carefully to avoid aspirating the gel in the chamber.
PDMS Lumening- Part 2: Seeding of endothelial cells in the lumen to generate a biomimetic blood vessel.
- Trypsinize cells and resuspend at the relevant concentration (15-25k/µl, depending on the cell type).
- Aspirate out fibronectin solution using p 200 tip.
- Perfuse the device with relevant culture media 2-3 times.
- Aspirate the culture media and load the previously homogenized cell solution from the lumen small inlet port.
- Around 1-2 µL of the cell solution is appropriate for loading using a p10 pipette tip
- Ensure an adequate volume of cells has been loaded by direct or microscopy inspection of the loaded lumen.
- Ensure sacrificial water/PBS is in place to minimize media evaporation.
- Place dish in incubator and flip every 15-20 minutes for 45-60 minutes to allow the cells to attach to both sides of the lumen.
- After that time, put a 5-10 µl droplet of media into the smaller inlet lumen port, this will wash out any non-adhered cells and will provide nutrients for the attached cells.
- In case of embedded cells in the lumen trypsinize cells.
- Each following day, remove the media using a pipette and add fresh media.
- Ayuso, J, Skala, M and Beebe, D(2021). Microdevice fabrication. Bio-protocol Preprint. bio-protocol.org/prep1160.
- Ayuso, J. M., Rehman, S., Virumbrales-Munoz, M., McMinn, P. H., Geiger, P., Fitzgerald, C., Heaster, T., Skala, M. C. and Beebe, D. J.(2021). Microfluidic tumor-on-a-chip model to evaluate the role of tumor environmental stress on NK cell exhaustion . Science Advances 7(8). DOI: 10.1126/sciadv.abc2331
Do you have any questions about this protocol?
Post your question to gather feedback from the community. We will also invite the authors of this article to respond.