
- Home
- Protocols

-

Endogenous tagging of IRE1 in U-2 OS cells
Last updated date: Aug 2, 2023 DOI: 10.21769/p2383 Views: 851 Forks: 0
Overview
This protocol describes the insertion of a C-terminal tag (specifically, HaloTag) into the endogenous locus of the human ERN1 gene, which encodes the ER stress sensing protein IRE1α. It is important to note that, while this protocol reflects the procedure exactly as we performed it1, it is not a well-optimized protocol and results in very low editing efficiency. For someone seeking to introduce an endogenous tag into the ERN1 locus in a different cell line, we strongly recommend combining the useful features of this protocol (e.g. guide RNA sequence and homology directed repair (HDR) template sequence) with a more efficient strategy for CRISPR/Cas9-directed genome editing. For instance, our colleagues recently achieved substantially higher editing efficiency by pre-treating cells with nocodazole and nucleofecting a pre- assembled Cas9-sgRNA complex into the cells together with the HDR template DNA2. In contrast, our approach relied on a transient transfection of the target cells with two plasmids, one encoding both the Cas9 protein and the sgRNA and the other carrying the HDR template sequence, largely as described in part 3 of the book chapter by K. L. McKinley3. While this approach is simpler, it produced such low editing efficiencies that we were unable to modify every ERN1 allele in U-2 OS cells, which are hypertriploid (according both to our own observations and to the American Type Culture Collection, ATCC). Instead, we started with a clonal population of U-2 OS cells in which all but one ERN1 alleles had been knocked out via CRISPR/Cas9-directed editing of exon 1. This partial IRE1α knockout cell line was generated as a by-product of our earlier effort to completely knock out IRE1α in U-2 OS cells4. The logic behind using a partial knock-out is that only one allele needs to be edited in order to ensure that all IRE1α protein contains the HaloTag. In summary, while this protocol worked for us, it was inefficient and time-consuming, and we would like to be transparent about the fact that there exist better alternatives to achieve endogenous tagging of the ERN1 locus in human cells.
Protocol
Part 1: Selection and preparation of parental cells.
As discussed in the Overview section, U-2 OS cells (and many other commonly used immortalized cell lines) are hypertriploid. The low efficiency of this protocol means that the chances of finding a clone in which every allele carries the desired C-terminal insertion is very low. One way to resolve this issue is to start with a clonal population of partial knock-out cells that carry only a single intact copy of the ERN1 gene. Such partial knock-out cells will typically get generated as a byproduct of any attempt to generate a CRISPR knock-out cell line, since CRISPR editing is not perfectly efficient and every CRISPR round will result in a mixed population of fully edited, partially edited, and unedited cells. For the details on generating IRE1α knock-out U-2 OS cells in house, please refer to our earlier paper4. Alternatively, a mixed population of partial and full knock-out cells can be obtained commercially from a company such as Synthego. The following steps describe the identification of a clonal population of a cell containing only a single intact ERN1 locus. The approach has been directly applied to U-2 OS cells but should work with minimal modifications for most immortalized adherent cell lines.
1. Separate the mixed polyclonal population of edited cells into single clones. There are two ways of getting individual cell clones: limiting dilution and plate sorting. Note: unless specified otherwise, cells are grown in fully supplemented growth medium: high glucose DMEM (e.g. Thermo Fisher Cat# 11965092), 10% fetal bovine serum (FBS), 2 mM L-glutamine, 50 I.U./mL of penicillin-streptomycin.
1.1 Option 1: Limiting Dilution
1.1.1 Grow the mixed cell population in a well of a 6-well plate or on a 10 cm dish until the cells are ~70% confluent.
1.1.2 Dissociate and count the cells (we recommend counting in triplicate and taking the average of the measurements, since an accurate count is very important for the subsequent step).
1.1.3 Calculate the dilution needed to plate the cells into a 96 well plate with a final density of 0.5 cells/well. At the recommended volume of 150 µl of growth media per well, this corresponds to ~3.3 cells/mL.
1.1.4 Dilute the cells as calculated above and seed them into wells of four 96-well plates (384 wells total). Note #1: this step can be adjusted to use more or fewer plates if desired, trading off the required resources for the probability of finding good clones. Note #2: as a backup for unexpectedly low cell viability after limiting dilutions, we recommend also plating 1 or 2 96-well plates at a higher calculated seeding density of 2 cells per well.
1.2 Option 2: Single-cell Plate Sort. This might be a better way of getting clones, but our fluorescence-activated cell sorting (FACS) machine was malfunctioning at the time of the experiment so we were not able to get plate sorting to work reliably. We used option 1, limiting dilution, instead.
1.2.1 Grow cells on a 15 cm dish or in a T150 flask until ~70% confluent.
1.2.1 Trypsinize the cells, quench the trypsin with an equal volume of fresh growth medium, and pellet the cells by gentle centrifugation (300 RCF for 3 minutes).
1.2.3 Resuspend the pellet in FACS medium (for U-2 OS, PBS supplemented with 0.5% FBS seems to work fine).
1.2.4 Place the cells on ice.
1.2.5 As quickly as possible, perform a plate sort, targeting one cell into every well of a 96-well plate. Aim to seed 3-5 plates since you won't know at the start what your survival rate will be. The exact protocol for the plate sort will depend on your specific FACS machine. In terms of gating, the cells are not expressing any fluorescent markers yet, so just use forward and side scatter gates to remove debris and cell clumps, allowing any singlet cells through.
1.3 Recover individual clones. (Regardless of whether you picked Option 1 or Option 2 above).
1.3.1 Return the 96-well plates to the incubator and replace the growth medium every 3-4 days. Approximately 1.5 weeks after seeding, start scanning through the wells using a standard phase contrast microscope to identify wells that have healthy growing clones. A good clone will appear as a single, roughly circular tight clump of cells. Take care to only select wells with a single clone: if a well has two or more separate cell clumps, it should not be used in subsequent steps since it will contain a polyclonal mixture of cells. Note: you may not be able to find all the good clones at the 1.5 week mark since cells will take variable amounts of time to recover from a single-cell stage. Keep checking the plates for at least another 1-2 weeks and taking notes of any newly identified clones.
1.3.2 As some of the clones start getting dense in the wells of a 96-well plate (i.e. the clump of cells begins to occupy a significant fraction of the well’s surface area), split each clone into two wells of a 24-well plate. One well will be used for expanding the cells, and the other for genomic DNA (gDNA) analysis. Note: due to the variable growth rates, this process will not be perfectly synchronized for all clones. Process the individual clones as they get ready.
2. Screen the clones to identify ones with a single intact ERN1 allele.
2.1 Once any cells grow to near-confluency in a well of the 24-well plate reserved for gDNA analysis, harvest it and purify the gDNA using your protocol of choice. We recommend the PureLink Genomic DNA Mini Kit (Thermo Fisher, cat# K182002). If using the recommended kit, follow the instructions exactly and elute the purified gDNA in 25 µl of 2 mM Tris buffer, pH 8.0.
2.2 Measure the concentration of the purified gDNA on a Nanodrop instrument or using your method of choice; your yield should be at least 10 ng/µl for a successful subsequent PCR reaction (preferably above 30 ng/µl).
2.3 Prepare PCR reactions for each gDNA sample to amplify the edited regions as follows:
Reagent | Amount |
| 5XPhusion GC Buffer (New England BioLabs Cat# B0519S) | 5 µL |
| dNTP mix (10 mM each) | 0.5 µL |
| DMSO | 0.75 µL |
| Forward Primer, 10 µM (5'-AGCGCTTATAGGGCCGGGAA-3') | 1.25 µL |
Reverse Primer, 10 µM (5'- GTTCAAACAAGGATTCGAAGCGCAGG-3') | 1.25 µL |
| Phusion DNA Polymerase (New England BioLabs Cat# M0530S) | 0.5 µL |
| Template DNA (concentration measured by NanoDrop) | Sufficient volume to give 100 ng ofgDNA |
Nuclease-free water | Sufficient volume to bring total reaction volume up to 25 µL |
2.4 Amplify the reactions in a standard PCR cycler using the following program:
Step # | Description | Temperature | Duration (min:sec) |
1 | Initial denaturation | 95°C | 5:00 |
2 | Denaturation | 98°C | 0:20 |
3 | Annealing | 69°C | 0:15 |
4 | Extension | 72°C | 0:30 |
| Go to step 2 (repeat 31x) | |||
5 | Final extension | 72°C | 3:00 |
6 | Sample ready | 10°C | hold |
2.5 Clean up the PCR products using a method of your choice (we use the DNA Clean & Concentrator-5 kit, Zymo Research Cat# D4014, following the manufacturer’s instructions) and measure the resulting DNA concentration. You should elute the gDNA in 10 µL of elution buffer and get a yield of at least 500 ng total DNA (> 50 ng/µL). NOTE: it may be a good idea to run the PCR product on a gel to ensure that you are getting a single strong band at the expected size. If you are not, you’ll want to troubleshoot your PCR first before proceeding with TOPO cloning.
2.6 Clone the PCR product into a TOPO vector (we use the Zero Blunt TOPO PCR Cloning Kit, Thermo Fisher Cat# 451245). Note: The reason for doing TOPO cloning is to get individual sequencing results for every allele in a given clone. Remember that the master PCR product you generated above will contain a mixture of every allele; by cloning it into TOPO vectors, transforming the vectors into bacterial cells, and sequencing many colonies for each clone, you can get individual insertion/deletion sequences for each of the alleles.
2.6.1 Assemble the TOPO cloning reactions (one for each PCR product) as follows:
Reagent | Amount |
PCR product (~50-100 ng/ µL) | 1 µL |
Salt solution (included with kit) | 0.5 µL |
Water | 1 µL |
pCR™Blunt II-TOPO™ mix | 0.5 µL |
2.6.2 Mix gently and incubate for 5 minutes at room temperature.
2.6.3 Place the reaction on ice and proceed immediately to the next step (transformation).
2.7 Transform the TOPO reactions into competent E. coli cells of your choice. We transformed 2 µL of the TOPO mixture into 16 µL of Stellar chemically competent cells (Takara Bio Cat# 636766) following the manufacturer’s instructions, but you may need to modify the amounts if using different competent cells).
2.8 Plate the cells on pre-warmed LB-Kanamycin plates and wait for colonies to grow overnight.
2.9 Perform colony PCRs on ~30 individual colonies for each gDNA sample:
2.9.1 Prepare a PCR master mix for all reactions as follows:
Reagent | Amount per reaction |
| 5XPhusion HF Buffer (New England BioLabs Cat# B0518S) | 3 µL |
| dNTP mix (10 mM each) | 0.4 µL |
Forward Primer, 18 µM (M13 Forward [−20], 5'- GTAAAACGACGGCCAG -3') | 0.25 µL |
Reverse Primer, 18 µM (M13 Reverse, 5'- CAGGAAACAGCTATGAC-3') | 0.25 µL |
| Phusion DNA Polymerase (New England BioLabs Cat# M0530S) | 0.1 µL |
| Nuclease-free water | 10.9 µL |
2.9.2 Split the master mix into as many PCR tubes as needed, pipetting 15 µL into each tube.
2.9.3 Add bacterial cells from a different colony to each PCR tube. To do this, just barely touch the colony with a pipette tip and dip it into the PCR tube, pipetting up and down a couple times to mix. You only need a tiny number of cells; too many cells can cause the PCR to fail.
2.9.4 Amplify the reactions in a standard PCR cycler using the following program:
Step # | Description | Temperature | Duration (min:sec) |
1 | Initial denaturation | 98°C | 5:30 |
2 | Denaturation | 98°C | 0:10 |
3 | Annealing | 52°C | 0:30 |
4 | Extension | 72°C | 0:30 |
| Go to step 2 (repeat 32x) | |||
5 | Final extension | 72°C | 10:00 |
6 | Sample ready | 10°C | hold |
2.9.5 (optional but recommended) Run the colony PCR products on a large 1% agarose gel. Colony PCR can be finicky, and it's a good idea to check which reactions have a good product (you expect to see a sharp single band in the 700-800 bp size range) before wasting money on sequencing reactions.
2.10 Send the PCR reactions that showed a clear band out for Sanger sequencing with a compatible primer (e.g. M13 Forward [-21], 5′-GTA AAA CGA CGG CCA GT-3′).
2.11 Once the sequencing results are in, align them to the sequence of human ERN1 exon 1. If you have a sufficient number of clones, you should be able to see a clear pattern, where every modified allele shows up multiple times (see examples of multiple identical edited sequences from a single clone of mammalian cells).
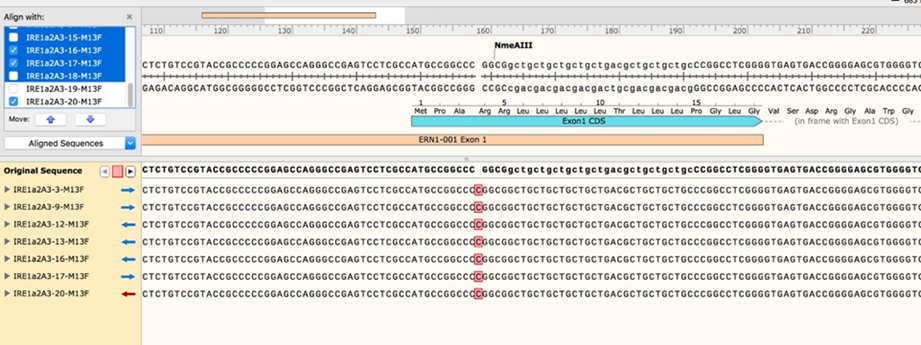
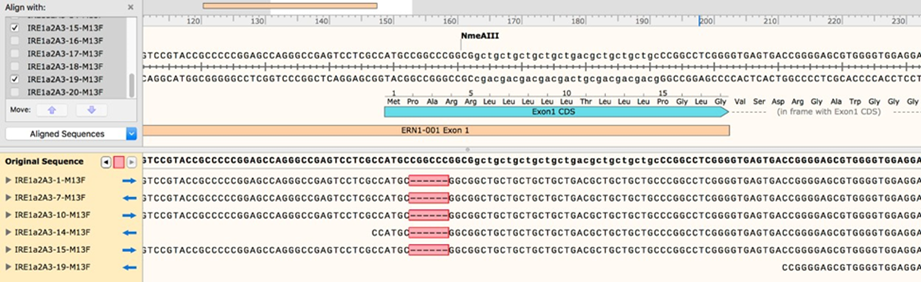
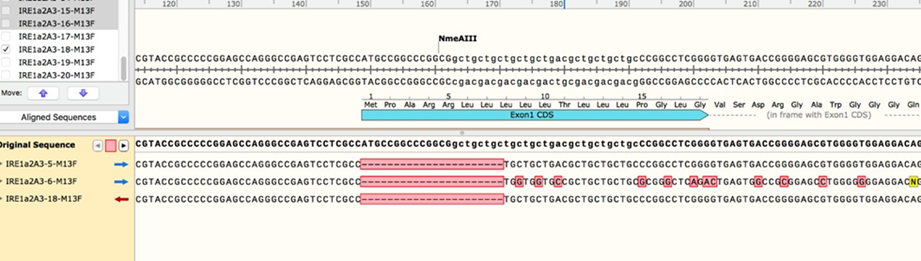
2.12 You may need to send out a few more bacterial colony PCRs for sequencing as needed, but once you have enough sequencing data, you should be able to identify a good clone that contains a single intact (WT) allele. To estimate allele copy number, compare the number of sequencing reads for each modification
2.12.1 For example: if you have allele versions A, B, C, and D, and you get 8 reads for allele A, 3 reads for B, 4 for C, and 3 for D, your clone likely contains two alleles of allele A and one copy each of B, C, and D. This is not an exact approach but given enough sequencing data it should be reasonably accurate.
2.13 To move forward with the protocol, you'll need to identify a clone that contains frameshifts or stop codons in every ERN1 allele except for one unedited (WT) allele. To be extra sure, it may be a good idea to check IRE1 protein expression levels and stress-induced phosphorylation in the selected clone(s) by Western blotting before proceeding.
Part 2: Insertion and validation of the tag into the chosen parental cells.
3. Insert a C-terminal HaloTag into the chosen clonal population by CRISPR/Cas9 genome editing.
3.1 Count and seed your chosen cells from the previous section for transfection (80,000 cells into one well of a 6-well plate).
3.2 Grow overnight cultures of the two plasmids required for transfection: pPW3754, which contains the SpCas9 protein and the sgRNA targeting the C-terminus of human IRE1α, and pPW3755, which contains the HDR template for inserting a C-terminal HaloTag.
3.3 Purify the plasmid DNA from the two overnight cultures, making sure to use a minprep kit that generates endotoxin-free DNA suitable for transient transfections. Note: we found that using freshly miniprepped plasmid DNA (a few weeks old or less) helps boost transfection efficiency.
3.4 Two days after the human cells were seeded into the well of a 6-well plate, they should be ~60% confluent and ready for transfection. Transfect them as follows:
3.4.1 Mix 1.6 µg of pPW3754 plasmid DNA and 1.6 µg of pPW3755 plasmid DNA in a 15 mL conical tube.
3.4.2 Add enough room-temperature Opti-MEM I reduced serum medium (Thermo Fisher Cat# 31985062) to the tube to bring the total volume of the DNA + OptiMem mixture to 140 µL (e.g. If you added 3 µL of pPW3754 and 6 µL of pPW3755, add 131 µL of OptiMem). Mix well.
3.4.3 Add 11 µL of Fugene HD transfection reagent (Promega Cat# E2311) directly to the DNA- OptiMem solution and immediately vortex the tube for 5 seconds to mix.
3.4.4 Incubate the solution at room temperature for 5 minutes (not longer!).
3.4.5 Aspirate the growth medium from cells.
3.4.6 Quickly 3 mL of pre-warmed fully supplemented medium (containing 10% FBS and 2 mM L-glutamine) but without Penicillin/Streptomycin to the conical tube containing the DNA- Fugene mixture and mix by pipetting up and down a couple of times.
3.4.7 Gently add the media with DNA and Fugene to the cells. There is no need to remove the transfection reagent after several hours.
3.5 1-2 days post transfection (once the cells get ~90% confluent), split them into a 10 cm dish.
3.6 Once the 10 cm dish is ~70% confluent, split it into one 10 cm dish for maintenance and one 15 cm dish (or T150 flask) for FACS. As soon as you have enough cells in the maintenance dish, we recommend freezing a couple of aliquots as “checkpoints” before expanding the cells further.
4. Isolate and identify correctly edited clones.
4.1 Once the cells in the FACS flask are ~70% confluent, they should be ready to sort. In preparation, label the IRE1-HaloTag protein with a Janelia Fluor 549 HaloTag ligand (Promega Cat# GA1110). Note: It is a good idea to grow up a parallel plate of unedited parental cells (containing no IRE1-HaloTag) and label them with dye in the same way so that they can serve as a control during FACS. The unedited cells will be very important in setting up gates since IRE1 is a low-abundance protein and your fluorescence signal will be very weak, so distinguishing it from the baseline will not be trivial without a proper control.
4.1.1 Dissolve the Janelia Fluor 549 HaloTag dye in anhydrous DMSO to prepare a 1 mM stock solution.
4.1.2 Pipet 0.4 µl of the 1 mM dye stock solution into a 15 mL conical tube.
4.1.3 Add 20 mL of pre-warmed growth medium to the same tube, taking care to mix well by pipetting up and down to make sure the dye is evenly dispersed. This will result in a 20 nM dye solution.
4.1.4 Aspirate the medium from the growing cells and replace it with the dye-containing medium.
4.1.5 Place the cells back in the incubator and let the labeling proceed for 1 hour.
4.1.6 Wash the plate 3x with warm PBS to remove excess dye.
4.2 Trypsinize the cells, quench the trypsin with an equal volume of fresh growth medium, and pellet the cells by gentle centrifugation (300 RCF for 3 minutes).
4.3 Resuspend the pellet in FACS medium (for U-2 OS, PBS supplemented with 0.5% FBS seems to work fine).
4.4 Place the cells on ice.
4.5 Sort the cells. There are two options: either performing a plate sort, directly seeding positive clones into wells of a 96-well plate, or pooling all positive clones together and seeding them all into a single well or dish. As mentioned previously, our plate sorter was experiencing issues, so we pooled ~100 positive clones together and seeded them into a single well of a 6-well plate. The exact protocol for the plate sort will depend on your specific FACS machine.
4.5.1 Note 1: It is recommended to use extra-rich medium (20% FBS instead of 10% FBS) to improve recovery of single clones post-FACS.
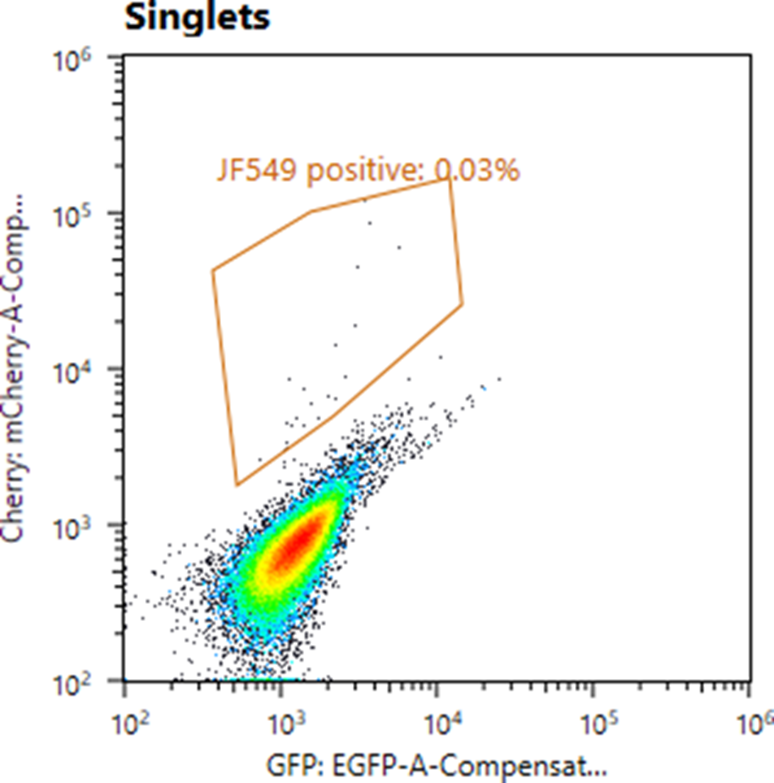
4.5.2 Note 2: As mentioned above, IRE1 is a low-abundance protein and, even with the excellent Janelia Fluor dyes, positive cells produce a weak fluorescent signal. To help distinguish truly edited cells from autofluorescence, we recommend using a 2-dimensional FACS gate in two different channels (e.g. green and red) rather than a simple 1D gate. Please refer to the image below to see what a positive population looks like with 2D gating. Also note the extremely low editing efficiency.
4.6 Place the cells back in the incubator and let them recover for 1-2 weeks, replacing growth medium every 3-4 days.
4.7 If you seeded all cells into a well of a 6-well plate or 10 cm dish:
4.7.1 Keep periodically checking the clones under the microscope until they become readily visible.
4.7.2 When ready, use cloning cylinders to trypsinize and expand the individual clones as described, e.g., in section D of a recent Bio-Protocol publication5.
4.8 If you plate-sorted the cells into wells of a 96-well plate:
4.8.1 Monitor cell growth in the wells periodically. Once a particular well reaches high cell density, trypsinize and expand the cells from that well.
4.9 Once the candidate clones have been sufficiently expanded, check the presence and expression level of edited IRE1α by Western blotting, using e.g. the anti-IRE1α antibody 14C10 (Cell Signaling Cat# 3294S). Due to the HaloTag's substantial size, edited IRE1 will run significantly slower on a denaturing gel than WT IRE1, making the difference easy to see. In a good clone, you're looking for a) expression levels of IRE1-HaloTag that are as close as possible to those of WT IRE1 in the parental cells, and b) a complete absence of detected WT IRE1 protein.
4.10 Perform additional checks on the activity of the protein as needed (stress-dependent phosphorylation, splicing of XBP1 mRNA, correct localization to the ER under the microscope, etc.).
References
- Belyy, V., Zuazo-Gaztelu, I., Alamban, A., Ashkenazi, A. & Walter, P. Endoplasmic reticulum stress activates human IRE1α through reversible assembly of inactive dimers into small oligomers. eLife 11, e74342 (2022).
- Schoof, M. et al. eIF2B conformation and assembly state regulate the integrated stress response. eLife 10, e65703 (2021).
- McKinley, K. L. Employing CRISPR/Cas9 genome engineering to dissect the molecular requirements for mitosis. in Methods in Cell Biology vol. 144 75–105 (Elsevier, 2018).
- Belyy, V., Tran, N.-H. & Walter, P. Quantitative microscopy reveals dynamics and fate of clustered IRE1α. Proc. Natl. Acad. Sci. 117, 1533–1542 (2020).
- Han, Z., Madhavan, B., Kaymak, S., Nawroth, P. & Kumar, V. A Fast and Reliable Method to Generate Pure, Single Cell-derived Clones of Mammalian Cells. BIO-Protoc. 12, (2022).
- Ashkenazi, A and Belyy, V(2023). Endogenous tagging of IRE1 in U-2 OS cells. Bio-protocol Preprint. 10.21769/p2383.
- Endoplasmic reticulum stress activates human IRE1α through reversible assembly of inactive dimers into small oligomers. eLife. DOI: 10.7554/eLife.74342
Do you have any questions about this protocol?
Post your question to gather feedback from the community. We will also invite the authors of this article to respond.