
- Home
- Protocols

-

A user-friendly protocol for the cultivation and successful crossing of Lotus japonicus
Last updated date: Dec 9, 2021 Views: 1253 Forks: 0
A user-friendly protocol for the cultivation and successful crossing of Lotus japonicus
Author Information
Shiv Kumar Meena1,2, Christine Wagner1, Laura Caggegi, Katja Baumann-Kaschig1 and Martina K. Ried1*
1Department of Molecular Signal Processing, Leibniz Institute of Plant Biochemistry, 06120 Halle, Germany
2Current address: Umeå Plant Science Centre, Department of Forest Genetics and Plant Physiology, Swedish University of Agricultural Sciences, 90187 Umeå, Sweden
* Correspondence should be addressed to mried@ipb-halle.de
Abstract
This is a detailed and user-friendly protocol for the cultivation and successful crossing of Lotus japonicus (L. japonicus) e.g. for the generation of higher order mutants, based on methods previously reported (Grant et al., 1962; Handberg and Stougaard, 1992; Jiang and Gresshoff, 1997; Pajuelo and Stougaard, 2005).
Keywords
Lotus japonicus, cultivation, crossing
Materials and Reagents
- L. japonicus seeds
- 1.5 / 2 mL micro centrifuge tubes
- 15 / 50 mL conical tubes
- Grinding paper P120
- Sterile bidest. H2O
- Square plates 12 x 12 x 1.7 cm (e.g. Greiner Bio-one)
- ½ Gamborg’s B5 medium
- Parafilm® or Leukopor® tape 2.5 cm
- Aluminum foil
- Seed sterilization solution
- Sand-soil mix
- 70 % ethanol
- Pots 9 x 9 x 9.5 cm (e.g. Göttinger)
Equipment
- Mortar
- Forceps to handle sterilized seeds (e.g. AL99.1 and AN00.1, Carl Roth GmbH)
- Forceps for crossing (e.g. 5-NANO and 7-NANO, Outils Rubis SA)
- Clean bench with Bunsen burner
- Sample mixer for end-over-end mixing (e.g. HulaMixer™ Sample Mixer, Invitrogen)
- Lab marker tape and waterproof pen
- Phytocabinet or walk-in chamber (24º C, 16 h light / 8 h dark, 60 % humidity, 145 µmol/m2s)
- Wooden sticks and plant binders
- Stereo microscope and / or magnifier glasses (e.g. Zeiss Stemi 2000-C with Schott KL 1600 LED)
- Plastic bags (e.g. sample bags ROTILABO® drawstring,160 mm, Height: 240 mm, Carl Roth GmbH)
Procedure
A) Cultivation of Lotus japonicus plants
Sterilization of L. japonicus seeds
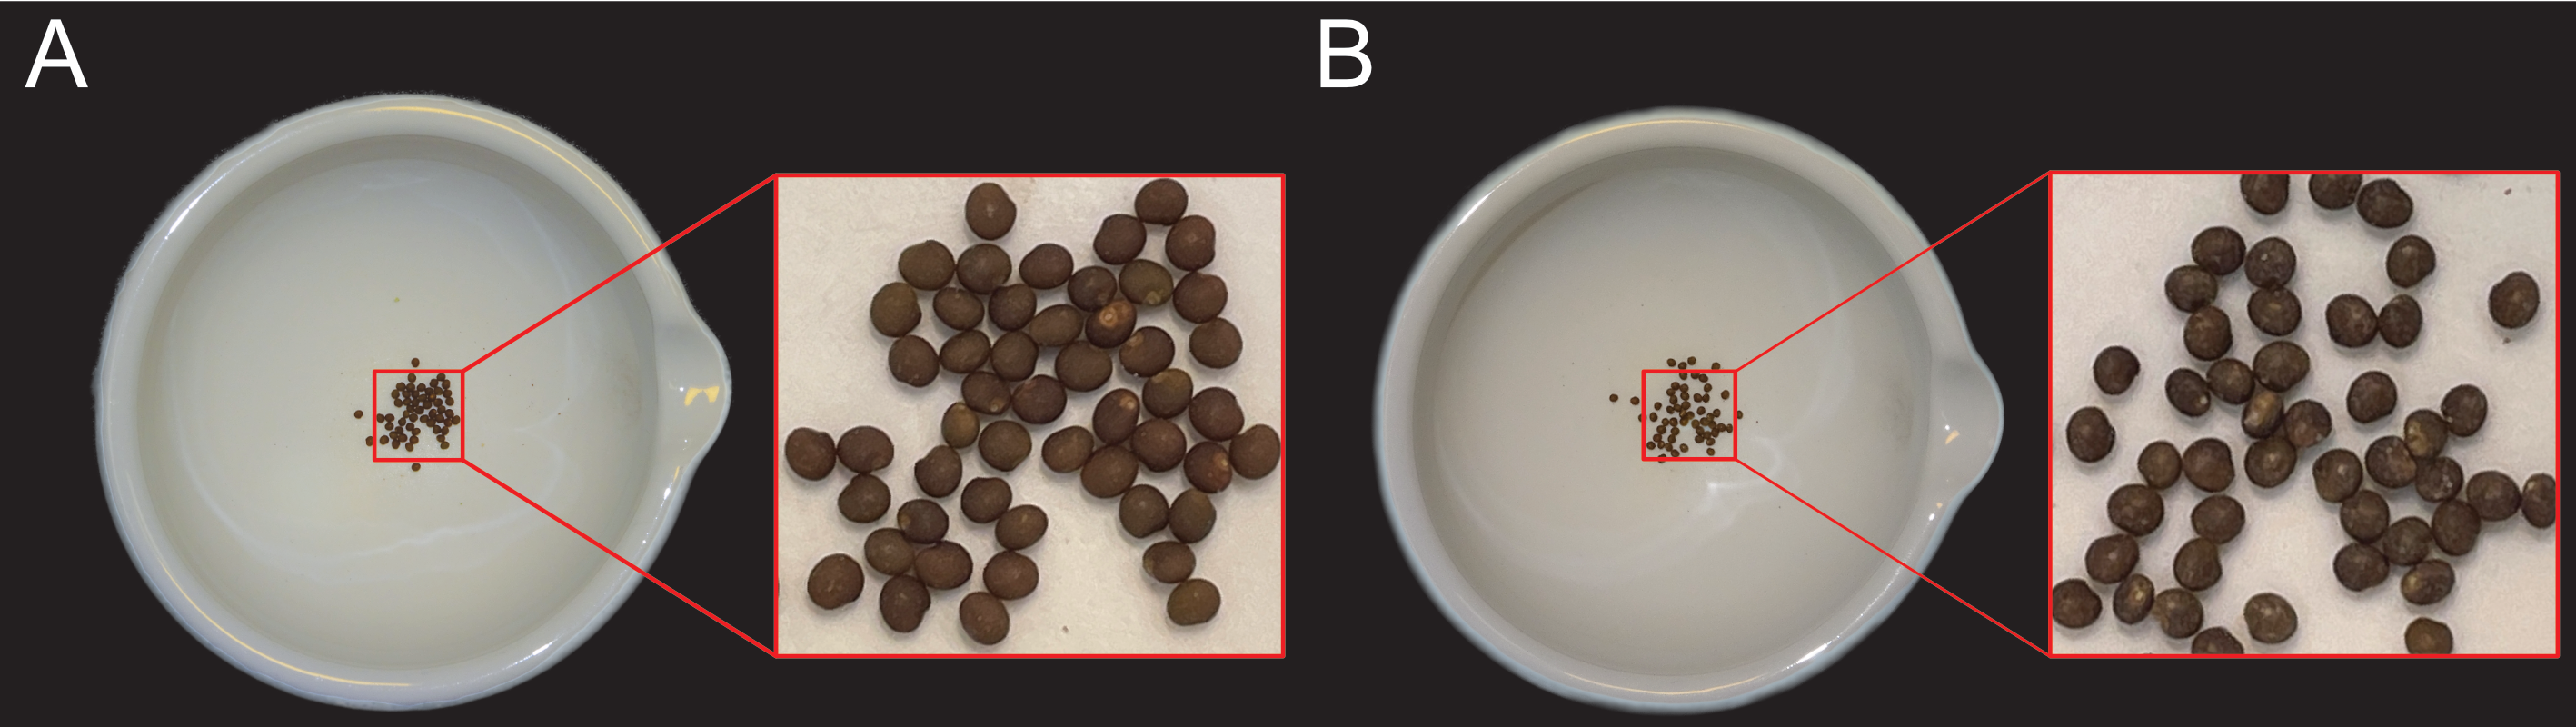
L. japonicus seeds are harvested from dry siliques and transferred to a mortar (A + B). The seed coat surface is roughened with grinding paper until the seeds appear shiny. A, Seeds before grinding. B, Seeds after grinding.
- Carefully roughen seed surface with grinding paper until it appears shiny (Figure 1).
- Transfer seeds to a suitable tube depending on seed number (1.5/2 mL micro centrifuge tube or 15/50 mL conical tube).
- Add sterilization solution (~ 4 times the volume of the seeds) and incubate at room temperature for 10 minutes with gentle end-over-end mixing.
- Remove sterilization solution and wash seeds 4 times with sterile bidest. H2O in a clean bench.
- Fill reaction tube ~ 90 % with sterile bidest. H2O.
- Incubate seeds at room temperature until they are swollen (4 – 6 h) or at 4 °C over night with gentle end-over-end mixing (Figure 2).
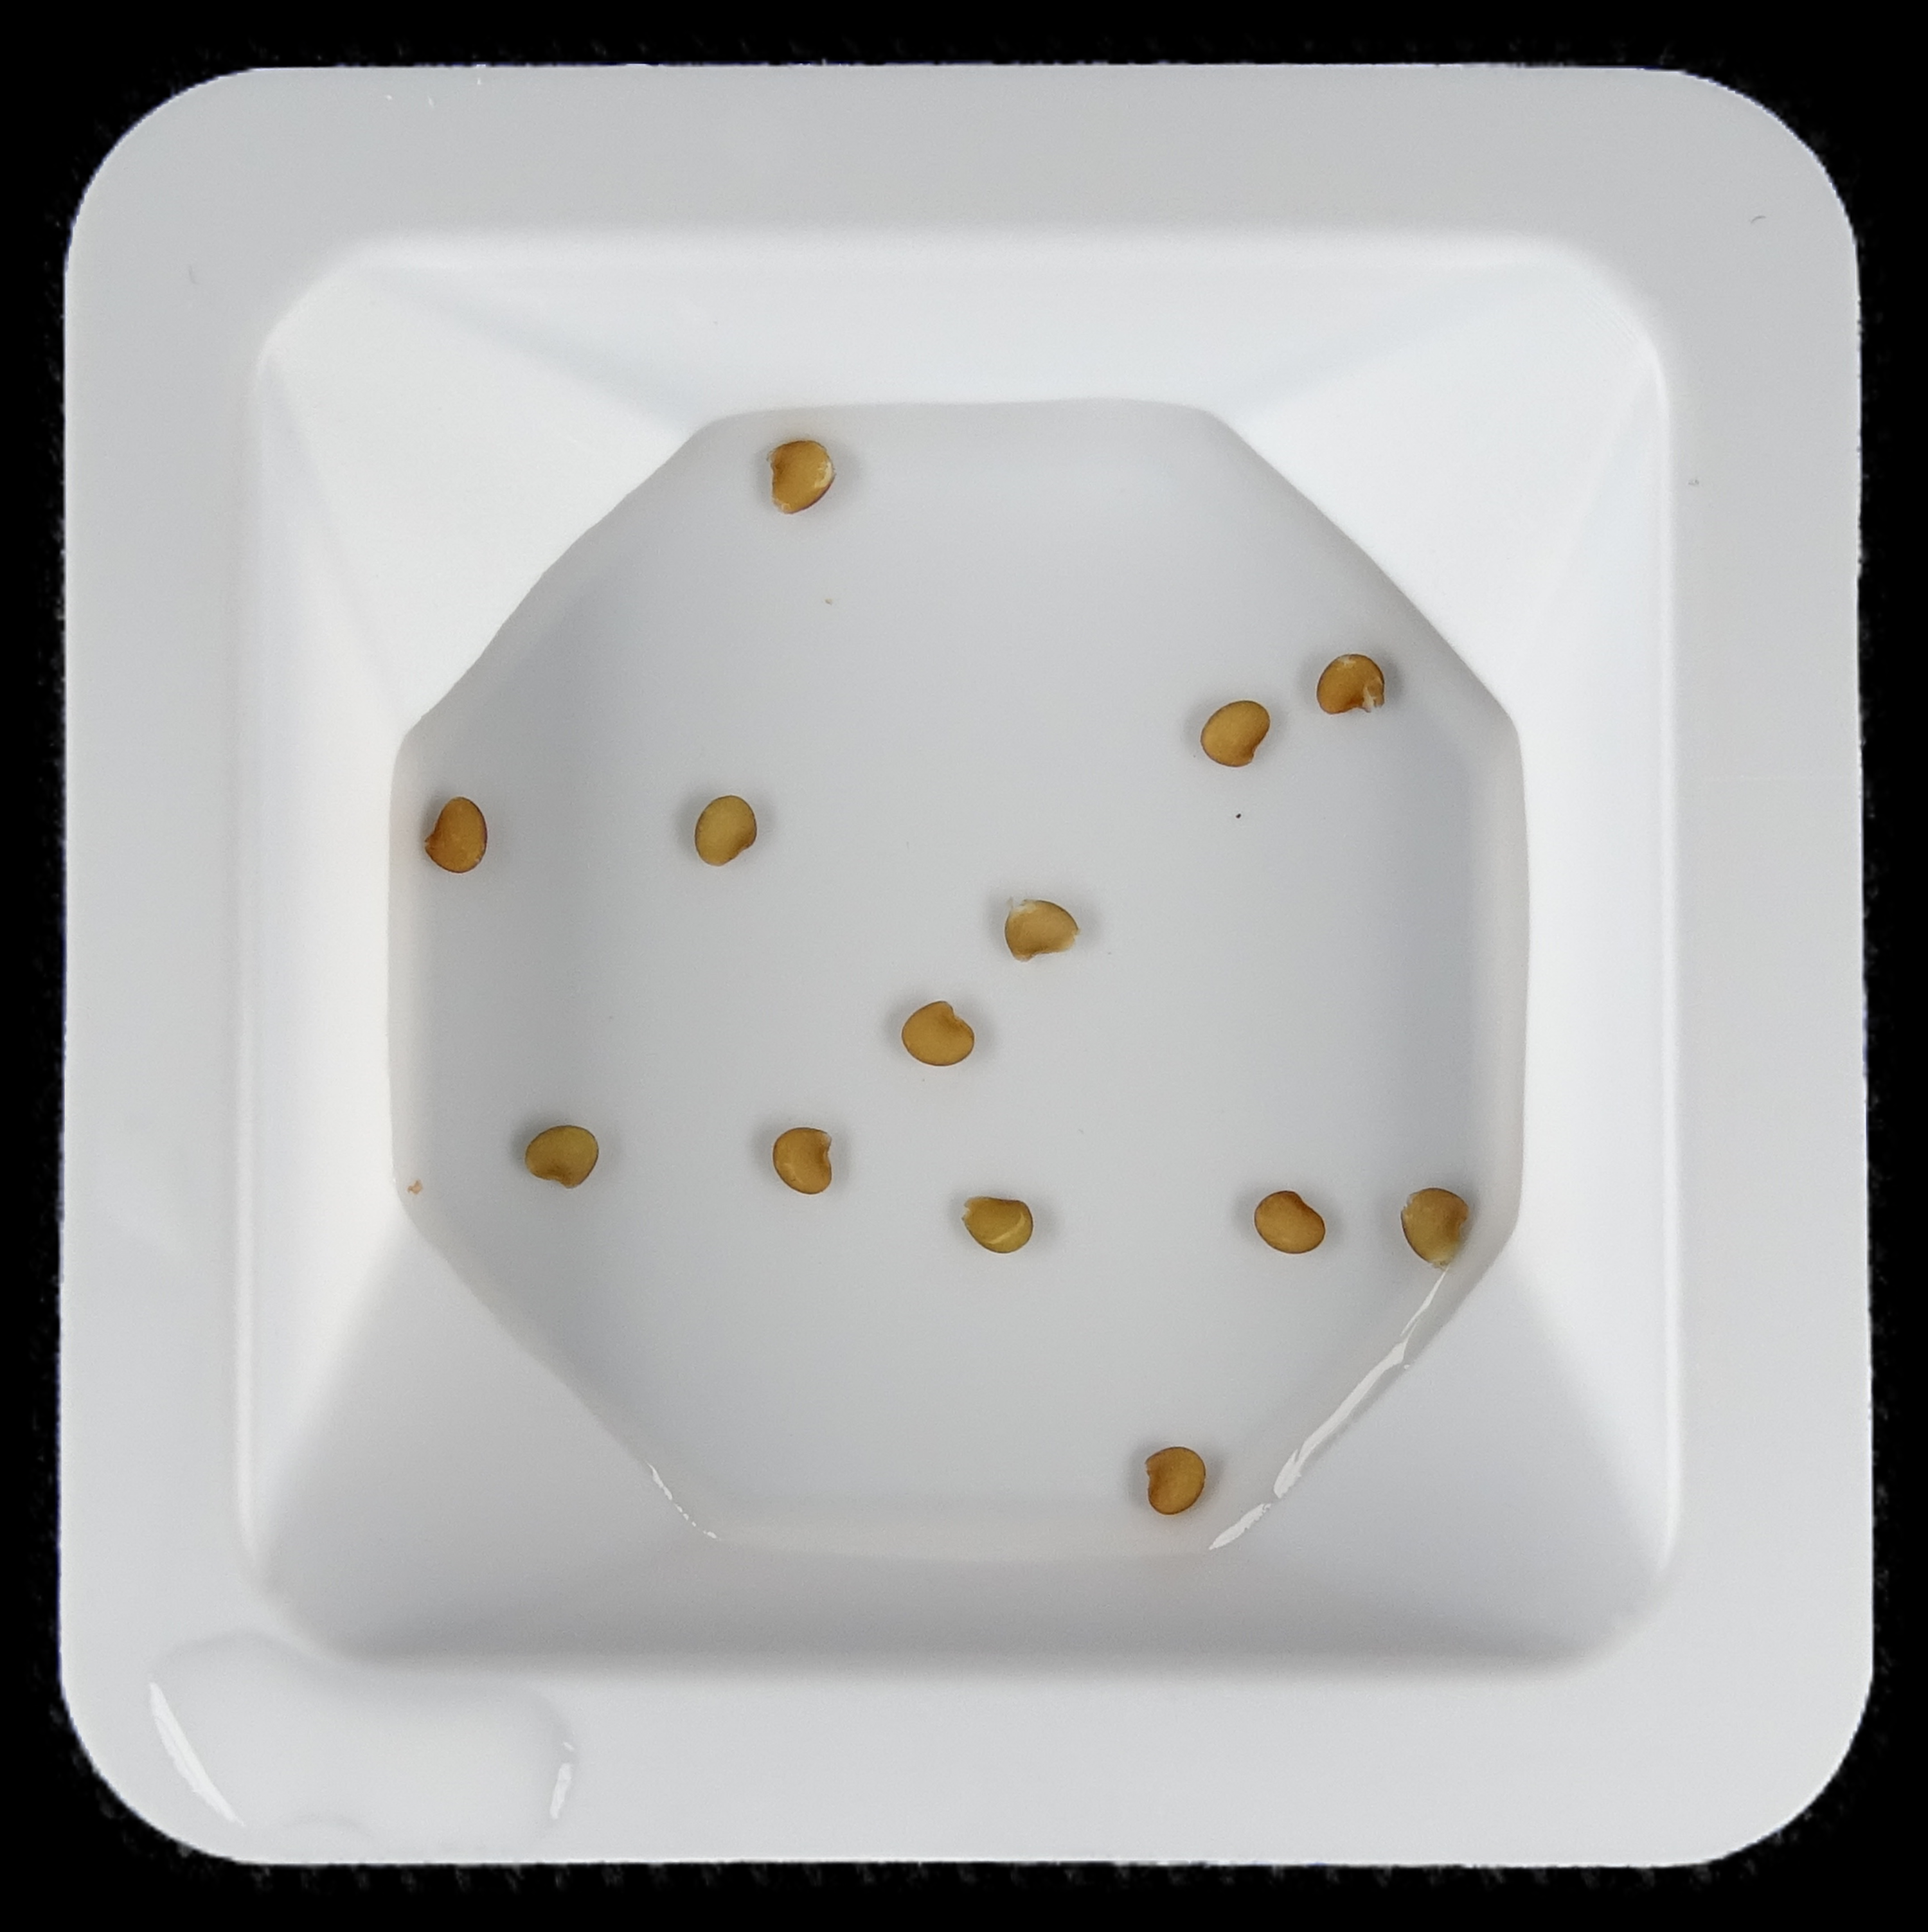
L. japonicus seeds are sterilized and incubated in sterile bidest. H2O in 1.5/2 mL micro centrifuge tubes or 15/50 mL conical tubes with gentle end-over-end mixing until they are swollen. Picture shows swollen seeds in water in a weighing pan.
Cultivation of L. japonicus seedlings
(!) Seeds can directly be planted in soil. However, especially for sensitive genotypes or poor seed quality it is advisable to first cultivate seedlings on plates before transfer to soil.
(!) The following steps should be performed in a clean bench
- Transfer swollen seeds to ½ Gamborg’s B5 medium (Gamborg et al., 1968) and seal plates with Parafilm® or Leukopor® tape (Figure 3A).
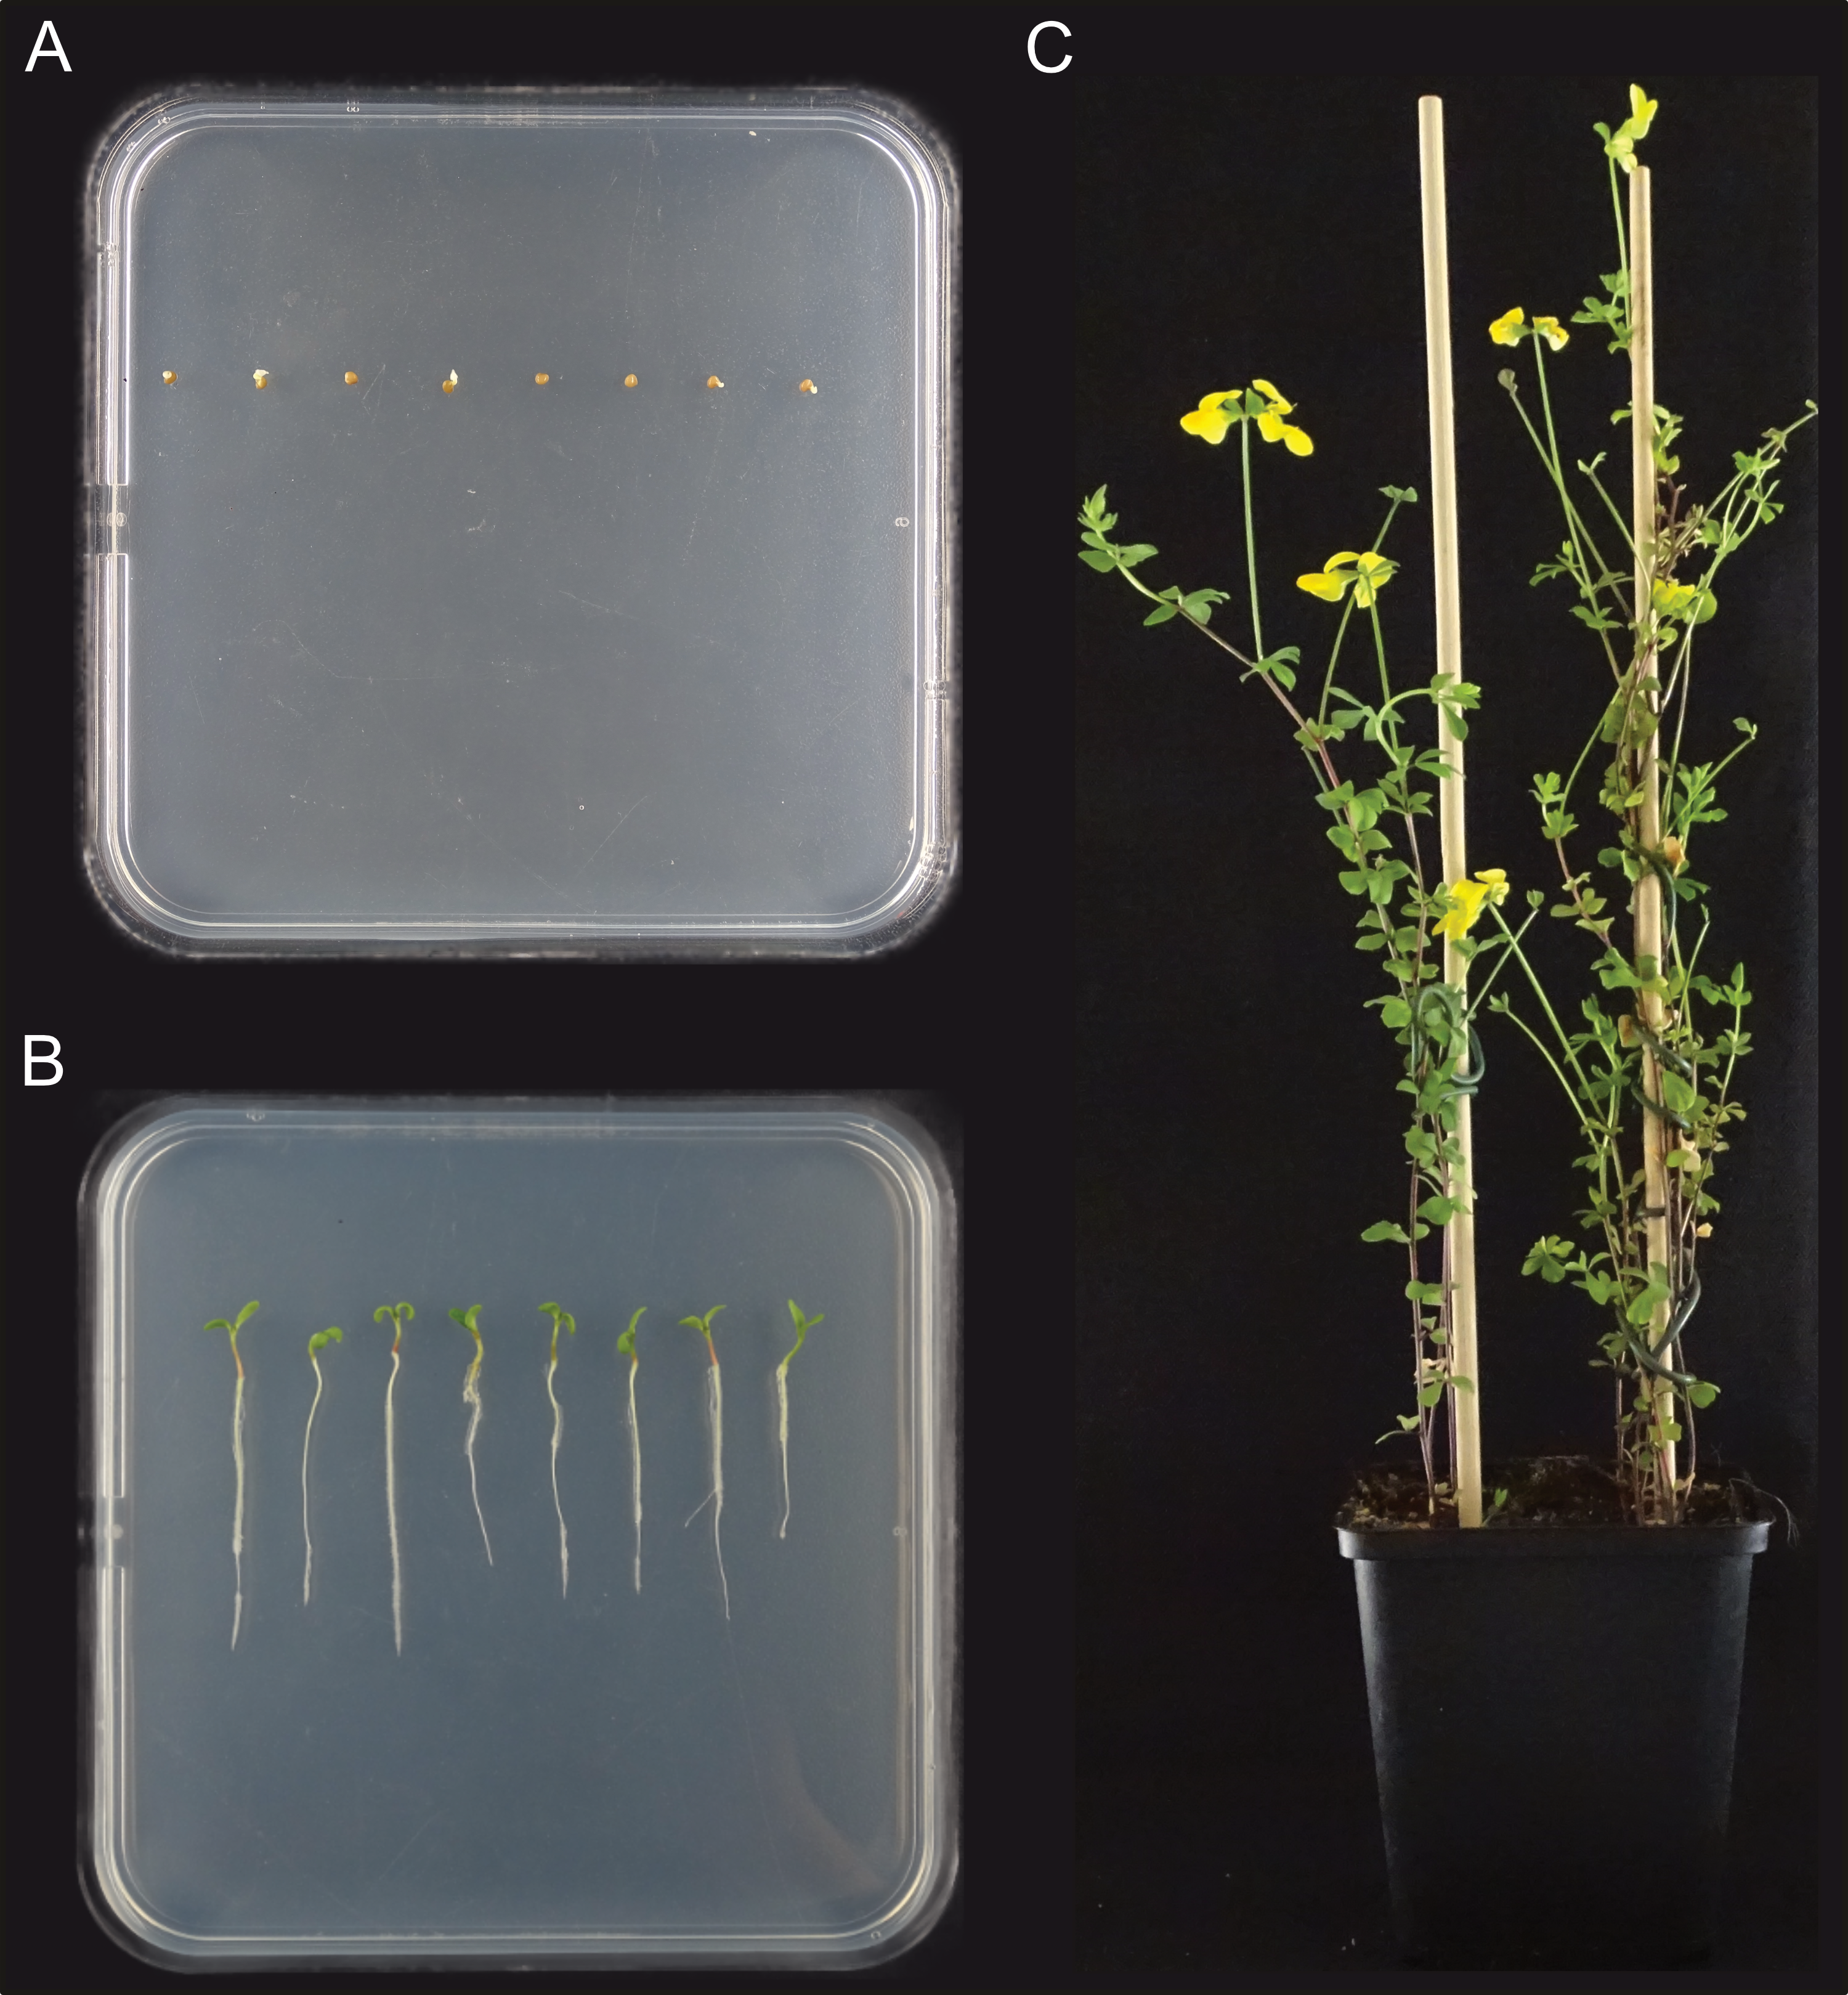
A, L. japonicus seeds are sterilized. Swollen seeds are placed on ½ Gamborg’s B5 plates and germinated for 3 – 4 days in the dark. B, L. japonicus seedlings are grown vertically on ½ Gamborg’s B5 plates for 10 – 14 days before transfer to open pots filled with sand-soil mixture. C, Plants are grown in open pots until suitable flowers for manual crossing develop (~ 2 – 3 month).
- Wrap plates in aluminum foil and incubate them vertically in the dark for 3 – 4 days at 21 - 24º C and 60 - 70 % humidity.
- Unwrap plates and incubate them for 7 - 10 days (16 h / 8 h light dark cycle; 145 µmol/m2s; 21 - 24º C; 60 - 70 % humidity) (Figure 3B).
- Transfer seedlings to open pots containing sand-soil mixture and incubate them until flowers develop. Use wooden sticks and plant binders to support plant growth and water 1 – 2 times per week (16 h / 8 h light dark cycle, 145 µmol/m2s, 21 - 24º C, 60 - 70 % humidity) (Figure 3C). Fertilizer can be applied if needed.
B) Crossing of L. japonicus plants
Emasculation of L. japonicus flowers for cross-pollination
(!) For better results, perform emasculation preferably in the evening with well-watered plants.
(!) To avoid contamination, clean all surfaces and tweezers with 70 % ethanol in the beginning and between each emasculation.
(!) Humidity is crucial for successful crossing. We recommend partial removal of petals and sepals to reduce the degree of desiccation in emasculated flowers.
- Identify suitable flowers for crossing.
Optional: Use a magnifying glass.
A guide for the selection of suitable flowers is shown in Figure 4. Flowers with slightly bent stigma should be selected (S4 - S6; 5 to 7.5 mm; S5 is ideal). Flowers at other stages are either too young (S1 - S3) or have already undergone self-pollination (S7 - S10) and should not be used for crossing.
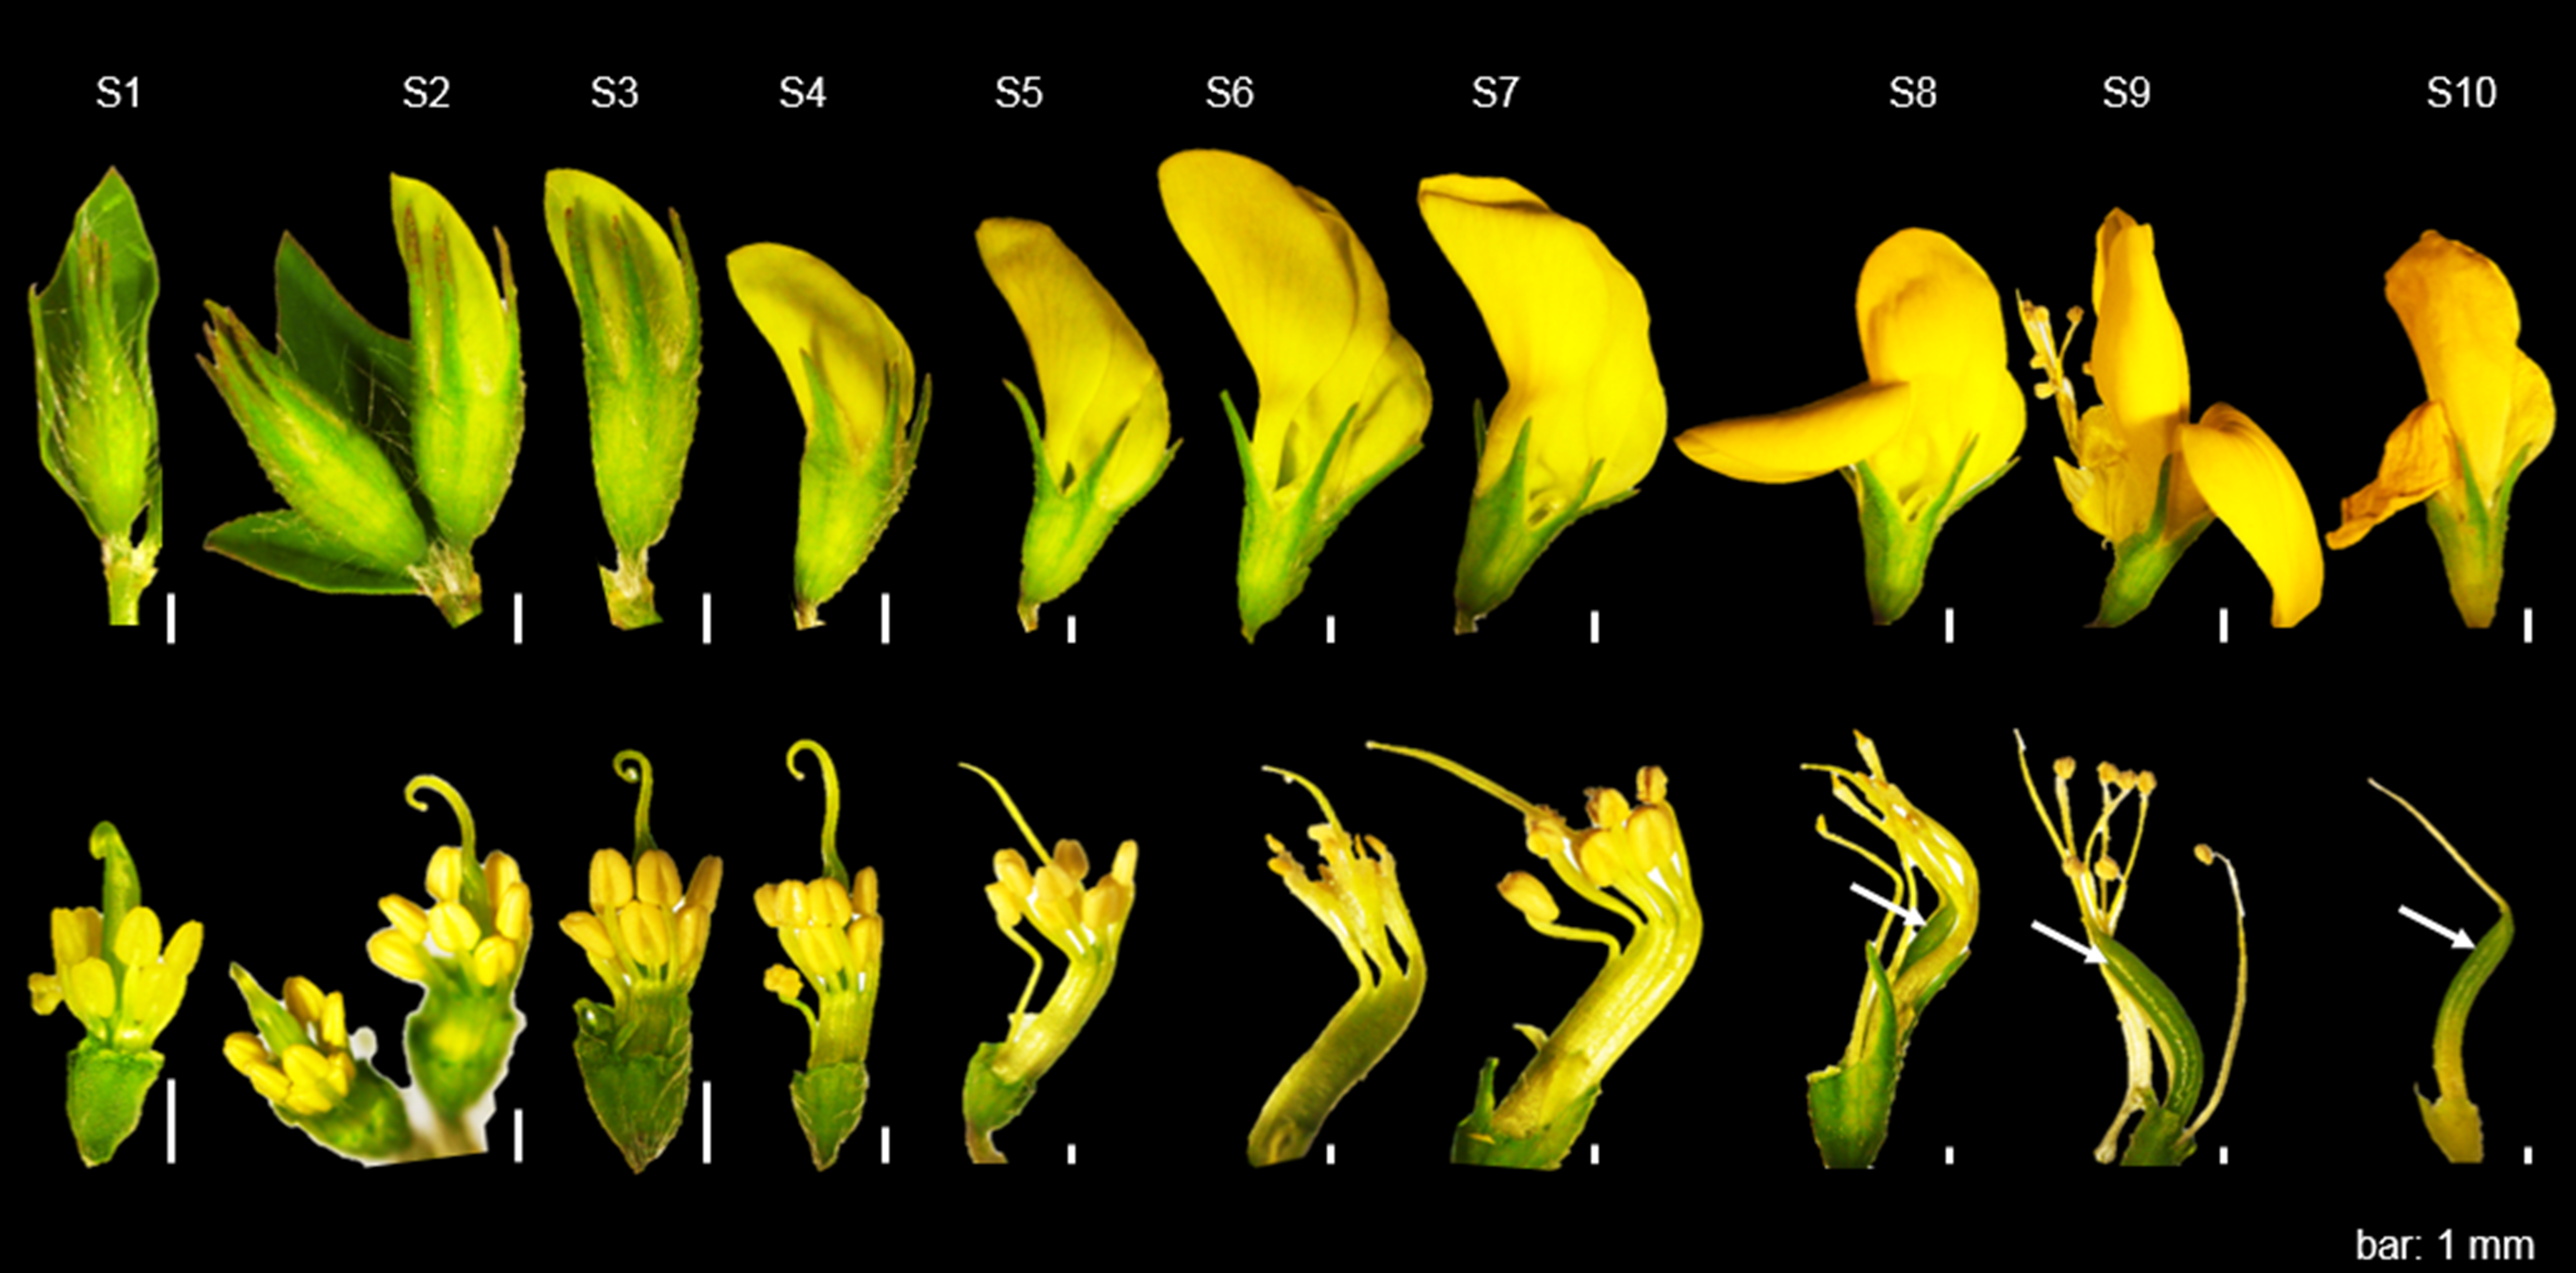
Upper panel: Intact flowers at stages S1 to S10. Bottom panel, Emasculated flowers at stages S1 to S10. Flowers at S4 to S6 are most suitable for cross-pollination, while S1 to S3 or S7 to S10 are too young or already have undergone self-fertilization, respectively. White arrow, pod formation; bar, 1 mm.
- Gently put the stem carrying the appropriate flower vertically under a stereo microscope and carefully open the flower from the tip towards the base using a pair of needle nose tweezers or a combination of two sharp pointed needle nose and tick tweezers.
Optional: Axillary buds and flowers near the selected flower(s) can be removed as a precaution to prevent self-pollination.
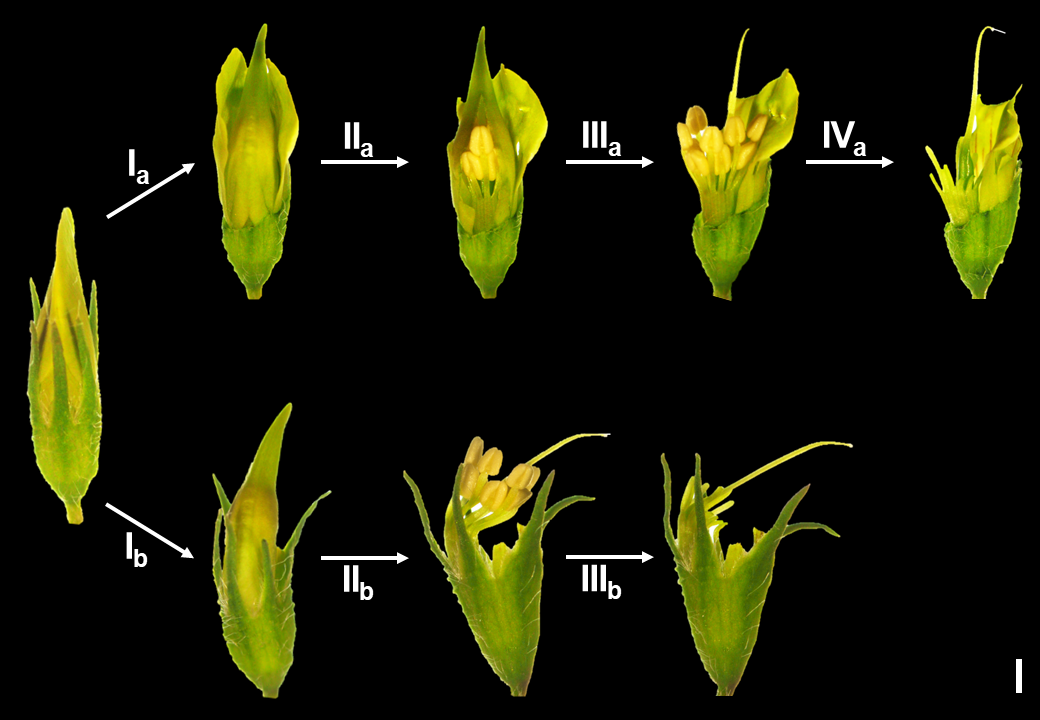
L. japonicus flowers can be efficiently emasculated in two different ways by partially removing either green sepals (a) or yellow petals (b). Upper panel (Ia - IVa), Carefully remove three green sepals with clean tweezers. Keep the base of the ovary protected with the remaining sepals (Ia). Make vertical incisions in the petals without their removal (IIa). Remove part of the petals (two abaxial fused keels and two lateral wings) with a perpendicular cut to reveal stamens and carpel (IIIa). Detach stamens without damaging the carpel and keep remaining petals intact to prevent carpel from drying (IVa). Lower panel (Ib - IIIb), Adaxial standard petal is removed by gently dragging upwards (Ib). Remaining petals are removed in the same way (IIb). Exposed stamens are detached carefully to achieve successful emasculation (IIIb). bar, 1 mm.
- Partially separate and cut the sepals and / or petals near the distal end and remove the anthers without touching the style and stigma (Figure 5).
- Label the stems and immediately after emasculation cover stems containing emasculated flowers with a clean plastic bag and tighten the cotton string to keep humidity (Figure 6).
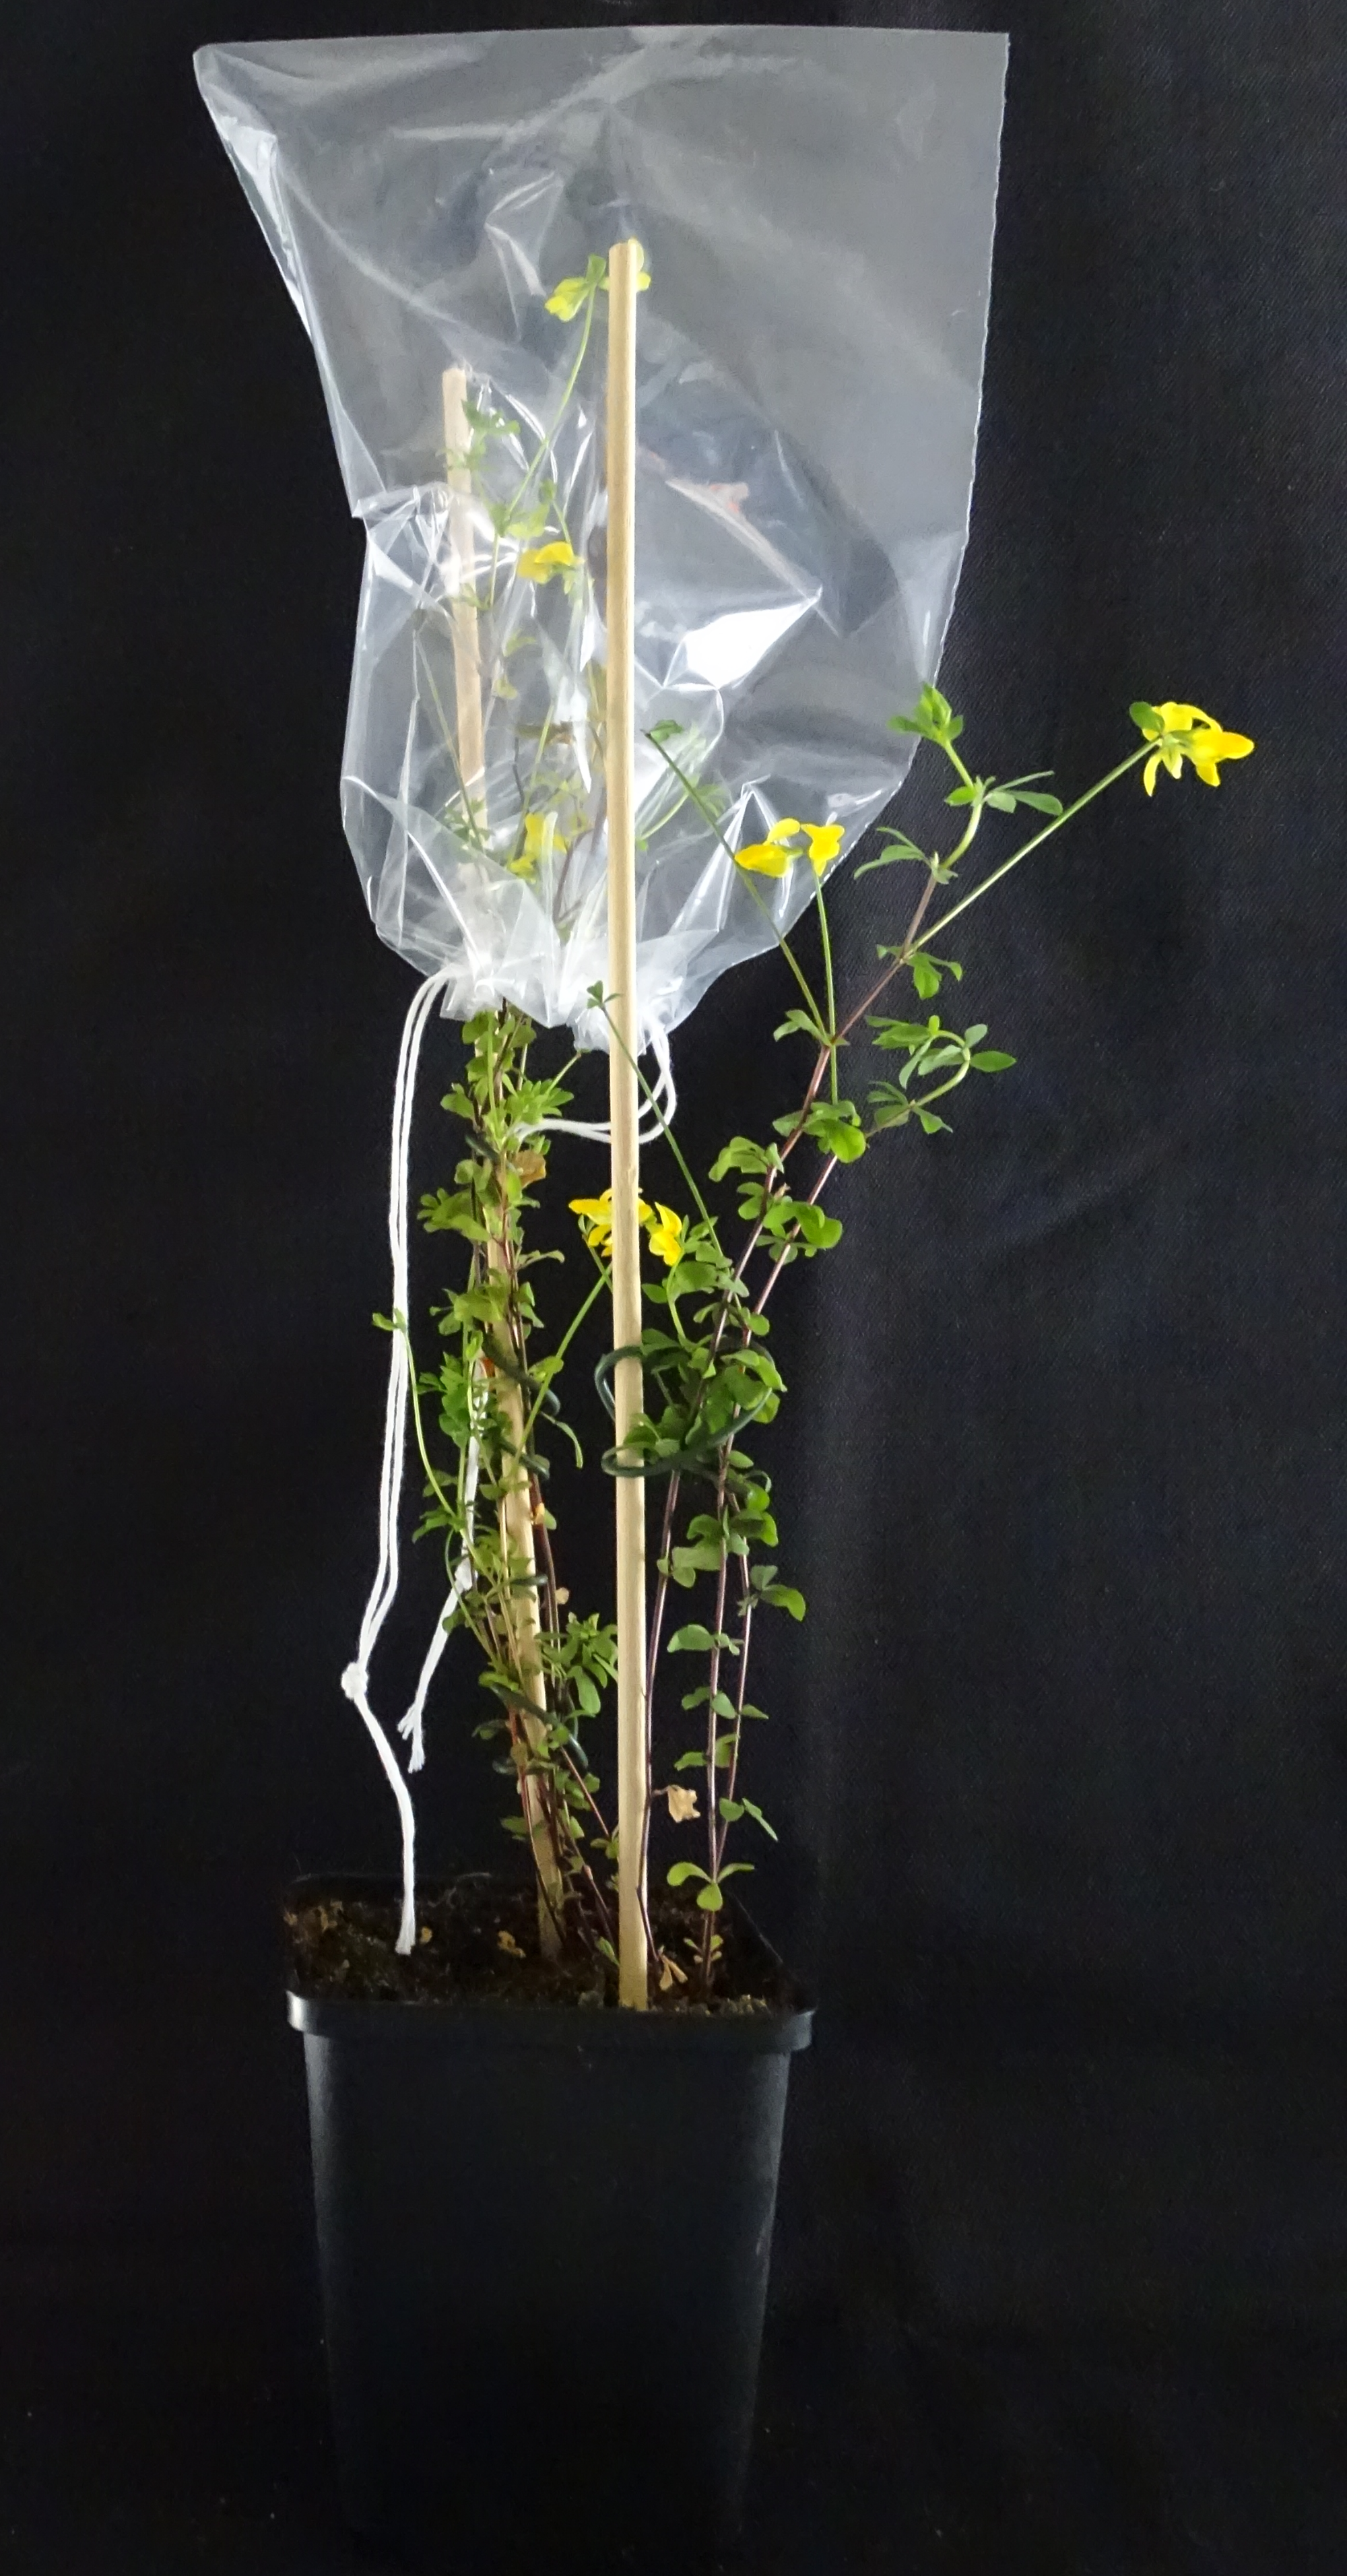
2 - 3 stems and corresponding branches of 30-40 cm height containing the emasculated flower are covered with one plastic bag and the cotton strings are closed. Like this, the humidity inside the bag is kept high (~70 - 80%), which is favorable for cross-pollination and for preventing the drying of style and stigma.
Cross-pollination of emasculated L. japonicus flowers
(!) Cross-pollination in the morning (7 AM to 11:30 AM) is more efficient than in the afternoon.
(!) Make sure to use enough pollen and try to keep plants as humid as possible.
- Irrigate pots containing designated male flowers one day before cross-pollination.
- Collect pollen from flowers at S6 to S8 at the tip of thumbnail using tweezers or forceps (Figure 4).
- Carefully take off the plastic bag from plants with emasculated flowers and gently touch the style of a recipient emasculated flower with the pollen.
- Cover the stem containing emasculated cross-pollinated flowers with the plastic bag and incubate the plant for 24 – 36 hours.
- Remove the plastic bag and monitor the development of green pods. Successful crossing results in the ‘development of pods 3 - 4 days post cross-pollination.
Recipes
Sterilization solution:
- 0.1 % (v/v) SDS
- 1 % (v/v) sodium hypochlorite solution (e.g. from Carl Roth, Art. No. 9062.3, 12 % Cl)
- Sterile bidest. H2O
½ Gamborg’s B5 medium:
- 1.65 g/L Gamborg’s B5 salt (e.g. Duchefa Biochemie, G0209.0050)
- 10 g/L plant agar (e.g Duchefa Biochemie, P1001)
- Adjust pH to 5.5 with NaOH
Autoclave for 15 min at 121 °C
Cool down to 50 – 60 °C
- Add 56 mg/L Gamborg’s B5 vitamin mixture ( e.g. Duchefa Biochemie, G0415.0250)
Acknowledgments
This protocol was developed based on work published previously (Grant et al., 1962; Handberg and Stougaard, 1992; Jiang and Gresshoff, 1997; Pajuelo and Stougaard, 2005).
Competing interests
The authors have no competing interests to declare.
References
Gamborg, O.L., Miller, R.A., and Ojima, K. (1968). Nutrient requirements of suspension cultures of soybean root cells. Experimental Cell Research 50, 151-158.
Grant, W.F., Bullen, M.R., and Nettancourt, D.D. (1962). The cytogenetics of Lotus. I. Embryo-cultured interspecific diploid hybrids closely related to L. corniculatur L. Canadian Journal of Genetics and Cytology 4, 105-128.
Handberg, K., and Stougaard, J. (1992). Lotus japonicus, an autogamous, diploid legume species for classical and molecular genetics. The Plant Journal 2, 487-496.
Jiang, Q., and Gresshoff, P.M. (1997). Classical and molecular genetics of the model legume Lotus japonicus. Molecular Plant-Microbe Interactions 10, 59-68.
Pajuelo, E., and Stougaard, J. (2005). Lotus japonicus as a model system. In MárquezA.J. (eds) Lotus japonicus Handbook, Springer, Dordrecht, pp. 3-24.
Figure legends
Figure 4: L. japonicus seeds before and after treatment with grinding paper.
L. japonicus seeds are harvested from dry siliques and transferred to a mortar (A + B). The seed coat surface is roughened with grinding paper until the seeds appear shiny. A, Seeds before grinding. B, Seeds after grinding.
Figure 5: Swollen L. japonicus seeds.
L. japonicus seeds are sterilized and incubated in sterile bidest. H2O in 1.5/2 mL micro centrifuge tubes or 15/50 mL conical tubes with gentle end-over-end mixing until they are swollen. Picture shows swollen seeds in water in a weighing pan.
Figure 6: Cultivation of L. japonicus for crossing.
A, L. japonicus seeds are sterilized and incubated in sterile H2O. Swollen seeds are placed on ½ Gamborg’s B5 plates and germinated for 3 – 4 days in the dark. B, L. japonicus seedlings are grown vertically on ½ Gamborg’s B5 plates for 10 – 14 days before transfer to open pots filled with sand-soil mixture. C, Plants are grown in open pots until suitable flowers for manual crossing develop (~ 2 – 3 month). Picture shows two L. japonicus plants with flowers at different developmental stages at 2.5 month post germination.
Figure 4: Development stages of L. japonicus flowers.
Upper panel: Intact flowers at stages S1 to S10. Bottom panel, Emasculated flowers at stages S1 to S10. Flowers at S4 to S6 are most suitable for cross-pollination, while S1 to S3 or S7 to S10 are too young or already have undergone self-fertilization, respectively. White arrow, pod formation; bar, 1 mm.
Figure 5: Emasculation of L. japonicus flowers.
L. japonicus flowers can be efficiently emasculated in two different ways by partially removing either green sepals (a) or yellow petals (b). Upper panel (Ia - IVa), Carefully remove three green sepals with clean tweezers. Keep the base of the ovary protected with the remaining sepals (Ia). Make vertical incisions in the petals without their removal (IIa). Remove part of the petals (two abaxial fused keels and two lateral wings) with a perpendicular cut to reveal stamens and carpel (IIIa). Detach stamens without damaging the carpel and keep remaining petals intact to prevent carpel from drying (IVa). Lower panel (Ib - IIIb), Adaxial standard petal is removed by gently dragging upwards (Ib). Remaining petals are removed in the same way (IIb). Exposed stamens are detached carefully to achieve successful emasculation (IIIb). Bar, 1 mm.
Figure 6: L. japonicus wild-type plant containing an emasculated flower covered with a plastic bag to keep high humidity.
2 - 3 stems and corresponding branches of 30-40 cm height containing the emasculated flower are covered with one plastic bag and the cotton strings are closed. Like this, the humidity inside the bag is kept high (~70 - 80%), which is favorable for cross-pollination and for preventing the drying of style and stigma.
- Meena, S K, Wagner, C, Caggegi, L, Baumann-Kaschig, K and Ried, M K(2021). A user-friendly protocol for the cultivation and successful crossing of Lotus japonicus. Bio-protocol Preprint. bio-protocol.org/prep1464.
Do you have any questions about this protocol?
Post your question to gather feedback from the community. We will also invite the authors of this article to respond.