Materials and Reagents
- Alexa Fluor 488 or 546 Phalloidin (Life Technologies)
- Desired primary antibodies (see Table 1 for information for antibodies commonly used in the Henry Lab)
- Alexa Fluor 488, 546, or 633 secondary antibodies (e.g. goat anti-mouse or goat anti-rabbit secondary antibodies, Life Technologies)
- Vacuum grease (e.g. Dow Corning High vacuum grease)
- 10x PBS (see Recipes)
- PBS 0.1% Tween-20® (see Recipes)
- PBS 2% Tween-20® (see Recipes)
- 8% PFA (see Recipes)
- 4% PFA (see Recipes)
- Block (see Recipes)
- 80:20 glycerol:PBS solution (see Recipes)
Equipment
- Two fine forceps (e.g. Dumont #5 tweezers)
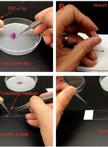
- Two deyolking tools (e.g. insect pin super glued in the end of a glass capillary tube, Figure 1)
- Bench rocker
- 1.5-2 ml Microcentrifuge tubes
- Glass Pasteur pipettes
- Pipette pump
- Micropipettes
- Micropipette tips
- Microscope slides
- Microscope slides
- Dissecting microscope
- Microscope for image acquisition (e.g. Zeiss Axio Imager running AxioVision software)

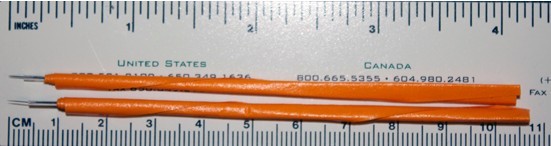
Figure 1. Deyolking tools. Deyolking tools can be used to surgically remove the yolk sac from fixed zebrafish embryos. Deyolking tools consist of insect pins (Fine Science Tools, catalog number: 26002-20) super glued into the ends of glass capillary tubes (Sutter Instruments, catalog number: BF100-50-10). The glass capillary tubes are then wrapped in lab tape.
Procedure
- Fixation and Phalloidin staining:
- Dechorionate embryos with two pairs of fine forceps. Under a dissecting microscope, pinch an embryo’s chorion using a pair of forceps held in one of your hands. With the forceps in your other hand, pinch the chorion near to the original pinch and gently tear the chorion by separating your hands. Repeat pinching and tearing chorions with forceps until the embryos are dechorionated.
- Using a pipette pump and glass pipettes, transfer dechorionated embryos into microcentrifuge tubes. Put a maximum of 10 embryos in a single tube. Label the tubes accordingly.
Note: A pipette pump and glass pipette tips can be used for all solution additions and removals in this protocol excluding the addition of primary and secondary antibodies. Gently pipetting the embryos up and down in the glass pipette tip with each solution change improves washing and keeps the embryos from sticking together.
- Remove as much liquid as possible from the microcentrifuge tubes.
- Wear gloves when working with PFA. Add ~0.5 ml of 4% PFA to each microcentrifuge tube.
- Place the microcentrifuge tubes containing fixative on their sides at room temperature on a bench rocker (gently rocking) for 4 h or at 4 °C overnight. Orient the tubes perpendicular to the rocking motion such that the embryos rock from side to side in the tube rather than from cap to bottom.
- Remove the fixative and dispose of it in the appropriate waste container.
- Rinse the embryos 3 times for 5 min each in ~0.5 ml PBS 0.1% Tween-20®. With each rinse in this protocol, gently resuspend the embryos in the solution to improve rinsing and keep them from sticking together.
- Remove the last PBS 0.1% Tween-20® rinse and add ~0.5 ml PBS 2% TritonX-100® to each tube to permeabilize the embryos for Phalloidin staining.
- Lay the tubes containing PBS 2% Trition on their sides and gently rock for 1.5 h at room temperature.
- Remove the PBS 2% TritonX-100® and use a P20 micropipette to add 19 μl of PBS 2% TritonX-100® to each tube. Use a P20 micropipette to add 1 μl of Alexa Fluor 488 or 546 Phalloidin to each tube (wear gloves when working with Phalloidin).
- Lay the tubes on their sides and gently rock (if possible) overnight at 4 °C. From this point on, keep tubes in the dark whenever possible (e.g. under a box lid or wrapped in foil).
- Antibody staining with mono/polyclonal antibodies:
- Remove Phalloidin from the tubes and add ~0.5 ml of block to each tube.
- Rock tubes containing block on their sides in the dark for at least 1 h at room temperature.
- Use micropipettes to add block and primary antibody solutions into each tube to obtain the appropriate primary antibody dilution optimized for zebrafish embryo staining. A 1:100 dilution of primary antibody in block is a good place to start. Primary antibody dilutions can range from 1:10 to 1:5,000. Some antibodies may require additional permeabilization steps (e.g. incubation in methanol or acetone at -20 °C, proteinase treatment) prior to the addition of the primary antibody. Some primary antibodies may not be compatible with Phalloidin staining.
- Incubate embryos in primary antibody at 4 °C overnight in the dark with tubes on their sides and gently rocking, if possible.
- Remove the primary antibody dilution and add in ~0.5 ml block.
- Block embryos with tubes on their sides in the dark and gently rocking for ~8 h at room temperature. Additional rinses with block can be added if necessary to reduce non-specific background staining.
- Remove block and use micropipettes to add 199 μl of antibody block and 1 μl of the appropriate fluorescent conjugated secondary antibody into each tube. Be mindful of the wavelength of the fluorophore that you used for Phalloidin staining when determining the appropriate secondary antibody to use. Ensure that the secondary antibody used corresponds to whether the primary antibody is monoclonal or polyclonal.
- Incubate embryos in this secondary antibody dilution overnight at 4 °C in the dark with tubes on their sides and gently rocking, if possible.
- Remove secondary antibody dilution and store embryos in ~0.5 ml PBS 0.1% Tween-20® in the dark. Additional rinses in PBS 0.1% Tween-20® can be added if necessary to reduce non-specific background staining.
- Deyolking, Mounting, and Imaging:
- Manually deyolk embryos in 1x PBS with two deyolking tools. Use a deyolking tool to orient an embryo on its side. Hold the embryo down by inserting the tip of the deyolking tool held in one hand at a location in between the yolk sac and the embryo’s body. Use the deyolking tool in the other hand to ‘cut’ the yolk sac away from the embryo’s body while keeping the other hand stationary. Once the majority of yolk has been removed, use the pins as desired to clean up and remove any additional yolk sac remnants. Suck up and discard the pieces of yolk sac. Repeat deyolking process until all embryos are deyolked.
- Transfer embryos to 80:20 glycerol:PBS. If embryos become dehydrated upon transfer to 80:20 glycerol:PBS, slow washes in increasing concentrations of glycerol may have to be implemented. For example, 1 h long washes in each of 30:70 glycerol:PBS and 60:40 glycerol:PBS may be necessary before transfer to 80:20 glycerol:PBS. Use one deyolked embryo as a test sample and move it from 1x PBS to 80:20 glycerol:PBS. If the shape of the embryo changes, proceed with the incubations listed above for the rest of the embryos.
- Dot a glass microscope slide with 4 small dots of vacuum grease such that the dots will hold up the four corners of a square cover slip.
- Transfer one embryo and two drops of 80:20 glycerol:PBS onto the microscope slide in the middle of the 4 dots of grease.
- Orient the embryo with a deyolking tool so that it is side mounted and flat.
- Place the cover slip over the specimen and gently press down on the corners of the cover slip until it is touching the embryo, but not squishing it.
- Repeat steps C3-6 until all embryos are mounted. Keep your prepared slides in a slide book in the dark at 4 °C until they are imaged. Image your stained zebrafish embryos within ~2 weeks, the sooner the better. Representative images are shown in Figure 2.

Figure 2. Phalloidin staining representative results. (A) Brightfield image of a deyolked, side mounted zebrafish embryo, anterior left, dorsal top. (B) Fluorescence micrograph of the same embryo showing phalloidin 546 staining. (C) Image of the same embryo taken with the 20x objective on a Zeiss Axio Imager running AxioVision software. Phalloidin 546 staining enables visualization of the actin cytoskeleton of skeletal muscle fibers. For representative images of antibody staining, please refer to (Goody et al., 2010).
Table 1. Antibody staining information for antibodies commonly used in the Henry Lab.
| Name | Company
| Product #
| Dilution
| Mono/polyclonal
| Works withphalloidin®
| Extra
permeabiliza-tion® |
Beta-Dystroglycan
| Novocastra
| NCLbDG
| 1:50
| Monoclonal
| Yes
| No
|
F59
| Developmental StudiesHybridoma Bank (DSHB)
|
| 1:10
| Monoclonal
| Yes
| No
|
Fibronectin
| Sigma
| F3648
| 1:50
| Polyclonal
| Yes
| No
|
Laminin-111
| Thermo Scientific
| RB-082-A0
| 1:50
| Polyclonal
| Yes
| No
|
Paxillin
| BD TransductionLaboratories
| 610051
| 1:50
| Monoclonal
| Yes
| No
|
FAK pY397 or pY861
| Invitrogen
|
| 1:50
| Polyclonal
| Yes
| No
|
Dystrophin
| Sigma
| D8043
| 1:50
| Monoclonal
| Yes
| No
|
MF20
| DSHB
|
| 1:10
| Monoclonal
| Not well
| No
|
F310
| DSHB
|
| 1:10
| Monoclonal
| Not well
| No
|
Vinculin
| Sigma
| V4505
| 1:10
| Monoclonal
| Unknown
| PBS 2% TritonX-100® for 2.5 hours at room temp
|
4D9/engrailed
| DSHB
|
| 1:2
| Monoclonal
| Yes
| 10 minutes in acetoneat -20 °C |
Beta-catenin
| Abcam
| Ab6302
| 1:500
| Monoclonal
| Unknown
| Requires specialfixative (4% PFA, 4% sucrose, 3 mM CaCl2, 1x PBS)
|
GFP
| Molecular Probes
| A21311
| 1:200
| Polyclonal
| Unknown
| 2 h fix in 4% PFAat room temp
|
Recipes
- Phosphate Buffered Saline (PBS)
- 10x PBS
Add to a 1 L bottle
74 g NaCl
19.4 g Na2HPO4.7H2O
4.37 g NaH2PO4.H2O
~800 ml dH2O
Stir until dissolved. Bring volume up to 1 L with dH2O. Autoclave. Dilute 10x PBS to 2x PBS or 1x PBS with dH2O. Store at room temperature.
- PBS 0.1% Tween-20®
To 1 L of 1x PBS, add
1 ml of Tween-20®
Mix solution. Store at room temperature.
- PBS 2% TritonX-100®
To 1 L of 1x PBS, add
20 ml TritonX-100®
Mix solution. Store at room temperature.
- Paraformaldehyde (PFA)
- 8% PFA
Add to a 50 ml conical tube
4 g PFA
30 ml dH2O
20 drops 1 N NaOH
Gently heat and stir until dissolved. Bring volume up to 50 ml with dH2O. Filter solution through #1 Whatman paper. Add 20 drops 1 N HCl and mix. Store at 4 °C. Use within 1 week.
- 4% PFA
Add to a 50 ml conical tube
25 ml 8% PFA
25 ml 2x PBS
Mix, then store at 4 °C. Use within 1 week.
- Block
Add to a 50 ml conical tube-
2.5 g Bovine Serum Albumin (BSA)
40 ml 1x PBS
Gently heat and stir until BSA is dissolved. Then add
0.5 ml DMSO
0.5 ml TritonX-100®
0.1 g Saponin
Bring up to 50 ml with 1x PBS. Store at 4 °C. Use within 1 week.
- 80:20 glycerol:PBS
Add to a 50 ml conical tube-
40 ml glycerol
10 ml 1x PBS
Mix solution. Store at room temperature
Acknowledgments
This protocol was adapted from the previous publications: Goody et al. (2010) and Goody et al. (2012). Development of this protocol was supported by NIH grant RO1 HD052934-01A1 to CAH. MFG would like to thank the University of Maine Graduate School of Biomedical Sciences and Engineering for funding.
References
- Goody, M. F., Kelly, M. W., Lessard, K. N., Khalil, A. and Henry, C. A. (2010). Nrk2b-mediated NAD+ production regulates cell adhesion and is required for muscle morphogenesis in vivo: Nrk2b and NAD+ in muscle morphogenesis. Dev Biol 344(2): 809-826.
- Goody, M. F., Kelly, M. W., Reynolds, C. J., Khalil, A., Crawford, B. D. and Henry, C. A. (2012). NAD+ biosynthesis ameliorates a zebrafish model of muscular dystrophy. PLoS Biol 10(10): e1001409.
文章信息
版权信息
© 2013 The Authors; exclusive licensee Bio-protocol LLC.
分类
发育生物学 > 形态建成
细胞生物学 > 细胞成像 > 荧光