

Microinjection of Synthetic Peptides Into Caenorhabditis elegans
发布: 2026年04月05日第16卷第7期 DOI: 10.21769/BioProtoc.5640 浏览次数: 42
评审: Gururaj RaoAYŞE NUR PEKTAŞAnonymous reviewer(s)
参见作者原研究论文
The authors used this protocol in:

Aug 2017


Abstract
The genome of the nematode Caenorhabditis elegans encodes at least 160 predicted peptide precursor genes that can generate over 300 bioactive peptides, the functions of most of which remain unknown. Phenotypes resulting from deletion or transgenic expression of peptide genes are readily assayed, but genetic dissection of individual peptide activities is often confounded when a single gene encodes multiple peptides or when distinct peptides act redundantly. Here, we describe a protocol for direct microinjection of chemically synthesized peptides into individual worms. This approach permits investigation of the effects of an individual peptide while providing precise temporal control over peptide delivery.
Key features
• Direct injection of chemically synthesized peptides into nematodes.
• In vivo effects can be analyzed within one day after peptide delivery.
• Full control over peptides, chemical modifications, genetic background, and timing of delivery.
• The approach may be adaptable to non-peptide compounds.
Keywords: Bioactive peptidesGraphical overview
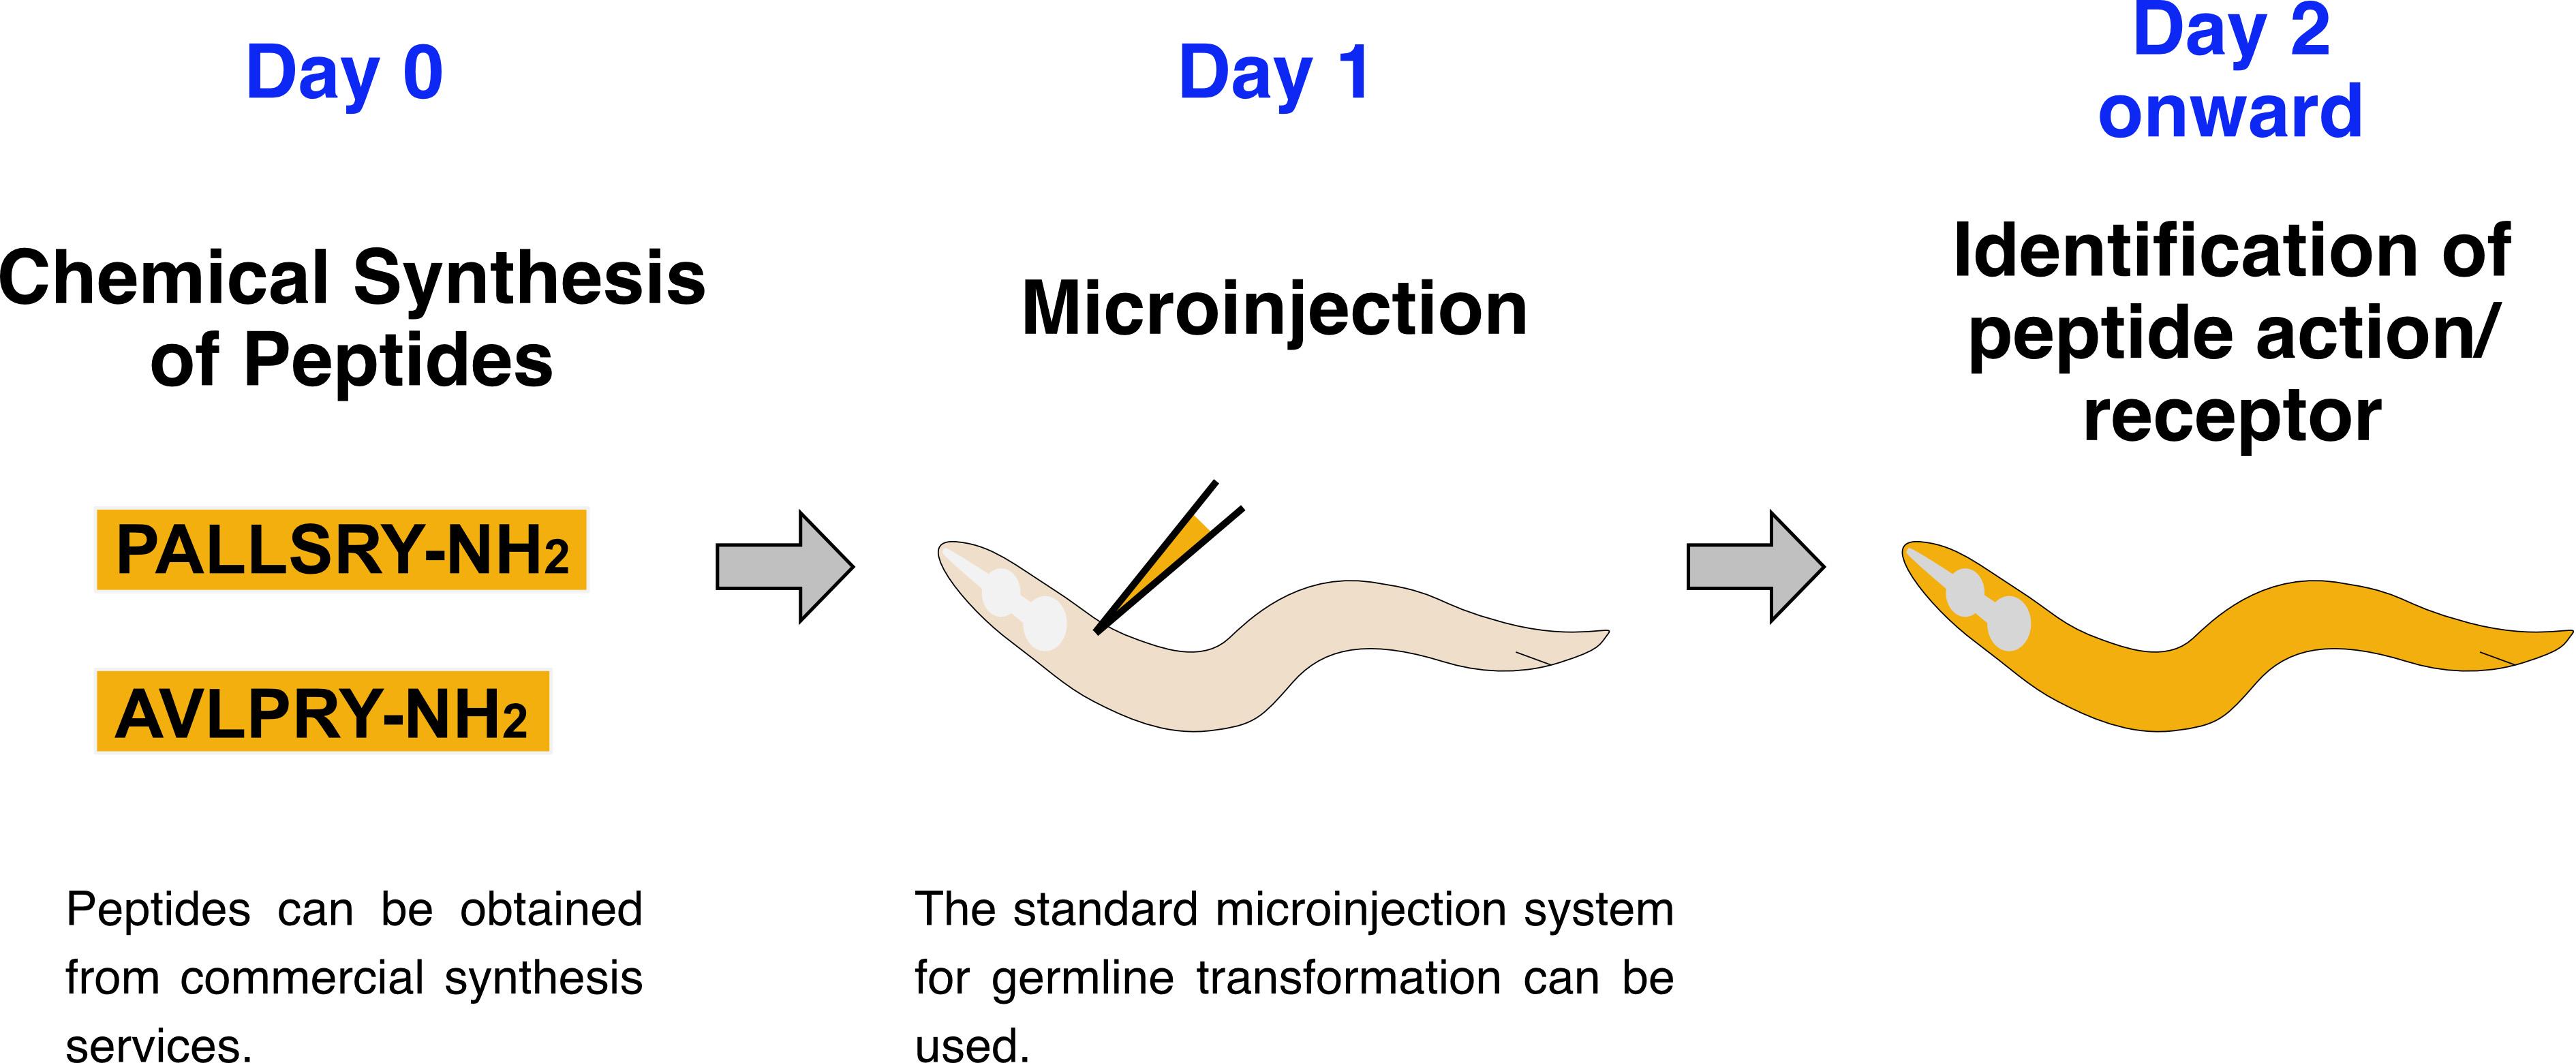
Direct microinjection of chemically synthesized peptides into C. elegans. To determine the in vivo effects of a specific peptide(s) and to identify receptor mutations that abolish those effects, chemically synthesized peptide(s) are microinjected into worms.
Background
Caenorhabditis elegans has a fully mapped synaptic connectome [1,2], yet understanding of how its nervous system functions remains far from complete, in part because of peptide-mediated signaling between distant cells. Bioinformatic and peptidomic analyses in C. elegans have identified 160 peptide-coding genes; post-translational processing of their protein products yields more than 300 distinct peptides [3–5]. Although some of these peptides may be released from non-neuronal cells, the majority are thought to function as neuropeptides [6,7].
Genetic analysis of peptide function in C. elegans faces several practical challenges. First, individual peptide genes typically encode multiple distinct peptides; therefore, phenotypes resulting from gene deletion or overexpression do not reveal which peptide(s) are responsible. Second, multiple peptides commonly act on the same receptor [7], such that deletion of a single peptide gene often produces no detectable phenotype. Third, standard genetic manipulations that delete or overexpress peptide genes do not allow precise temporal control of peptide expression.
The protocol we describe here—direct microinjection of chemically synthesized peptides into C. elegans [8,9]—addresses these issues; it enables the introduction of individual peptides, may reveal phenotypes that loss-of-function genetics miss, and allows control over the timing of peptide delivery. Furthermore, the approach can be adapted for chemically modified peptides or non-peptidic compounds. However, injected peptide concentrations can differ substantially from endogenous levels and may produce nonphysiological effects, and some peptide actions may require specific combinations of different peptides. Interpreting results is best done in conjunction with complementary approaches [5,10], such as pharmacological characterization and receptor mutant analysis.
Materials and reagents
Biological materials
1. C. elegans animals [e.g., available from Caenorhabditis Genetics Center (CGC), University of Minnesota, MN, USA]
2. Escherichia coli strain used as a food source (e.g., HB101 or OP50, available from the CGC)
Reagents
1. Synthetic peptide of interest; peptides can be obtained from commercial synthesis services (e.g., Scrum Inc., Tokyo, Japan)
Note: As little as 1 nmol is sufficient for the assays.
2. Trifluoroacetic acid (TFA) (Nacalai Tesque Inc., catalog number: 34840-34)
3. Distilled water (Nacalai Tesque Inc., catalog number: 14029-33)
4. Acetonitrile (Nacalai Tesque Inc., catalog number: 00430-83)
5. Milli-Q water (Millipore Corporation, Milli-Q Advantage A10)
6. Milli-RO water (Millipore Corporation, Elix Essential UV10)
7. Peptone (Gibco Bacto Peptone, catalog number: 211677)
8. Sodium chloride (NaCl) (FUJIFILM Wako Pure Chemical, catalog number: 191-01665)
9. Cholesterol (FUJIFILM Wako Pure Chemical, catalog number: 034-03002)
10. Ethyl alcohol (Ethanol) (Sigma-Aldrich, catalog number: 09-0770)
11. Agar (TAISHO TECHNOS, catalog number: 17071902)
12. Calcium chloride dihydrate (CaCl2·2H2O) (FUJIFILM Wako Pure Chemical, catalog number: 033-25035)
13. Magnesium sulfate heptahydrate (MgSO4·7H2O) (FUJIFILM Wako Pure Chemical, catalog number: 131-00405)
14. Potassium dihydrogen phosphate (KH2PO4) (FUJIFILM Wako Pure Chemical, catalog number: 169-04245)
15. Disodium hydrogen phosphate dodecahydrate (Na2HPO4 ·12H2O) (FUJIFILM Wako Pure Chemical, catalog number: 196-02835)
16. Dipotassium hydrogen phosphate (K2HPO4) (FUJIFILM Wako Pure Chemical, catalog number: 164-04295)
17. Potassium hydroxide (KOH) (FUJIFILM Wako Pure Chemical, catalog number: 168-21815)
18. Agarose (Nacalai Tesque Inc., catalog number: 01157-95)
19. Luria-Bertani (LB) broth (BD Biosciences, catalog number: 244620)
20. Liquid paraffin (FUJIFILM Wako Pure Chemical, catalog number: 128-04375) or Halocarbon oil 700 (Sigma-Aldrich, catalog number: H8898-100ML)
Solutions
1. 10% (v/v) TFA (stock) (see Recipes)
2. 0.1% TFA (see Recipes)
3. HPLC solvent B (see Recipes)
4. LB liquid medium (see Recipes)
5. 5 mg/mL cholesterol (see Recipes)
6. 1 M potassium phosphate buffer (pH 6.0) stock solution (see Recipes)
7. M9 buffer (see Recipes)
8. Nematode growth media (NGM) plates (see Recipes)
Recipes
1. 10% (v/v) TFA (stock)
| Reagent | Final concentration | Quantity or volume |
|---|---|---|
| 100% TFA | 10% | 1 mL |
| Distilled water | n/a | Up to 10 mL |
| Total | 10 mL |
Store at 4 °C in an amber glass bottle; it is functional for at least 1 year.
2. 0.1% TFA
| Reagent | Final concentration | Quantity or volume |
|---|---|---|
| 10% TFA | 0.1% | 1 mL |
| Distilled water | n/a | Up to 100 mL |
| Total | 100 mL |
Prepare 0.1% TFA by diluting the 10% stock. Store at room temperature in an amber glass bottle and use within 1 year.
3. HPLC solvent B
| Reagent | Final concentration | Quantity or volume |
|---|---|---|
| Acetonitrile | 40% | 40 mL |
| 10% TFA | 0.1% | 1 mL |
| Distilled water | n/a | Up to 100 mL |
| Total | 100 mL |
Store at room temperature in an amber glass bottle and use within 1 year. To enhance reproducibility, use graduated cylinders and glass pipettes reserved exclusively for this solution when measuring volumes.
4. LB liquid medium
| Reagent | Final concentration | Quantity or volume |
|---|---|---|
| LB broth | 25 g/L | 2.5 g |
| Milli-RO water | n/a | Up to 100 mL |
| Total | 100 mL |
Autoclave for 20 min in a 300–500 mL flask. Store at room temperature and use within 2 months.
5. 5 mg/mL cholesterol
| Reagent | Final concentration | Quantity or volume |
|---|---|---|
| Cholesterol | 5 mg/mL | 0.5 g |
| Ethanol | n/a | 100 mL |
Leave the suspension in a sterilized bottle overnight to ensure complete dissolution, mix the solution thoroughly, store at room temperature, and use within 1 year.
6. 1 M potassium phosphate buffer (pH 6.0) stock solution
| Reagent | Final concentration | Quantity or volume |
|---|---|---|
| KH2PO4 | 1 M | 136.1 g |
| KOH | n/a | As required to adjust pH |
| Milli-Q water | n/a | Up to 1 L |
| Total | 1 L |
Dissolve in ~800 mL of Milli-Q water, add KOH pellets to pH 6.0, and bring the volume to 1 L with Milli-Q water. Autoclave for 20 min. Store at room temperature; it is functional for at least 1 year.
7. M9 buffer
| Reagent | Final concentration | Quantity or volume |
|---|---|---|
| KH2PO4 | 3 g/L | 0.3 g |
| Na2HPO4·12H2O | 15.2 g/L | 1.52 g |
| NaCl | 5 g/L | 0.5 g |
| Milli-Q water | n/a | Up to 100 mL |
| Total | 100 mL |
Sterilize by autoclaving for 20 min at 121 °C and add 100 μL of 1 M MgSO4 after cooling to room temperature (final concentration: 1 mM). Store at room temperature; it is functional for at least 1 year.
8. NGM plates
| Reagent | Final concentration | Quantity or volume |
|---|---|---|
| Peptone | 2.5 g/L | 2.5 g |
| NaCl | 3 g/L | 3 g |
| Agar | 17 g/L | 17 g |
| 5 mg/mL cholesterol | 5 mg/L | 1 mL |
| Milli-RO water | n/a | 800 mL |
Autoclave for 30 min in a 1 L Erlenmeyer flask. Let the NGM cool to ~65 °C. Add 100 mL of 10 mM CaCl2, 100 mL of 10 mM MgSO4, and 25 mL of 1 M potassium phosphate buffer (pH 6.0) and thoroughly mix the medium. Dispense 10 mL per 60 × 15 mm Petri dish. Leave the plates at room temperature for ~48 h under low-humidity conditions or ~72 h under high-humidity conditions; then, use them immediately or store at 4 °C and use within 2 months.
Laboratory supplies
1. Sterile pipette tips
2. 50 mL conical polypropylene centrifuge tubes
3. 0.5 mL PCR single tube (SARSTEDT, catalog number: 72.735.002)
4. Glass capillary with filament (NARISHIGE, catalog number: GDC-1)
5. Capillary loading tips (Eppendorf, catalog number: 5242956003)
6. Cover glass, 24 mm × 50 mm (Matsunami Glass, catalog number: C018181)
7. Cover glass, 18 mm × 18 mm (Matsunami Glass, catalog number: C024501)
8. 1.5 mL screw-cap microtubes (SARSTEDT, catalog number: 72.692J)
9. Petri dishes, 60 mm × 15 mm (Greiner Bio-One, catalog number: 628161)
10. Platinum wire pick to transfer C. elegans
11. 0.22 μm filter column (Merck Millipore, catalog number: SLGV004SL)
Equipment
1. Vacuum oil pump (Thermo Scientific, model: VLP200)
2. Refrigerated vapor trap (Thermo Scientific, model: RVT4104)
3. Desiccator (Sankyo, catalog number: 85-5131)
4. Diaphragm-type dry vacuum pump (ULVAC, model: DAP-15)
5. Microcentrifuge (e.g., TOMY, model: MC-150)
6. -80 °C freezer
7. Microwave
8. Stereomicroscope
9. Glass micropipette puller (NARISHIGE, model: PB-7)
10. Inverted microscope for microinjection [ZEISS, model: Axiovert S 100 equipped with differential interference contrast (DIC) prisms, gliding table, objective 40×/0.75 EC Plan-NEOFLUAR] (Figure 1)
11. Microinjector unit (e.g., Eppendorf, model: FemtoJet 4i) (Figure 1)
12. Micromanipulator (NARISHIGE, model: MMO-4) (Figure 1)
13. (optional) Microscope camera (Wraymer, model: WRAYCAM-VEX832) (Figure 1)
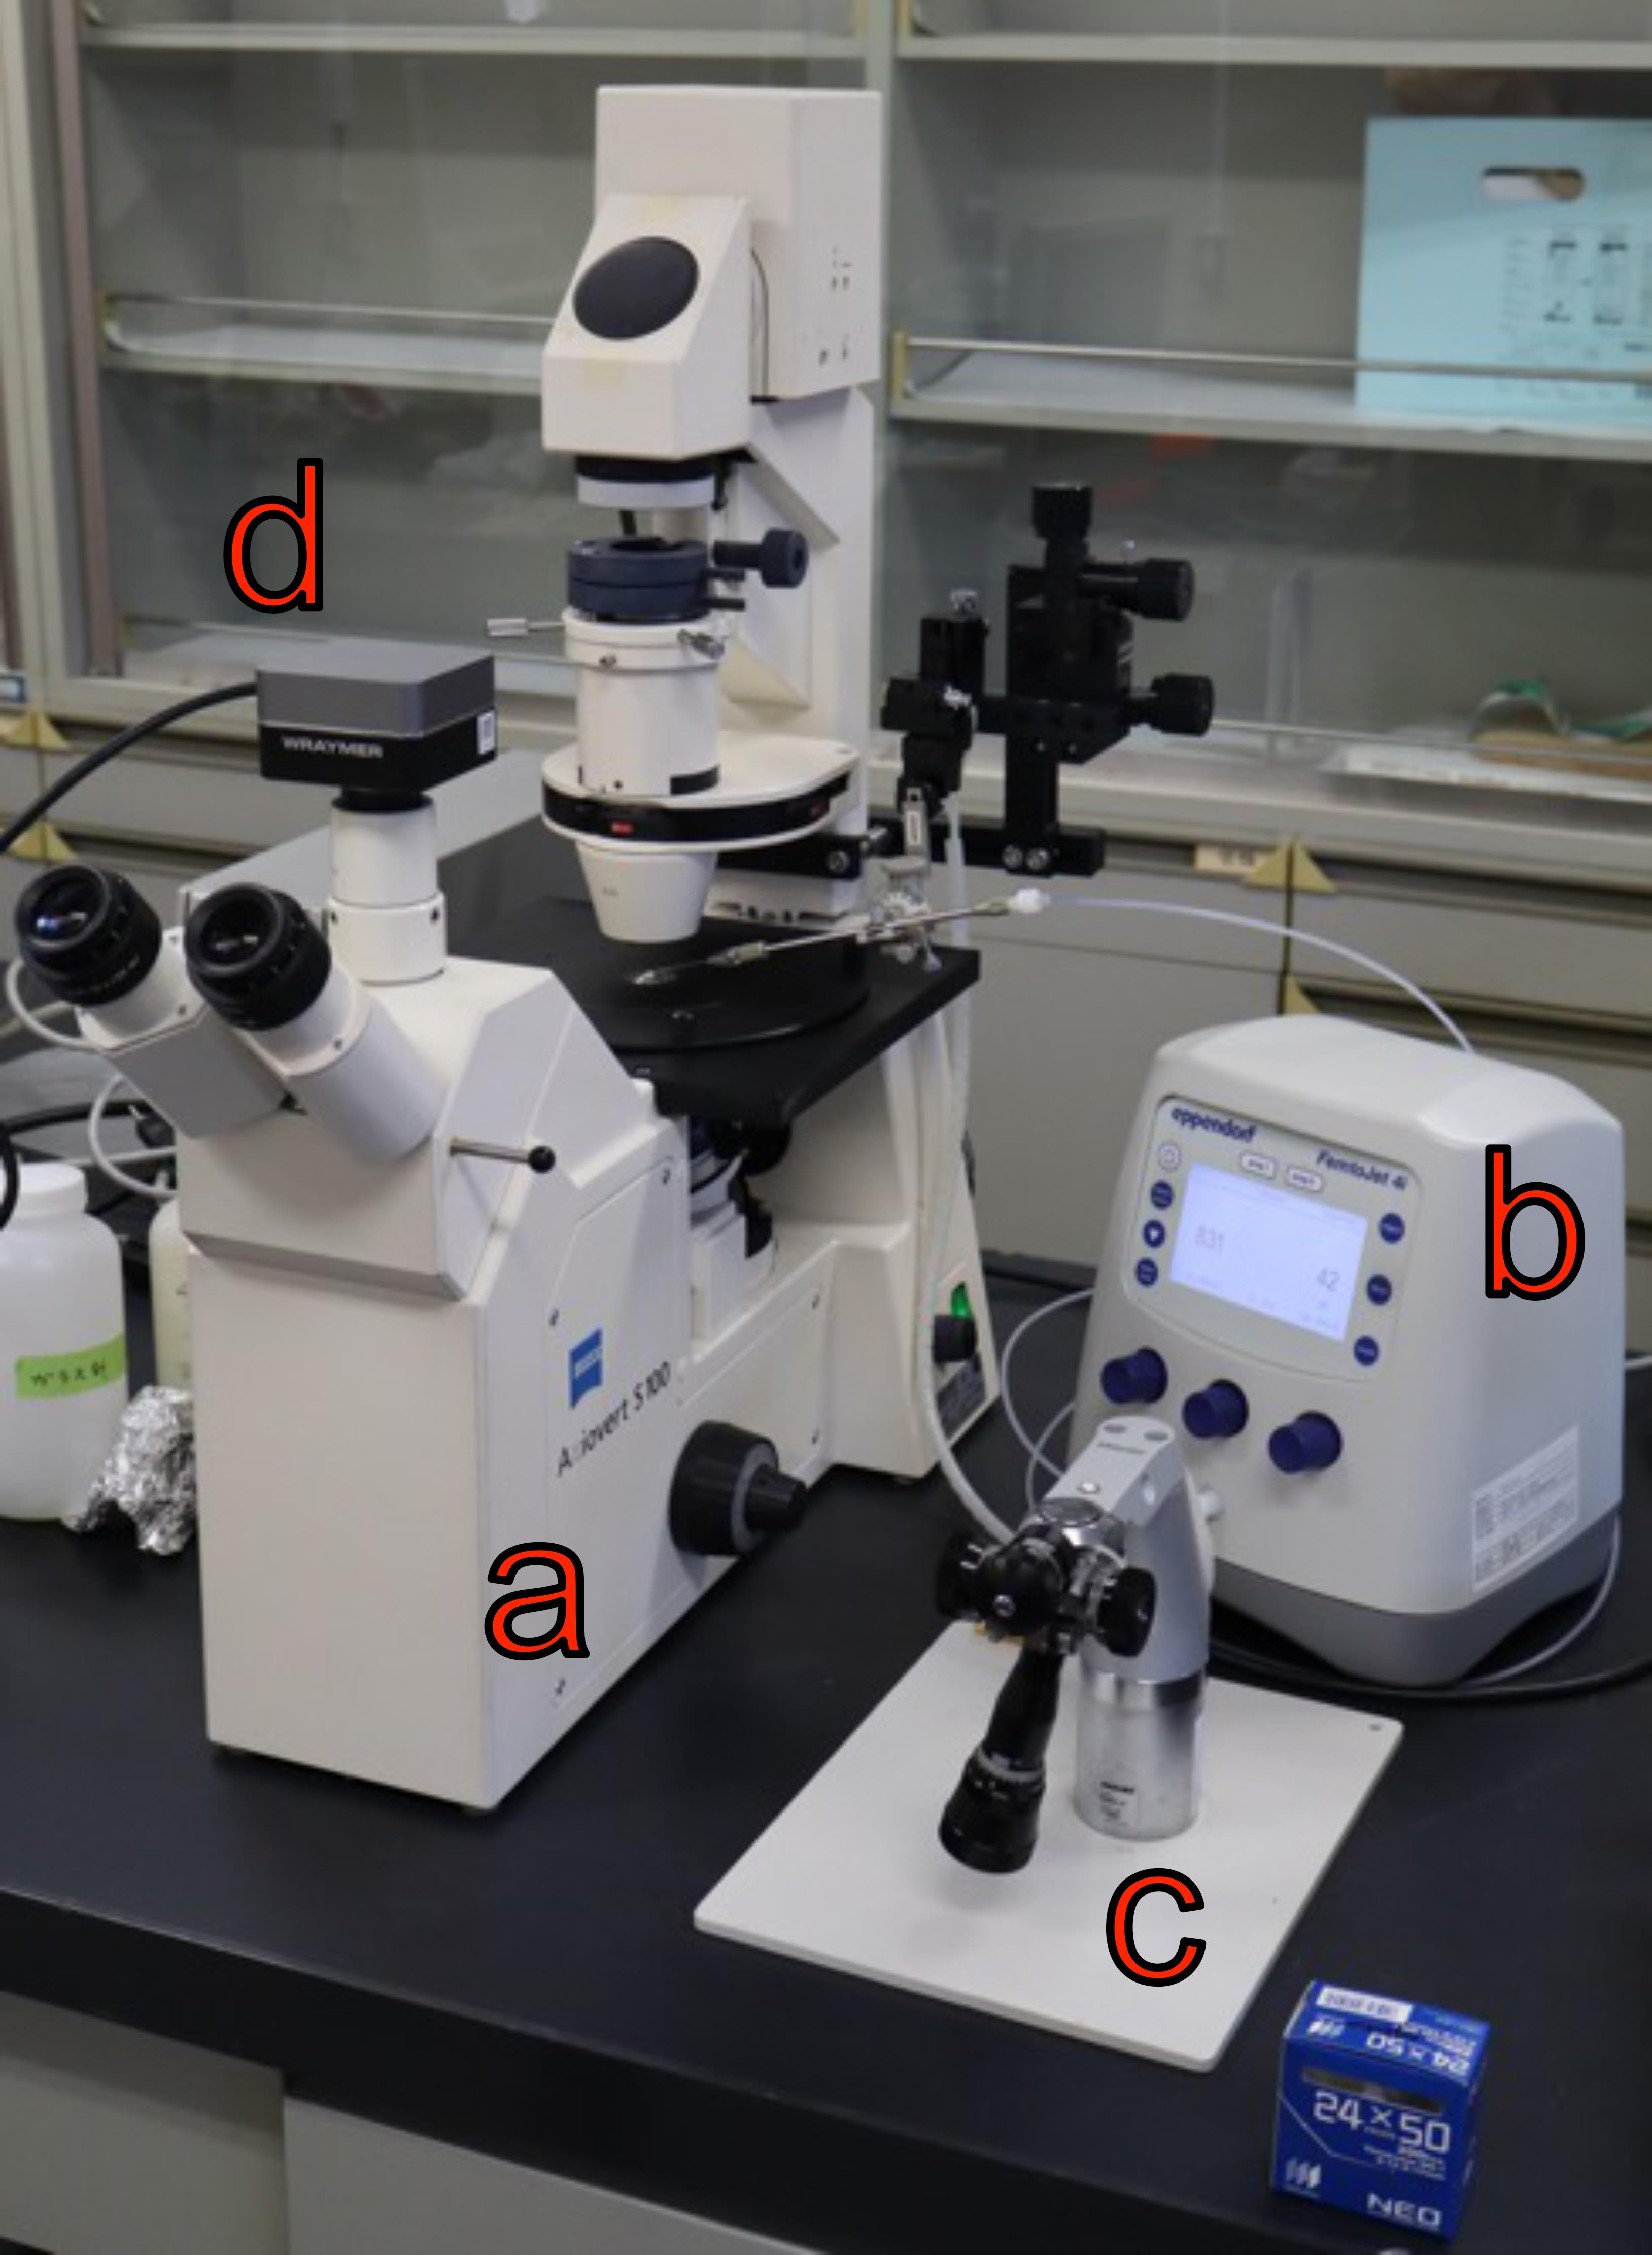
Figure 1. Example of a microinjection system setup. (a) Inverted microscope Axiovert S 100; (b) microinjector FemtoJet 4i; (c) micromanipulator MMO-4; (d) camera WRAYCAM-VEX832.
Software and datasets
1. MicroStudio (Wraymer, Version 1.9.25633.20240519) for movie acquisition from WRAYCAM-VEX832 (optional)
2. ImageJ/Fiji (NIH, Version 2) for image and video analysis (optional)
Procedure
Overview and timeline
The protocol consists of five main phases:
A. Preparation of injection pads and injection needles (~1 h).
B. Preparation of peptides (~1–2 days).
C. Preparation of worms (~1 week).
D. Microinjection (~2–6 h).
E. Phenotype analysis (several hours to several days; several weeks if measuring lifespan)
A. Preparation of injection pads and injection needles
1. Boil ~20 mL of 2% (w/v in water) agarose in a 100 mL glass bottle by heating in a microwave.
2. Place ~10 μL of the molten agarose onto the center of a 24 × 50 mm coverslip, then immediately place a second 24 × 50 mm coverslip on top to flatten the drop.
Note: Lowering the temperature of the agarose solution during pad formation increases the thickness of the resulting agarose pads. Although thicker pads facilitate immobilization of worms, they also exacerbate dehydration-induced damage. We typically spread ~10 μL of the 2% agarose solution into a circular pad about 1.5 cm in diameter; however, you should determine the optimal pad thickness empirically.
3. Separate the coverslips and dry the pad in a 60 °C incubator for at least several hours. The injection pads can be stored in bulk at room temperature.
Note: Tracing the outline of the agarose on the back side of the coverslip with an oil-based marker makes the pad location easy to find. Marking one corner of the coverslip (for example, the lower-left corner) with the same marker and maintaining a consistent orientation prevents confusion between the front and back (Figure 2).
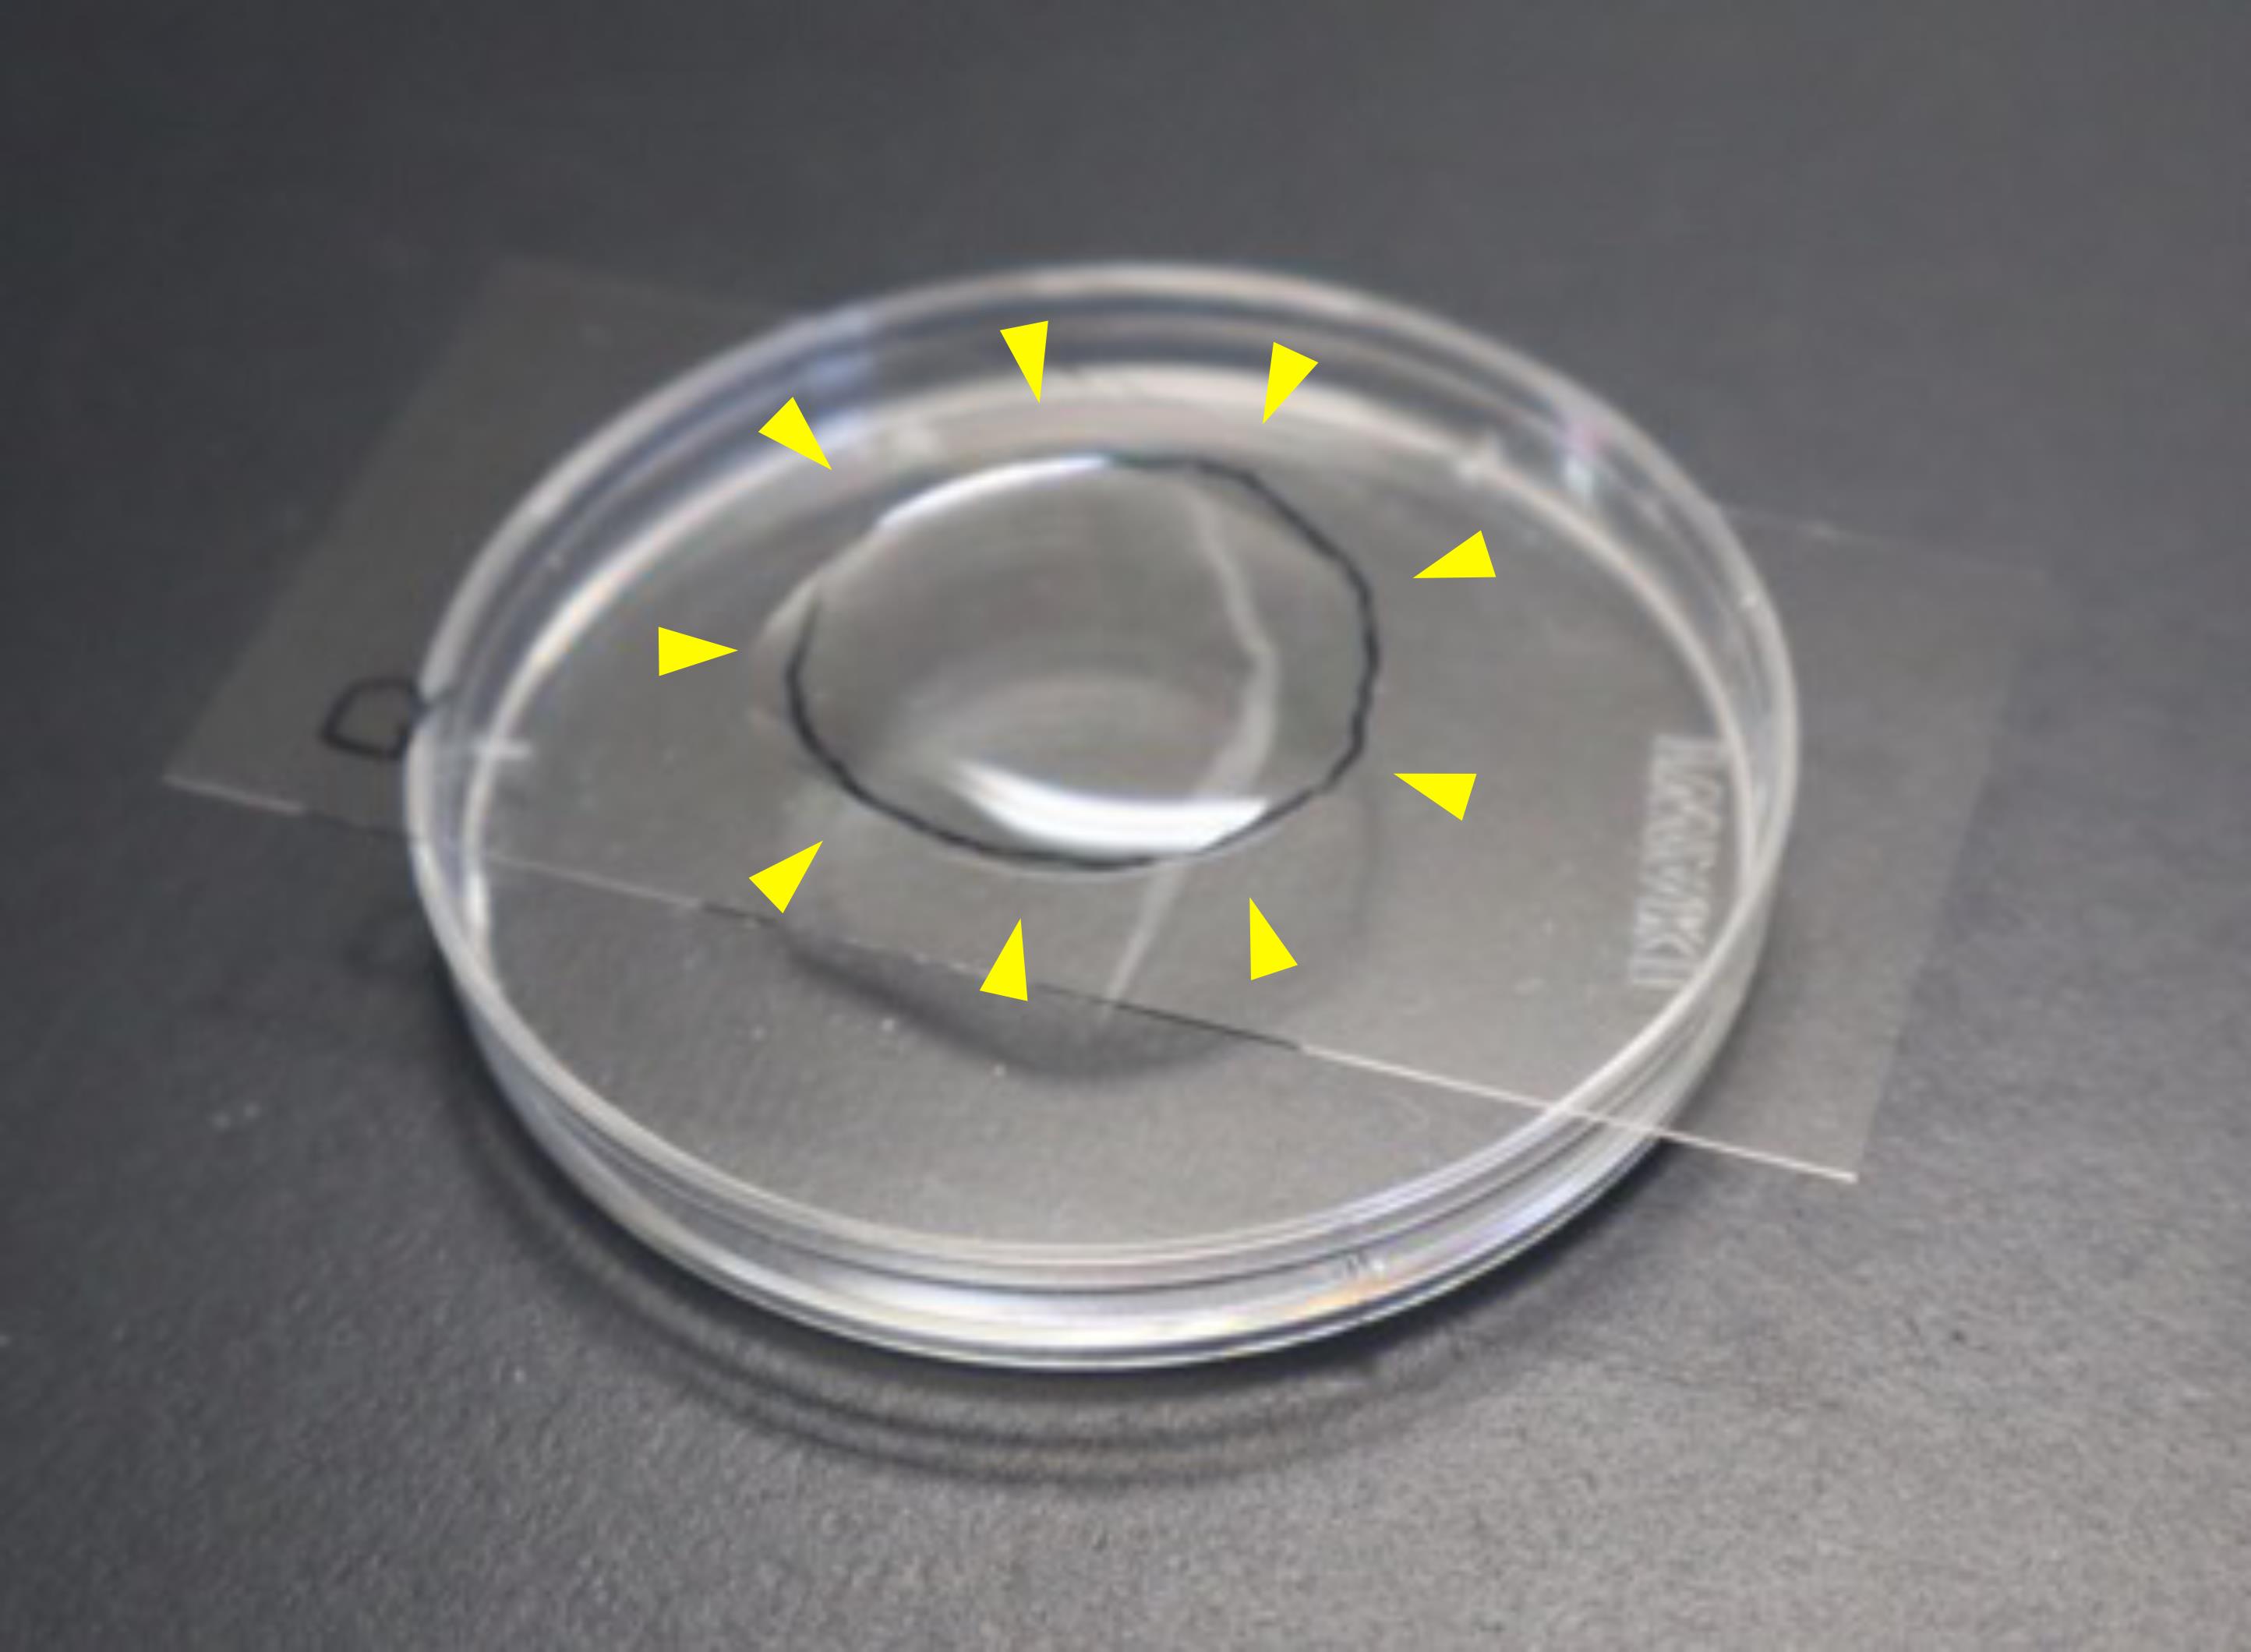
Figure 2. An injection pad. A droplet of liquid paraffin (described in section D) was placed on the injection pad (circled, yellow arrowheads).
4. Mount a GDC-1 glass capillary in a micropipette puller and pull it at 65–70 °C to produce two injection needles.
Note: Ensure that the tip thickness and the size of its opening are appropriate. Typically, needles with a tip opening diameter of ~1 μm and a conical taper length of about 5 mm are used. Tips that are too fine clog easily, whereas tips that are too thick do not penetrate tissue reliably. If the tip opening is too small to allow fluid flow, widen it as follows: place an 18 × 18 mm coverslip on a 24 × 50 mm coverslip, drop ~50 μL of liquid paraffin at the edge of the smaller coverslip, bring the needle tip into contact with that edge using a micromanipulator under a microscope, and gently tap the microscope stage or the needle holder. Alternatively, pre-pulled needles are commercially available (Eppendorf, Femtotips II, catalog number: 930000043 or Tritech Research, MINJ-PP).
B. Preparation of peptides
1. Transfer 30 mL or 0.1% TFA to a 50 mL conical centrifuge tube.
Note: To remove coating residues and other substances, pre-wash the 50 mL conical tube by adding approximately 5 mL of 0.1% TFA, vortexing, discarding the liquid, and repeating this wash three times.
2. Add 500 μL of HPLC solvent B to each of two 1.5 mL screw-cap microtubes and vortex. Centrifuge the tube at 1,000× g for a few seconds at room temperature, open the caps, and remove the liquid by aspirating with a pipette tip connected to a diaphragm-type dry vacuum pump.
3. Repeat step B2 two additional times (total of three washes). Allow the tubes to dry before use.
4. Dissolve a lyophilized synthetic peptide of interest, which can be obtained from commercial synthesis services, in 0.1% TFA to a final concentration of 10-2 M.
Note: For pipetting 0.1% TFA or the peptide solution, precondition each pipette tip by aspirating and discarding 0.1% TFA three times before use to remove coating residues and other substances that could leach from its inner surface.
5. Transfer 10 μL (100 nmol) of the 10-2 M peptide solution into a 1.5 mL screw-cap microtube washed with HPLC solvent B in steps B2–3 and lyophilize as follows:
a. Close the cap, spin briefly, then loosen the cap.
b. Freeze at -80 °C for 1 h.
c. Place the tube in a desiccator and dry overnight with a vacuum oil pump connected with a refrigerated vapor trap.
d. Remove the tube from the desiccator and tighten the cap.
Pause point: Lyophilized peptides can be stored at -20 °C for at least 1 year.
6. Redissolve the lyophilized peptide in 1 mL of 0.1% TFA to a 10-4 M solution.
7. Transfer 10 μL (1 nmol) of the 10−4 M peptide solution into a 1.5 mL screw-cap microtube washed with HPLC solvent B in steps B2–3, and lyophilize by repeating step B5a–d.
Pause point: Lyophilized peptides can be stored at -20 °C for at least 1 year.
C. Preparation of worms
1. Inoculate Escherichia coli into LB liquid medium and incubate with shaking at 37 °C overnight.
2. Pipette 200 μL of the overnight culture onto the center of each NGM plate (see Recipes), incubate the plates at room temperature for ~48 h, and then use them immediately or store them at 4 °C and use within 2 months.
3. Grow C. elegans worms on the E. coli–seeded NGM plates to the desired developmental stage [11]. For example, transfer L4 larvae at the white crescent stage to fresh plates using a stereomicroscope and a platinum wire pick and incubate at 20 °C for 36 h to obtain 1-day-old adult animals.
D. Microinjection
1. Dissolve the lyophilized peptide (1 nmol, see above) in 100 μL of M9 buffer to give a 10-5 M solution.
Note: Peptides can adsorb to tube walls over time after dissolution, reducing activity. Use the solution immediately or store the peptide in the lyophilized state until use.
2. Insert a 0.22 μm filter column into a 0.5 mL PCR single tube (Figure 3), load 10 μL of the peptide solution onto the filter, and centrifuge the tube at 5,000× g for 1 min.
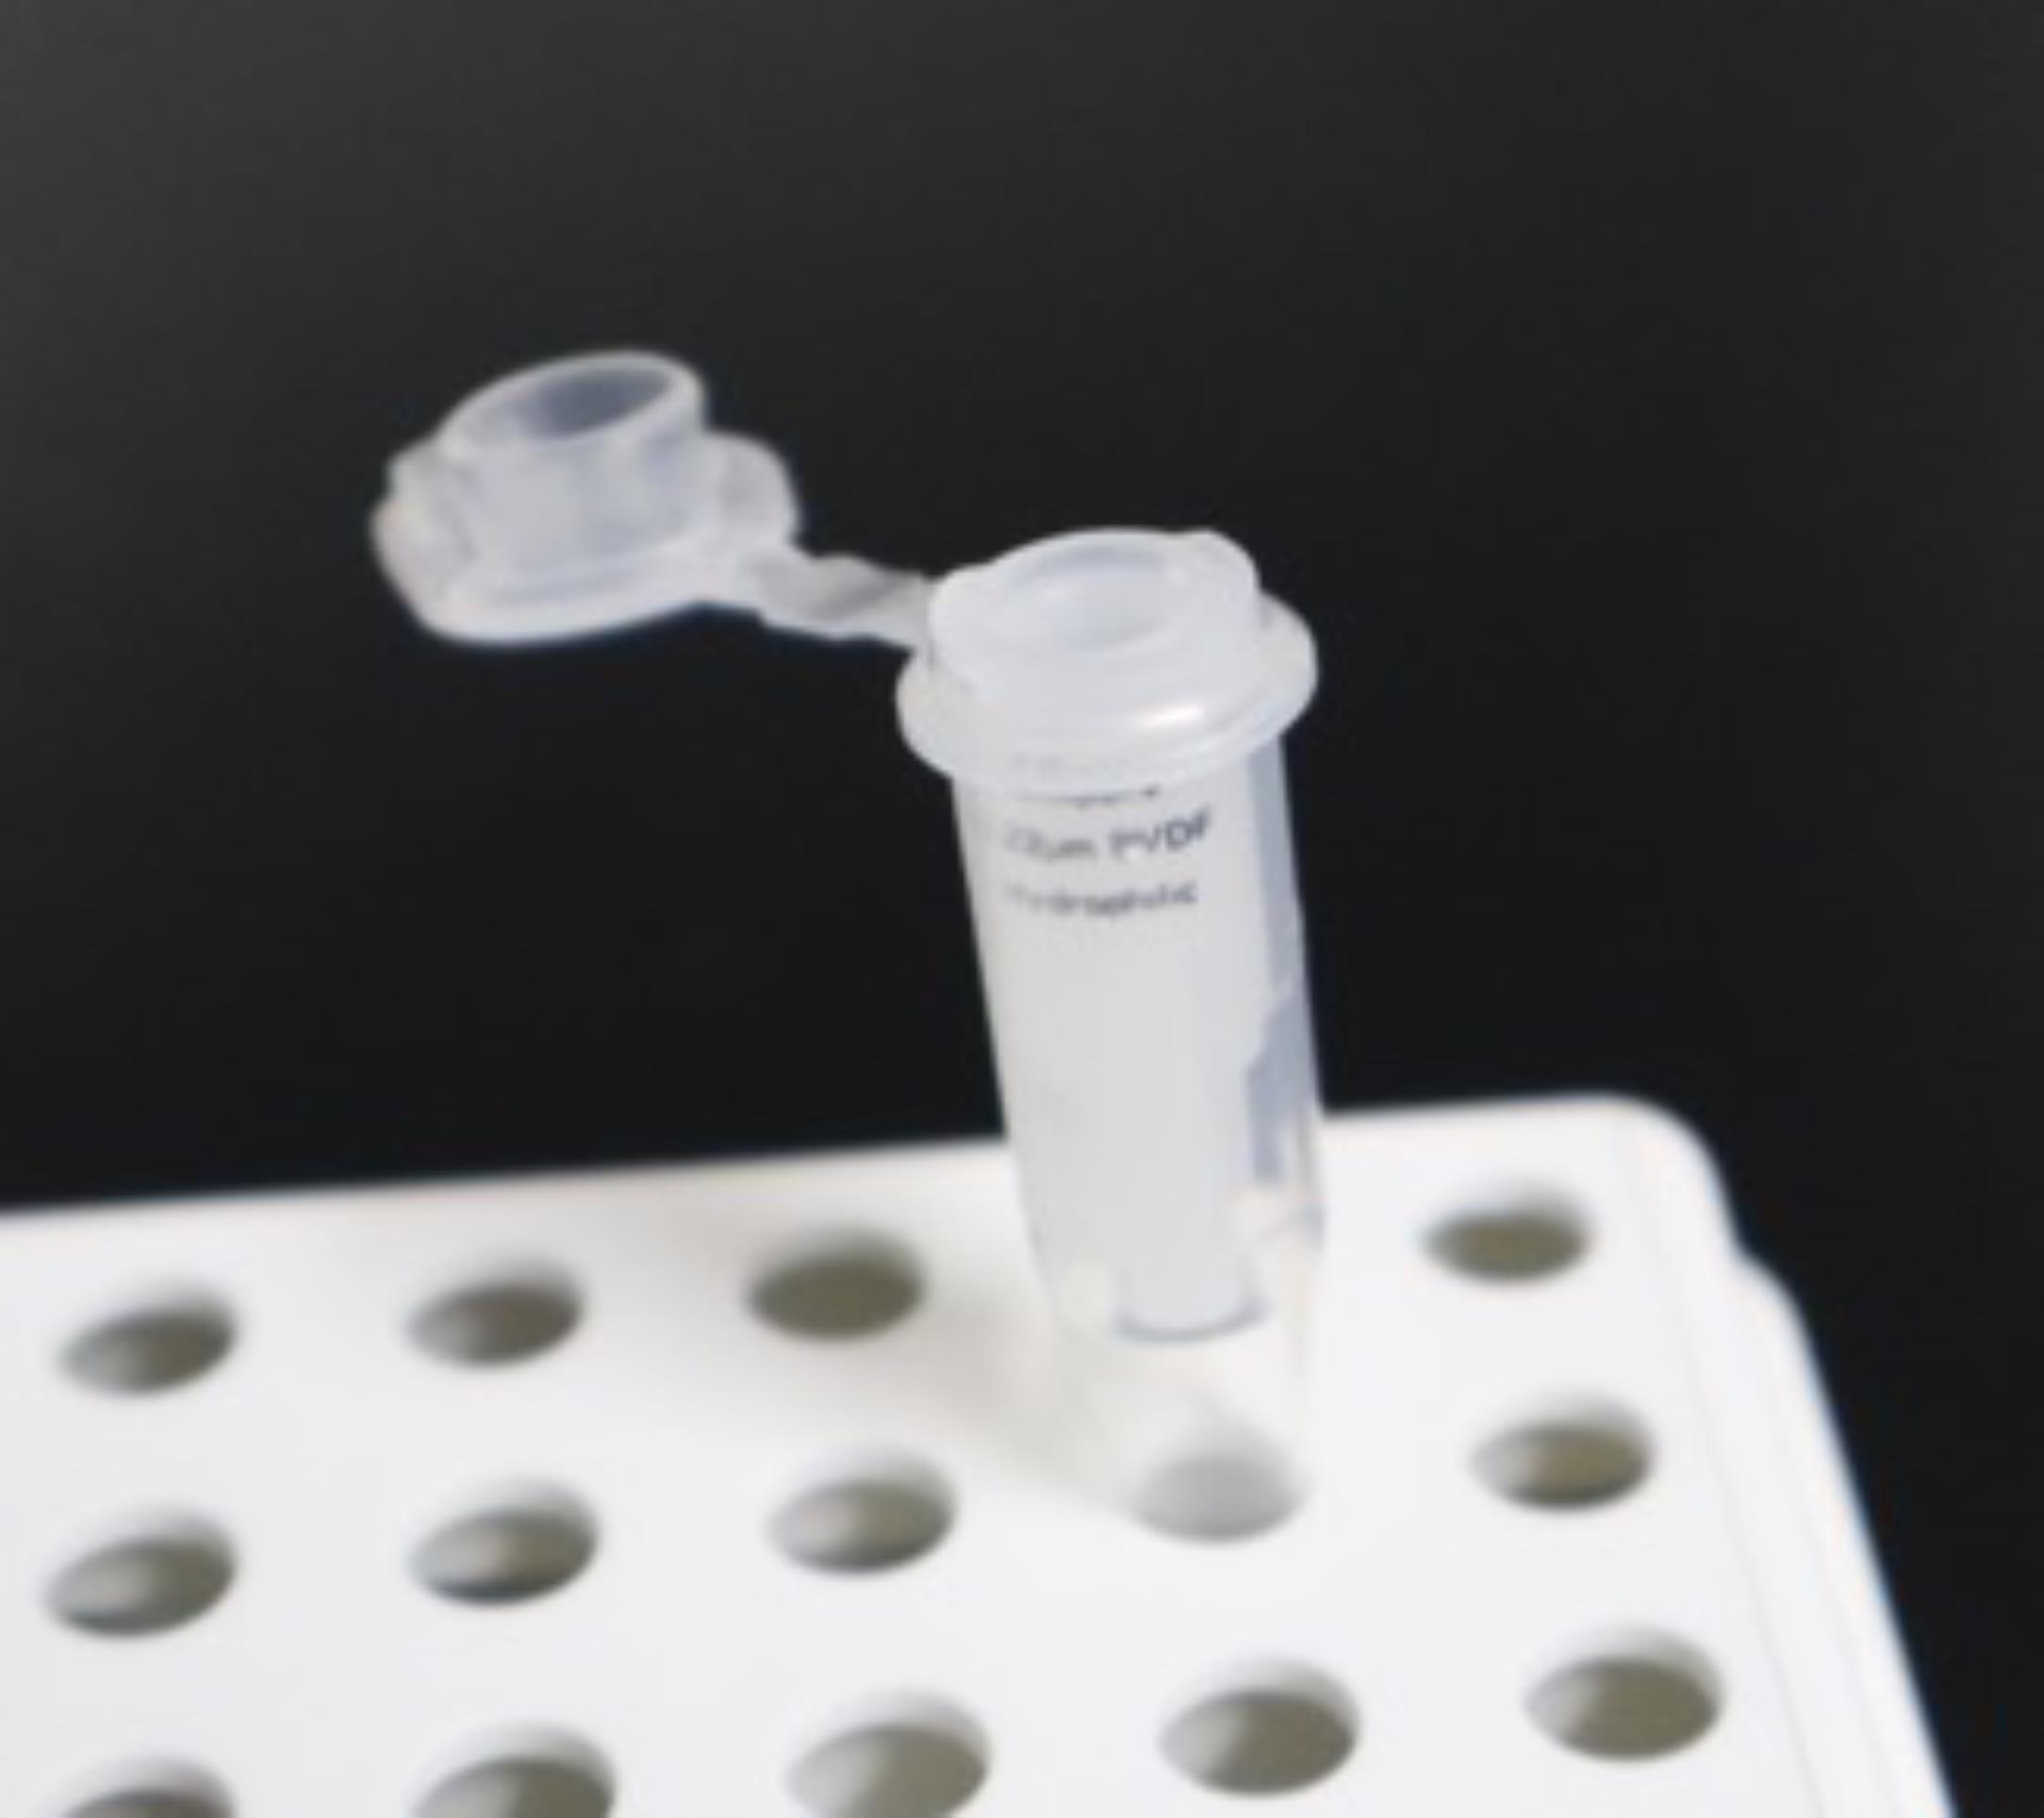
Figure 3. Filter column set in a 0.5 mL tube
3. Remove the filter column and centrifuge the filtrate in a microcentrifuge at maximum speed for 10 min to pellet particulates to reduce the risk of capillary clogging.
4. Wipe the area around an inverted microscope for microinjection with 70% ethanol to prevent contamination.
5. Place ~100 μL of liquid paraffin onto an injection pad (Figure 2).
6. Turn on the microinjection unit and set the injection pressures to Pi = 500 and Pc = 20. If the unit allows setting the injection volume, set it to 100 fL.
7. Load ~1 μL of the peptide solution (step D3) into an injection needle (see above) using a capillary loading tip.
8. Hold the needle vertically for ~1 min to allow bubbles to rise and escape. Confirm under a stereomicroscope that no bubbles are present at the tip.
9. Mount the needle into a needle holder attached to a micromanipulator.
10. Confirm that the micromanipulator retains sufficient travel range in all directions.
11. Position the micromanipulator so that the needle tip lies at the center of the field of view of the inverted microscope.
12. Raise the needle tip upward with the micromanipulator to make space for placement of the injection pad.
13. Transfer a worm at the appropriate developmental stage (see above) to a fresh, E. coli-free NGM plate and let the worm move around for ~20–30 s to remove adherent bacteria; eliminating bacterial carryover increases injection efficiency. Pick the worm onto the injection pad and wait until it is immobilized.
14. Place the injection pad on the stage of the inverted microscope and center the worm in the field of view.
15. Lower the needle tip using a micromanipulator and adjust focus so that both the pharyngeal region and the needle tip are sharply in view.
16. Advance the needle into the head in a direction from the midbody toward the head tip (Video 1). Inject the solution slightly posterior to the dorsal part of the pharyngeal terminal bulb until the spread diameter reaches approximately 5–10 μm (≈1/6 to 1/3 of the terminal-bulb diameter). The injected volume is roughly estimated to be around 100 fL, depending on the degree of vertical compression of the worm.
Note: As a control, inject peptide-free M9 buffer (vehicle) or an unrelated peptide. The injection site need not be restricted to the head; select a location that is not far from the putative receptor cells and unlikely to influence the phenotype of interest.

17. While viewing under a stereomicroscope, apply 1 μL of M9 buffer to the worm and confirm detachment and movement.
E. Phenotype analysis
1. Transfer injected worms to E. coli–seeded NGM plates using a stereomicroscope and a platinum wire pick.
2. After incubation at 20–23 °C for an appropriate interval, assess the phenotype of interest. The latency to detectable peptide effects depends on the peptide and the phenotype; for example, LURY-1-mediated modulation of pharyngeal pumping and egg-laying behavior is apparent 3–4 h after microinjection [8].
Validation of protocol
This protocol has been used and validated in the following research article:
• Ohno et al. [8]. Luqin-like RYamide peptides regulate food-evoked responses in C. elegans. eLife (Figure 5A, B and Figure 5, figure supplement 1C–D).
Raw data that support the findings of the article are available at https://figshare.com/articles/dataset/Ohno-2017- elife/5362588/2.
General notes and troubleshooting
General notes
1. The feasibility of applying this method to large-scale screening depends on proficiency with the injection technique. With sufficient practice, a skilled experimenter can inject hundreds of worms per day. For screening many candidate peptides, one feasible strategy would be to pool peptides into groups (e.g., several to a few dozen peptides per pool), inject each pool, and identify which pools contain the active peptide(s).
2. Injected peptides do not necessarily mimic the concentration or temporal pattern of endogenous peptide expression. Therefore, the concentration and timing of peptide delivery and the interpretive validity of any resulting phenotypes should be evaluated carefully. Peptide purity is also an important factor when determining the concentration for administration; peptides should be produced at the highest practicable purity.
3. Variations in injected volume and injection-induced tissue damage can contribute to phenotype variability. The required sample size depends on the strength and type of phenotype being observed; in some cases, it may be larger than that required for genetic mutant analyses or other approaches.
Acknowledgments
Conceptualization, H.O., T.I., Y.I.; Investigation, H.O., T.I.; Writing—Original Draft, H.O., T.I.; Writing—Review & Editing, H.O., T.I., Y.I.; Funding acquisition, H.O., T.I., Y.I.; Supervision, T.I., Y.I.
This work was supported in part by the Japan Society for the Promotion of Science (JSPS) KAKENHI 23K05644 and grants from the Mitsubishi Foundation, the Lotte Foundation, the Koyanagi Foundation, the Takeda Science Foundation, the G-7 Scholarship Foundation, and the Mishima Kaiun Memorial Foundation to HO.
The protocol is based on the publication by Ohno et al. [8].
Competing interests
The authors have no conflicts of interest to declare.
References
- White, J. G., Southgate, E., Thomson, J. N. and Brenner, S. (1986). The structure of the nervous system of the nematode Caenorhabditis elegans. Philos Trans R Soc Lond B Biol Sci. 314(1165): 1–340. https://doi.org/10.1098/rstb.1986.0056
- Cook, S. J., Jarrell, T. A., Brittin, C. A., Wang, Y., Bloniarz, A. E., Yakovlev, M. A., Nguyen, K. C. Q., Tang, L. T., Bayer, E. A., Duerr, J. S., et al. (2019). Whole-animal connectomes of both Caenorhabditis elegans sexes. Nature. 571(7763): 63–71. https://doi.org/10.1038/s41586-019-1352-7
- Van Bael, S., Watteyne, J., Boonen, K., De Haes, W., Menschaert, G., Ringstad, N., Horvitz, H. R., Schoofs, L., Husson, S. J. and Temmerman, L. (2018). Mass spectrometric evidence for neuropeptide-amidating enzymes in Caenorhabditis elegans. J Biol Chem. 293(16): 6052–6063. https://doi.org/10.1074/jbc.RA117.000731
- Cockx, B., Van Bael, S., Boelen, R., Vandewyer, E., Yang, H., Le, T. A., Dalzell, J. J., Beets, I., Ludwig, C., Lee, J., et al. (2023). Mass Spectrometry-Driven Discovery of Neuropeptides Mediating Nictation Behavior of Nematodes. Mol Cell Proteomics. 22(2): 100479. https://doi.org/10.1016/j.mcpro.2022.100479
- Watteyne, J., Chudinova, A., Ripoll-Sanchez, L., Schafer, W. R. and Beets, I. (2024). Neuropeptide signaling network of Caenorhabditis elegans: from structure to behavior. Genetics. 228(3): iyae141. https://doi.org/10.1093/genetics/iyae141
- Ripoll-Sánchez, L., Watteyne, J., Sun, H., Fernandez, R., Taylor, S. R., Weinreb, A., Bentley, B. L., Hammarlund, M., Miller, D. M., 3rd, Hobert, O., et al. (2023). The neuropeptidergic connectome of C. elegans. Neuron. 111(22): 3570–3589 e3575. https://doi.org/10.1016/j.neuron.2023.09.043
- Beets, I., Zels, S., Vandewyer, E., Demeulemeester, J., Caers, J., Baytemur, E., Courtney, A., Golinelli, L., Hasakiogullari, I., Schafer, W. R., et al. (2023). System-wide mapping of peptide-GPCR interactions in C. elegans. Cell Rep. 42(9): 113058. https://doi.org/10.1016/j.celrep.2023.113058
- Ohno, H., Yoshida, M., Sato, T., Kato, J., Miyazato, M., Kojima, M., Ida, T. and Iino, Y. (2017). Luqin-like RYamide peptides regulate food-evoked responses in C. elegans. eLife. 6: e28877. https://doi.org/10.7554/eLife.28877
- Rogers, C., Reale, V., Kim, K., Chatwin, H., Li, C., Evans, P. and de Bono, M. (2003). Inhibition of Caenorhabditis elegans social feeding by FMRFamide-related peptide activation of NPR-1. Nat Neurosci. 6(11): 1178–1185. https://doi.org/10.1038/nn1140
- Li, C. and Kim, K. (2008). Neuropeptides. WormBook: 1–36. https://doi.org/10.1895/wormbook.1.142.1
- Altun, Z. F. and Hall, D. H. (2009). Introduction. In WormAtlas. https://doi.org/10.3908/wormatlas.1.1
文章信息
稿件历史记录
提交日期: Dec 31, 2025
接收日期: Feb 19, 2026
在线发布日期: Mar 2, 2026
出版日期: Apr 5, 2026
版权信息
© 2026 The Author(s); This is an open access article under the CC BY license (https://creativecommons.org/licenses/by/4.0/).
如何引用
Readers should cite both the Bio-protocol article and the original research article where this protocol was used:
- Ohno, H., Ida, T. and Iino, Y. (2026). Microinjection of Synthetic Peptides Into Caenorhabditis elegans. Bio-protocol 16(7): e5640. DOI: 10.21769/BioProtoc.5640.
- Ohno, H., Yoshida, M., Sato, T., Kato, J., Miyazato, M., Kojima, M., Ida, T. and Iino, Y. (2017). Luqin-like RYamide peptides regulate food-evoked responses in C. elegans. eLife. 6: e28877. https://doi.org/10.7554/eLife.28877
分类
神经科学 > 细胞机理 > 受体-配体结合
生物化学 > 其它化合物 > 肽
您对这篇实验方法有问题吗?
在此处发布您的问题,我们将邀请本文作者来回答。同时,我们会将您的问题发布到Bio-protocol Exchange,以便寻求社区成员的帮助。