

Analysis and Quantification of Functional Regeneration of Dendrite and Axon of PVD Neuron After Laser Injury in Caenorhabditis elegans
线虫PVD神经元激光损伤后树突与轴突功能性再生的分析与定量
发布: 2025年04月20日第15卷第8期 DOI: 10.21769/BioProtoc.5280 浏览次数: 2443
评审: Sravanthi S P NadimintiAnonymous reviewer(s)
参见作者原研究论文
The authors used this protocol in:

May 2024
Advertisement


Abstract
Research into nervous system injuries and regeneration has emerged as a crucial field of study. In many cases such as trauma or stroke, both axons and dendrites are equally damaged; however, studying injury and repair mechanisms in both neurite processes (axons and dendrites) of the same neuron has been challenging. Additionally, correlating the behavioral aspects of neuronal injury with anatomical regeneration is important for a better understanding of the functional rewiring process. Here, we describe protocols for injuring the dendrites and the axon of the PVD neuron of C. elegans using a two-photon infrared (IR) femtosecond laser system, and subsequent imaging of injured neurites during the course of regeneration. Additionally, we describe the protocols for the behavioral study concerning the PVD neuron and their analysis, which can offer valuable insights. These assays can be implemented to assess the function of the pathways that play specific roles in dendrite vs. axon regeneration.
Key features
• Dendritic and axonal injury in PVD neurons using a two-photon microscope.
• Behavioral analysis involving harsh touch response and proprioception following neurite injury.
• Correlation of dendrite and axon regeneration events with behavioral parameters.
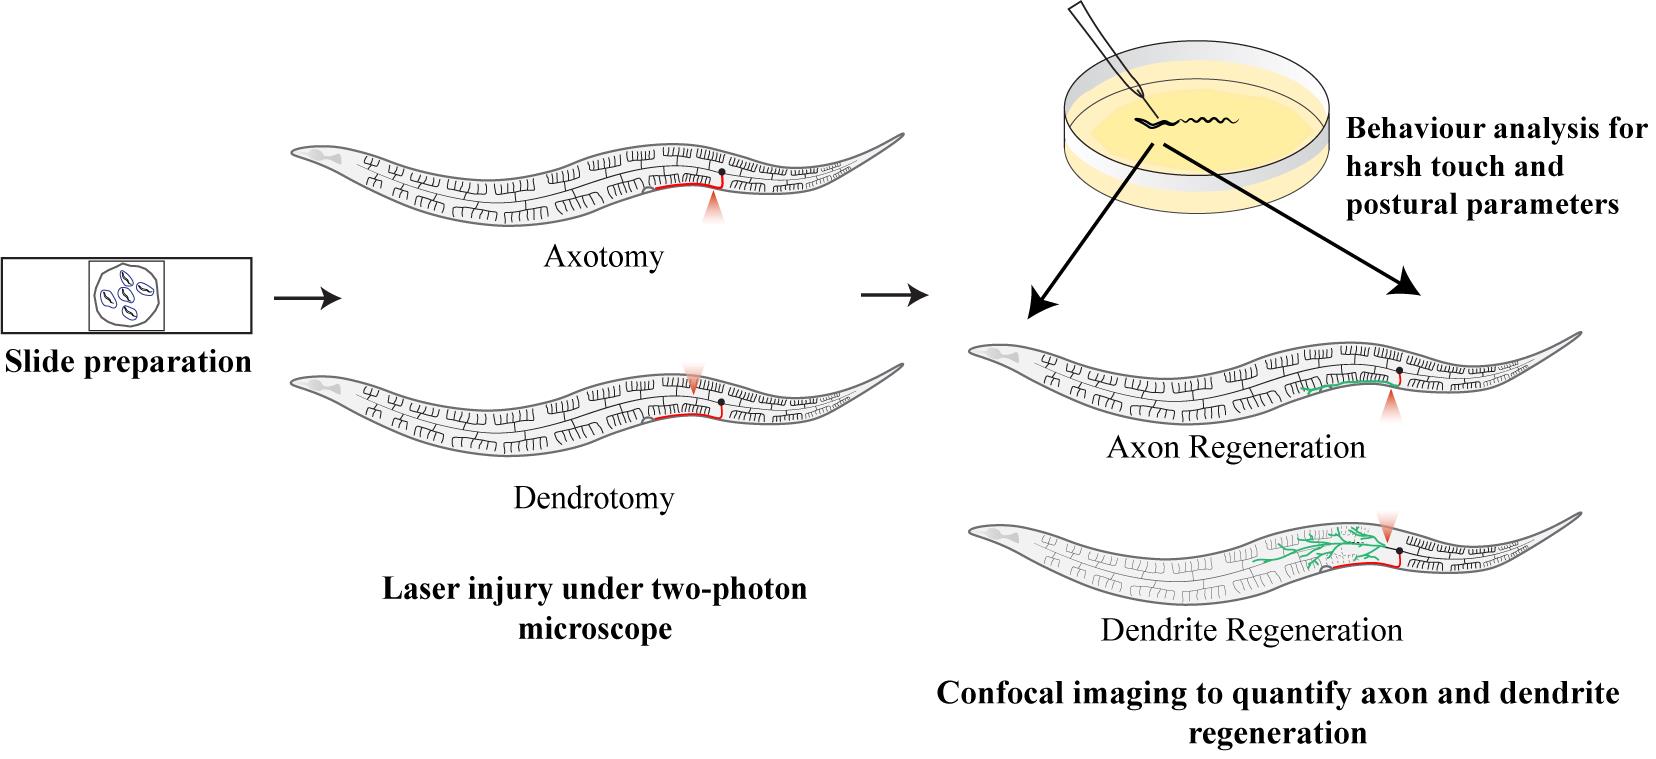
Keywords: C. elegans (秀丽隐杆线虫(C. elegans))Graphical overview
Background
The structure and function of dendrites play a crucial role in the processing and integration of the input signal from synapses. While the severing of axons, their regeneration responses, and repair, along with their impact on associated behaviors, have been widely studied in Caenorhabditis elegans as well as other organisms [1–5], much less is known about the mechanisms underlying dendrite regeneration. Although both dendrites and axons are structurally and functionally distinct, they are part of the same cell, and both play important roles in the transmission of information. Thus, to comprehend the molecular mechanisms that may be involved in the regeneration events of both dendrites and axons, as well as how they vary, it is necessary to investigate both of them in the same neuron. Therefore, developing protocols for targeted dendrite injury is crucial to bridging the knowledge gap involving dendritic response to injury and its impact on behavioral outcomes. Dendrites present a unique challenge as they are thinner, more fragile, and more branched than axons, making their precise severing difficult [6,7]. Additionally, dendrites receive input as graded potential, as opposed to the transmission of input as action potential through the axon. This imparts another level of complexity in information processing, rendering challenges in studying the functional aspect of dendrite regeneration. Also, dendrotomy protocols must be carefully developed to allow for targeted and reproducible dendritic injury with minimal collateral damage. Laser-based techniques have been highly successful in axotomy and could potentially be adapted for dendrotomy as well [6,8]. Femtosecond lasers offer the precision necessary for severing an individual neurite [5,9–12]. Moreover, advancements in imaging technologies such as high-resolution confocal and multiphoton microscopy make it easier to manipulate both the axon and dendrites of the same neuron in C. elegans model [6,13]. However, no systematic protocol for performing dendrotomy and subsequent study of dendrite regeneration events currently exist for C. elegans, implying the need for innovation in this area.
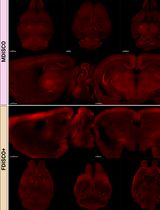
Here, we have outlined both axotomy and dendrotomy protocols using a femtosecond laser in a two-photon microscope, which is adapted from a recent study in PVD neurons labeled with the genetically encoded green fluorescent protein (GFP) [13]. This protocol has been used to quantify various parameters involving dendritic responses to injury, their remodeling, and the impact on the behavioral outcomes related to the PVD neuron [6]. This protocol allowed researchers to compare the roles of molecular pathways in dendrite and axon regeneration post-laser surgery [6,13]. The PVD neuron acts as a multisensory neuron, which controls both nociceptive touch sensation and body posture or proprioception [14]. The dendrites are known to play a role in proprioception and axons relay the information about nociceptive stimuli. We used assays based on these two sensory behaviors for the functional assessment of dendrite and axon regeneration events [13]. Potentially, this approach could lead to the discovery of novel genes and pathways that specifically regulate dendrite repair, further expanding our understanding of neuronal plasticity and repair mechanisms.
Materials and reagents
Biological materials
1. C. elegans strains (wdIs52)(F49H12.4::GFP) expressing GFP in the PVD neuron. The C. elegans strains utilized in this work were obtained from the Caenorhabditis Genetic Center (CGC) in Minneapolis, USA. Please refer to wormbook.com for fundamental worm culture procedures
2. OP50 E. Coli bacteria obtained from CGC USA
Reagents
1. Sodium chloride (NaCl) (Sigma, catalog number: 71376)
2. Tryptone (TM Media, catalog number: 3514)
3. Peptone (TM Media, catalog number: 1506)
4. Agarose (Sigma, catalog number: A9539)
5. Agar agar type 1 (TM Media, catalog number: 242M)
6. Cholesterol (Sigma, catalog number: C8667)
7. Levamisole hydrochloride (Sigma, catalog number: L0380000)
8. Calcium chloride (CaCl2) (Qualigens Fine Chemicals, catalog number: 22205)
9. Magnesium sulphate heptahydrate (MgSO4.7H2O) (Merck, catalog number: 193645)
10. Potassium phosphate monobasic anhydrous (KH2PO4) (Merck, catalog number: 193205)
11. Absolute ethanol (Merck, catalog number: 100983)
12. Sodium phosphate dibasic anhydrous (Na2HPO4) (Merck, catalog number: 193609)
13. Ammonium Chloride (NH4Cl) (Merck, catalog number: 193621)
Solutions
1. Nematode growth medium (NGM) plates (see Recipes)
2. B broth (see Recipes)
3. OP50 culture (see Recipes)
4. 5% agarose solution (see Recipes)
5. M9 buffer (see Recipes)
Recipes
1. Nematode growth medium (NGM) plates
For preparation of 1 L of media, add 3 g of NaCl, 2.5 g of peptone, and 20 g of agar to 700 mL of MilliQ water; then, bring up the volume to 1,000 mL. Autoclave the media, let it cool down to 55 °C, and add the following solutions after filter sterilization using a 0.22 μm filter: 1 mL of cholesterol (10 mg/mL prepared in absolute ethanol), 1 mL of 1 M CaCl2, 1 mL of 1 M MgSO4.7H2O, and 25 mL of 1 M KH2PO4 under sterile conditions. Mix well and pour media into 60 mm Petri plates with 10 mL of media per plate. Keep at room temperature for 24 h and then store at 4 °C for later use.
2. B broth
Add 0.5 g of tryptone and 0.25 g of NaCl to 50 mL of MilliQ water. Autoclave and store it at 4 °C.
3. OP50 culture and seeded NGM plates
Thaw the OP50 bacteria from its glycerol stock by streaking it onto an NGM plate. Incubate this plate at 37 °C for 12 h. Using a sterile tip, pick one colony of OP50 bacteria from the freshly streaked plate and place it into autoclaved B broth. Incubate it overnight at 37 °C. Use this liquid culture for seeding the NGM plates for worm growth and maintenance. Parafilm the freshly streaked plate of OP50 and the liquid culture in B broth and store in a 4 °C refrigerator. This liquid culture can be used for up to 2 weeks.
From the cultured media, pour around 5 mL in a sterile 60 mm plate. Take a sterile glass L-shaped rod, dip in the culture of OP50 in the 60 mm plate, and use this L rod to spread the culture in a square patch on the sterile NGM plate. Sterilize the L rod over a flame in between spreading on multiple plates. Incubate these plates at 37 °C for 10–12 h so that a thin square-shaped patch of OP50 bacteria grows. These plates are used for regular worm maintenance.
To create a uniform lawn for behavioral experiments, pour around 100 μL of cultured OP50 on the sterile NGM plates and spread the culture onto the plate by swirling the Petri plate. Do not put the lids on until the culture has dried completely. Incubate these plates at 37 °C for 10–12 h so that a uniform circular lawn appears on the plates. These seeded plates can be stored at 15 °C for a week.
4. 5% agarose solution
Weigh 0.15 g of agarose in a test tube. Add 3 mL of 1× M9 buffer to it. Hold the test tube with the test tube holder and heat it up on a Bunsen burner or spirit lamp until the solution boils. Keep that test tube in the heating block set to 60 °C for 5 min to remove bubbles. When bubbles in the solution are cleared up, use it for making slides. Keep that test tube in the heating block until the experiment is done.
Note: Make sure to use a solution clear of bubbles as they may hinder imaging. Make fresh agarose solution every time imaging or injury experiments are to be conducted.
5. M9 buffer
For preparing 5× M9 buffer, add the following salts to make their final concentration as mentioned: 0.1 M KH2PO4, 0.2 M Na2HPO4, 0.04 M NaCl, and 0.1 M NH4Cl. Mix the salts (heat to 60–65 °C if needed). Autoclave the solution and store it at room temperature. Dilute the solution to 1× using MilliQ water for agarose preparation.
Laboratory supplies
1. Test tube, 5 mL (Praveen Scientific Corporation, catalog number: 40487)
2. Tips [Tarsons, catalog numbers: 521000 (10 μL), 521010 (200 μL), 521016 (1,000 μL)]
3. Filter tips, 200 μL (Tarsons, catalog number: 527104)
4. Micropipette [Gilson, catalog numbers: F144054M (P2), F144056M (P20), F144058M (P200), F144059M (P1000)]
5. Disposable sterile Petri dishes, 60 mm (Praveen Scientific Corporation, catalog number: 20440)
6. Glass slides (Blue Star, PIC 1.75 mm long × 25 mm wide, 1.35 mm thick)
7. Coverslips (Blue star, 0.13 mm thick, 18 mm square)
8. Thin glass capillary (World Precision Instruments, catalog number: TW150-6)
9. Rubber tube (7 mm outer diameter, 4 mm inner diameter)
10. Butterfly scalp vein set (HMD, 22G × 19 mm)
11. Erlenmeyer flask (Borosil Scientific)
12. Measuring cylinder (Borosil Scientific)
13. Pasteur pipette (VWR, catalog number: 612-1798)
14. Spatula
15. Rubber bulb
16. Permanent marker
17. Worm pick of platinum wire with 99.99% purity of 0.15 mm diameter for the harsh-touch stimuli and 0.3 mm diameter for regular worm picking
Equipment
1. Weighing balance [Sartorius, model: BSA224S-CW, 220 g(max), d-0.1 mg]
2. Laminar flow hood (Atlantis)
3. Luer connector (isolated from the butterfly scalp vein set)
4. Stereomicroscope (Nikon, model: SMZ745, zoom 5× max)
5. Leica stereomicroscope with attached camera for taking videos and still images of the worms over the NGM plate (Leica, model: M165FC), zoom 12× max, attached camera (Leica, model: MC120HD), resolution 2.5 megapixels (1,216 × 912), pixel size 3.34 μm, field of view 15 mm × 15 mm required for harsh touch videos
6. Two-photon microscope (Bruker ULTIMA multiphoton microscopy system) coupled with two spectra-physics, tunable infra-red femtosecond lasers (λ = 690–1,040 nm) having automated dispersion compensation (MaiTai with DeepSee), Conoptics Pockel cells with microseconds temporal resolution to control the output of the laser, two independent X-Y scan galvanometer mirrors for simultaneous imaging and cutting (6 mm scan galvanometer for imaging, 3 mm scan galvanometer for cutting). Imaging laser set at 920 nm with 50 fps (frames per second) pulse width, cutting laser set at 720 nm with 80 fps pulse width, irradiation time 20–30 ms, laser power 23 mW, lateral point spread function (PSF) ~400 nm, Z axis PSF ~1.5 μm, 60× Olympus water immersion objective (60×, 0.9 NAP). The IR femtosecond lasers can be switched on from MaiTai SpectraPhysics software (Figure 1E) or from the Prairie View software itself. The resting wavelength at which the lasers are switched on or off is 820 nm. Pockel-1 is used as a controller for primary laser power (used for imaging) (Figure 1E), which is present in the main home tab of Prairie View software. The output signal is detected by the photomultiplier tube (PMT) detector unit (green and red). The cutting laser is controlled by Pockel-2 (Figure 1E). The cutting laser controls reside in the electrophysiology tab in Prairie View software, where the power of the cutting laser and pulse duration can be tweaked
7. Confocal microscope (60×/1.4 NA oil objective of Nikon A1R confocal system for GFP imaging: 488 nm laser; for RFP imaging: 543 nm laser; intensity 4.0 and gain 48.3; pinhole set 1.0 AU; using AX galvanometer scanner with up to 8,192 × 8,192 pixels, 10 fps speed, 512 × 512 resolution image acquisition, dwell time 2 ms, averaging 2 frames, frame time 7.0 s, FITC scan mode, NPARC detector unit for imaging, Z-stack image acquisition at range of 25 μm, slice thickness 1 μm)
8. Worm incubator at 20 °C
9. Bacterial incubator at 37 °C
10. Worm pick platinum wire
11. Eyelash pick
12. Heating block kept at 60 °C (Neolab, model: TC544)
Software and datasets
1. Leica microscope software LAS V4.12
2. Prairie View software for two-photon microscope v5.4
3. MaiTai Spectra-Physics software
4. Nikon imaging software (NIS) Elements-C (imaging software)
5. ImageJ FIJI (analysis software)
6. GraphPad Prism v10.2.3
Procedure
文章信息
稿件历史记录
提交日期: Nov 28, 2024
接收日期: Mar 12, 2025
在线发布日期: Mar 26, 2025
出版日期: Apr 20, 2025
版权信息
© 2025 The Author(s); This is an open access article under the CC BY-NC license (https://creativecommons.org/licenses/by-nc/4.0/).
如何引用
Readers should cite both the Bio-protocol article and the original research article where this protocol was used:
- Brar, H. K., Bassi, D. and Ghosh-Roy, A. (2025). Analysis and Quantification of Functional Regeneration of Dendrite and Axon of PVD Neuron After Laser Injury in Caenorhabditis elegans. Bio-protocol 15(8): e5280. DOI: 10.21769/BioProtoc.5280.
- Brar, H. K., Dey, S., Singh, P., Pande, D. and Ghosh-Roy, A. (2024). Functional Recovery Associated with Dendrite Regeneration in PVD Neuron of Caenorhabditis elegans. eNeuro. 11(5): ENEURO.0292–23.2024. https://doi.org/10.1523/eneuro.0292-23.2024
分类
神经科学 > 神经解剖学和神经环路 > 荧光成像
细胞生物学 > 细胞成像 > 双光子显微镜
您对这篇实验方法有问题吗?
在此处发布您的问题,我们将邀请本文作者来回答。同时,我们会将您的问题发布到Bio-protocol Exchange,以便寻求社区成员的帮助。