

Negative Staining Transmission Electron Microscopy of HIV Viral Particles Permeabilized with PFO and Capsid Stabilized with IP6
应用透射电子显微镜负染技术观察 PFO 透化的和 IP6 稳定衣壳的 HIV 病毒颗粒
发布: 2022年10月20日第12卷第20期 DOI: 10.21769/BioProtoc.4536 浏览次数: 2326
评审: Kristin L. ShinglerMaria L CagigasSvetlana Kurilova

参见作者原研究论文
The authors used this protocol in:

Jun 2018


Abstract
The human immunodeficiency virus 1 (HIV-1) consists of a viral membrane surrounding the conical capsid. The capsid is a protein container assembled from approximately 1,500 copies of the viral capsid protein (CA), functioning as a reaction and transport chamber for the viral genome after cell entry. Transmission electron microscopy (TEM) is a widely used technique for characterizing the ultrastructure of isolated viral capsids after removal of the viral membrane, which otherwise hinders negative staining of structures inside the viral particle for TEM. Here, we provide a protocol to permeabilize the membrane of HIV-1 particles using a pore-forming toxin for negative staining of capsids, which are stabilized with inositol hexakisphosphate to prevent premature capsid disassembly. This approach revealed the pleomorphic nature of capsids with a partially intact membrane surrounding them. The permeabilization strategy using pore-forming toxins can be readily applied to visualize the internal architecture of other enveloped viruses using TEM.
Graphical abstract:

Background
The human immunodeficiency virus 1 (HIV-1) enters target cells by membrane fusion and releases the viral capsid containing HIV genomic RNA and associated proteins to the cytoplasm. The capsid is a conical protein container consisting of approximately 1,500 copies of the viral capsid protein (CA) that assemble into a closed lattice of hexamers and pentamers. This lattice is stabilized by the cellular metabolite inositol hexakisphosphate (IP6) that binds to a highly conserved ring of arginine residues in the center of CA hexamers. The disassembly of the HIV-1 capsid, also known as uncoating, needs to occur at the right place and time for a productive infection to occur.
To study the properties of the HIV capsid and its interactions without the need for low-yielding capsid isolation procedures, we have recently developed a method for permeabilizing the membrane of HIV particles with perfringolysin O (PFO). This cholesterol-dependent cytolysin assembles into ring-shaped oligomers on cholesterol-containing membranes, to form large transmembrane pores with a diameter of approximately 30–40 nm (Dang et al., 2005). These pores serve as windows that allow the passage of proteins in and out of the viral particle, facilitating real-time imaging of the interactions between the capsid and host proteins and of capsid uncoating, by single-molecule fluorescence microscopy. The same approach has also been used for visualizing the capsid by negative staining transmission electron microscopy (TEM) and by cryogenic electron microscopy. Here, we describe the protocol for permeabilizing HIV-1 particles with PFO, followed by negative staining TEM. Our images reveal that PFO forms rings on the membrane of these particles containing IP6-stabilized capsids.
The HIV-1 particles used in this protocol lack the viral envelope protein and are non-infectious. Alternatively, virus-like particles prepared using lentiviral packaging plasmids could be used. Permeabilization can be achieved using other pore-forming proteins in place of PFO (e.g., streptolysin O, which is commercially available).
Materials and Reagents
HIV-1 particle preparation
T25 cell culture flask (Corning, catalog number: 430639, or equivalent)
Microwell plates (Cytiva, catalog number: 28403943)
10 cm2 culture dishes (BD Biosciences, catalog number: 353803)
Greiner SensoplateTM poly-L-lysine-coated glass bottom (175 μm thickness) 96-well plates (Sigma, catalog number: M4187)
HEK-293T cells (ATCC, catalog number: CRL-3216)
Dulbecco’s modified eagle medium (DMEM) (Life Technologies, Invitrogen, catalog number: 11965-092)
Fetal bovine serum (FBS) (Sigma-Aldrich, catalog number: F2442-500ML)
1× PBS (Gibco, catalog number: 10010031)
1× trypsin–EDTA (Gibco, catalog number: 15400054)
Plasmid, psPAX2 (NIH AIDS Reagent Program, catalog number: 11348)
Plasmid, pNL4.3-iGFP-∆Env (Hübner et al., 2007; Aggarwal et al., 2012)
Polyethylenimine (PEI Max) reagent (Polysciences, catalog number: 9002-98-6)
Sodium chloride solution 0.9% w/v (Sigma-Aldrich, catalog number: S8776)
HEPES (Sigma-Aldrich, catalog number: H3375-250G)
NaCl (Chem Supply, catalog number: SA046-5KG)
Absolute ethanol (Chem Supply, catalog number: EA043-500M) to prepare storage solution for the column
Negative staining
Carbon Type B electron microscope grid (Ted Pella, catalog number: 01811)
Corning Cell-Tak cell tissue adhesive (Corning, catalog number: 354240)
Amicon concentrator Ultra-4, 3K MWCO (Millipore, catalog number: UFC800324)
1 M NaOH (Chem Supply, catalog number: SA178-5KG)
0.1 M sodium bicarbonate (Chem Supply, catalog number: SA001-500G)
Uranyl formate 1% (Electron Microscopy Science, catalog number: 22450) or uranyl acetate 1% w/v (BDH Chemicals Ltd, catalog number: 10288) supplied by UNSW Electron Microscope Facility
Phytic acid sodium salt hydrate, also known as inositol-6-phosphate (IP6) (Sigma Aldrich, catalog number: P8810-10G)
Perfringolysin O (PFO, 20 µM in HBS) supplied by lab of Michael W. Parker
Whatman filter paper (Whatman, catalog number: 1440-090) cut into pizza slices
Bacterial petri dish (Bio-strategy, catalog number: BDAA351029)
Parafilm (Labtek, catalog number: 155448)
EM grid box (e.g., reuse the boxes from Ted Pella, catalog number: 01811)
General
1.5 mL microcentrifuge tubes (Interpath, catalog number: 616201, or equivalent)
Milli-Q Water (from Millipore Milli-Q Integral 5 water purification system, or equivalent)
0.22 µm syringe filters (Merck, catalog number: SLGP033RS)
Pipettes (Eppendorf Research series, or equivalent)
Refrigerated tabletop centrifuge (Beckman Coulter, model: X-15R, or equivalent) equipped with an SX4750 swinging-bucket rotor for concentrating viral particles
Tabletop centrifuge (Eppendorf Centrifuge, model: 5417R, or equivalent)
Pipette tips (Edwards, catalog numbers: 1036-260-000, 1032-260-000, 1045-960-008)
Water bath (PolyScience, or equivalent)
Medium
Cell culture media (see Recipes)
HEPES buffered saline, pH 7.5 (HBS, see Recipes)
Equipment
HIV-1 particle preparation
10 mL super loop (GE Healthcare, catalog number: 18-1113-81)
Tissue culture incubator, humidity-, temperature-, and CO2-regulated (Thermo Fisher Scientific, model: 3110, or equivalent)
Biosafety cabinet (Thermo Fisher Scientific, model: 1323TS, or equivalent)
HiPrep 16/60 Sephacryl S-500 HR column (GE Healthcare, catalog number: 28-9356-06)
Fast protein liquid chromatography (FPLC) system including injector, one pump, UV-detector, and fraction collector (GE Healthcare, ÄKTA pure, or equivalent)
Neubauer cell counter (Blaubrand, or equivalent)
4 °C refrigerator
-20 °C freezer
-80 °C freezer
Negative electron microscopy staining and imaging
Pelco easiGlow 91000 Discharge Cleaning System or equivalent plasma cleaner
Pelco easiGlow TEM grid holder blocks (ProSciTech, PEL16820-81)
TEM grid holder block (Pelco, PEL16820-81)
Reverse action electron microscope grid tweezers (Electron Microscope Sciences Style 3X) or similar
Water bath set at 37 °C with floaties
FEI Tecnai G2 20 TEM operating at 200 kV
Procedure
Part I: HIV-1 viral particle preparation
Note: This protocol is reproduced from Márquez et al. (2019).
Producing HIV-1 viral particles (2.5 days)
Note: The combination of plasmids used in this protocol results in the production of viral particles that lack envelope proteins and are non-infectious. Procedures should be done in accordance with local biosafety regulations for producing virus-like particles. All the following steps are performed in a biosafety cabinet.
Culture HEK-293T cells as follows:
Thaw a vial of HEK-293T cells by gently agitating in a 37 °C water bath for 2 min or until completely thawed.
Remove the vial from the water bath, decontaminate the tube by spraying with 70% ethanol, and transfer the vial to the interior of a biosafety cabinet to work in aseptic conditions.
Transfer the thawed cells to a centrifuge tube containing 9 mL of cell culture media (see Recipes).
Spin at 125 × g for 10 min and remove the supernatant.
Resuspend the cell pellet with 5 mL of culture media and transfer to a T25 cell culture flask.
Incubate the cells at 37 °C and 5% CO2 in the tissue culture incubator.
Passage the cells when confluency reaches approximately 80%–90% by performing a dilution of 1:10 per passage. This should be done every two to three days.
Note: Do not exceed 20 passages.
In a 15 mL conical tube, prepare DNA solution for transfection by mixing 6.6 μg of pNL4.3-iGFP-∆Env plasmid, 3.3 μg of psPAX2 plasmid, and 60 μL of 1 mg/mL PEI Max solution in a final volume of 500 μL of 0.9% (w/v) sodium chloride. Incubate the mixture for 30 min at room temperature to allow formation of DNA/PEI complexes.
Split the HEK-293T cell culture as follows:
Heat 1× PBS, 1× trypsin–EDTA, and culture media to 37 °C.
Remove the culture media and wash the cell monolayer with 1× PBS. Add 1× trypsin–EDTA (typically 1 mL for a T25 cell culture flask) and incubate for 5 min at 37 °C.
Stop the trypsin digestion by adding new culture media and transfer the cell suspension to a 15 mL conical tube.
Take a sample to count cells using the Neubauer cell counter and determine the total number of cells in the tube. Centrifuge the cell suspension at 300 × g for 5 min at room temperature to pellet the cells and discard the supernatant. Resuspend the cells in the appropriate volume of fresh culture media to obtain a concentration of 7 × 10⁶ cells/mL.
Gently add 1 mL of cell suspension to the DNA/PEI mix and incubate for 5 min at room temperature.
Plate the cells/DNA/PEI mixture drop by drop in a 10 cm2 culture dish containing 6.5 mL of culture media. Slightly shake the dish to distribute the cells homogeneously. Incubate at 37 °C and 5% CO2 for 48 h.
Collect the virus-containing supernatant in a 15 mL conical tube and centrifuge at 2,100 × g for 10 min at 4 °C to remove cellular debris.
Collect the supernatant and transfer to a new conical tube. The final volume of the cleared virus-containing medium should be approximately 7 mL.
Notes:
Handling of viral particles must always be done wearing gloves and appropriate personal protective equipment, which should be discarded according to local biosafety regulations.
To verify the presence of fluorescent HIV particles in the supernatant, dilute the supernatant 1 in 100 in PBS and then spinoculate 200 μL of the virus preparation onto a poly-L-lysine-coated glass bottom plate well at 1,200 × g and 4 °C for 60 min. Inspect for fluorescent dots with a 60× objective in a fluorescence microscope. The number of viral particles per surface area can be determined by counting the number of fluorescent dots in at least four fields of view. The particle concentration can then be obtained by multiplying the number of particles per surface area by the surface area of the well (to obtain the number of particles per well) and then dividing this number by the volume of supernatant added to the well (0.2 mL).
Purifying the HIV-1 viral particles by size exclusion chromatography (1 day)
Connect a HiPrep 16/60 Sephacryl S-500 HR size exclusion chromatography column to the FPLC system. All solutions used for FPLC should be passed through a filtration membrane with 0.2 μm pore size for the removal of particulates and to degas the solutions.
Replace the storage solution (usually 20% ethanol) with 2 column volumes (CV) of purified water and then equilibrate the column with 2 CV of HBS pH 7.5. Monitor the absorption at 280 nm. Flow rate: 1 mL/min.
Note: This step should be started the day before collecting the viral particles, as it takes approximately 8 h for the column to be equilibrated.
Load the viral particles (approximately 6.5 mL) onto the column using a 10 mL super loop. Monitor the absorption at 280 nm. Flow rate: 0.5 mL/min.
Elute the sample with HBS pH 7.5 and collect 1 mL fractions until a total of 1.5 CV is reached (approximately 6 h). A representative elution profile is shown in Figure 1.
Combine the fractions corresponding to the first small peak that contains the viral particles (typically around fractions 34–39 or C10–D3 on a microwell plate, see Figure 1).
Purified viral particles can be used within seven days if they are stored at 4 °C. Alternatively, make 200–500 μL aliquots and store at -80 °C (no flash freezing in liquid nitrogen needed). Frozen samples can be thawed on ice before use.
Wash the column with 2 CV of purified water and then 2 CV of storage solution.
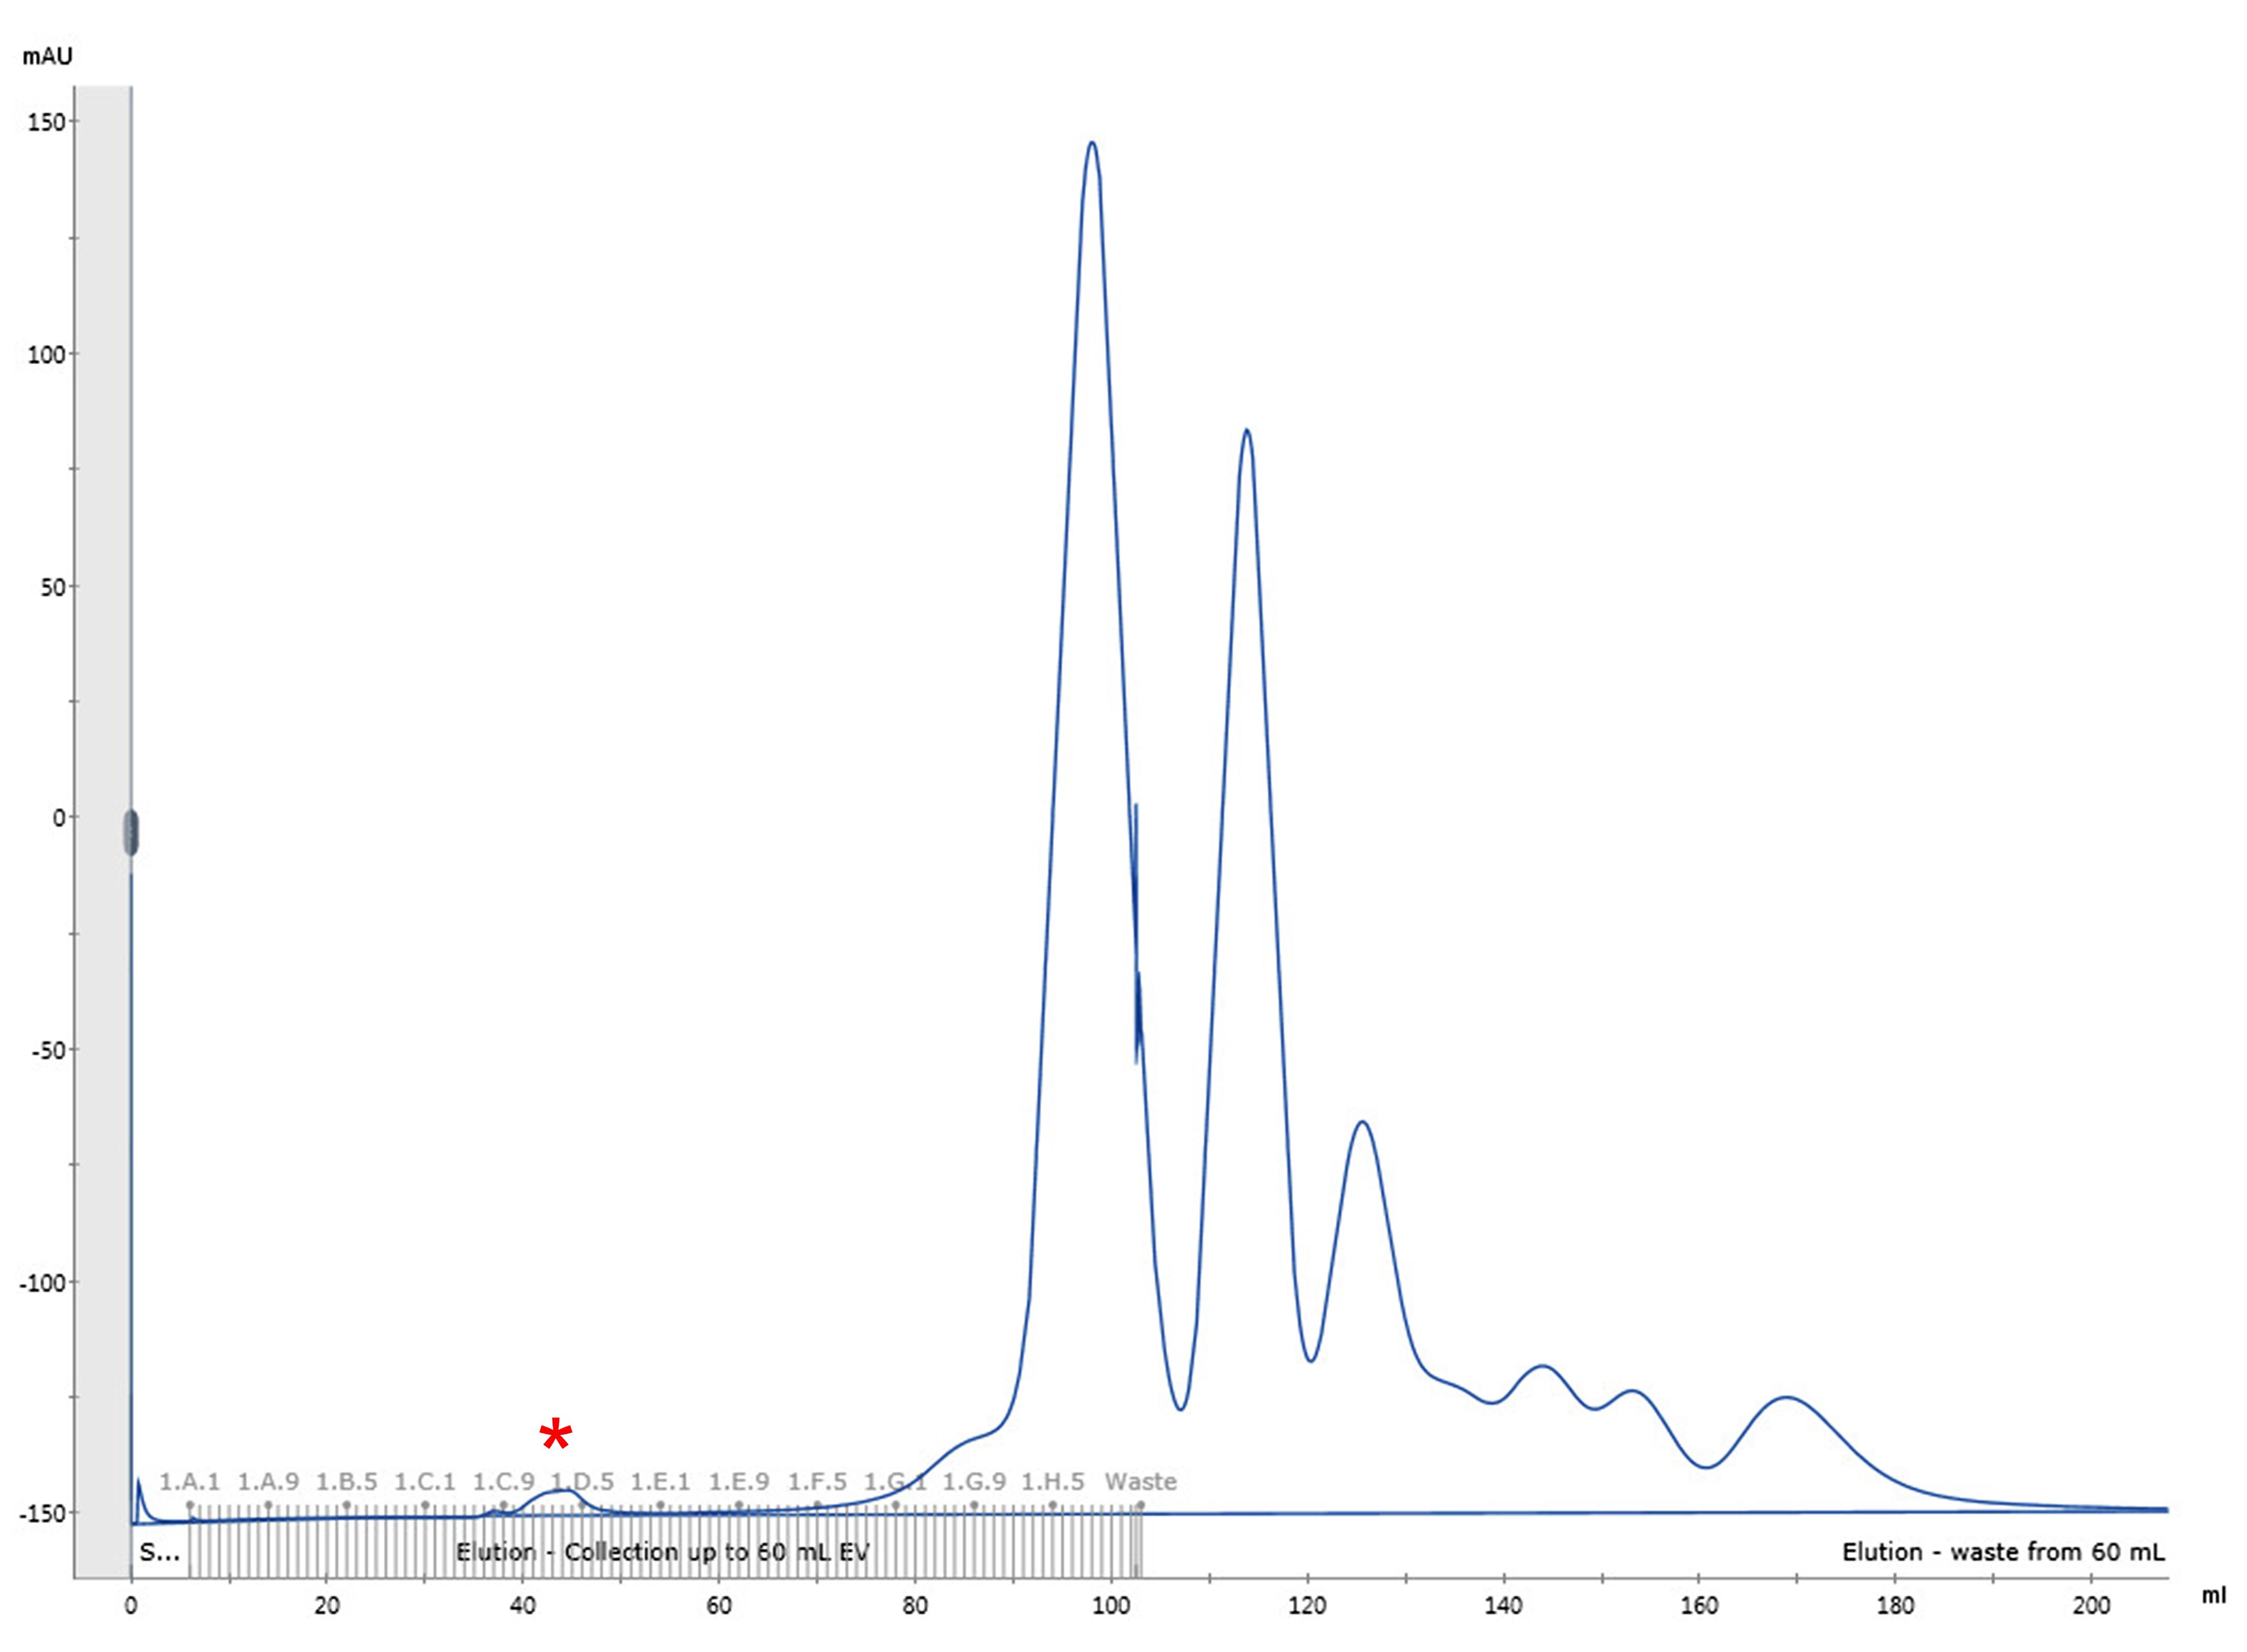
Figure 1. Representative elution profile of HIV-1 viral particles by size exclusion chromatography. Chromatographic separation of HIV-1 viral particles from culture media proteins. The first small peak (fractions C10–D3, marked with a red asterisk) corresponds to the HIV-1 viral particles. Reproduced from Márquez et al. (2019).
Part II: Negative staining of viral particles stabilized with IP6
Preparing reagents for negative staining (1 h)
Thaw viral particles and concentrate the particles 40–60-fold using the Amicon concentrator Ultra-4 at 4,000 × g and 4 °C, at 10 min per spin (Figure 2A1). Resuspend after each cycle to prevent clumping until the final volume is achieved.
Note: For example, the pooled SEC fractions C10–D3 (approximately 9.5 mL) in Figure 1 were concentrated to a final volume of 160 μL.
Thaw a solution of uranyl formate (1% w/v in water) and centrifuge at 18,000 × g and room temperature for 30 min to remove the precipitate. Transfer the supernatant to a clean Eppendorf tube wrapped in aluminum foil to protect uranyl formate from light (Figure 2A2).
Note: Uranyl formate can be replaced by uranyl acetate.
Prepare the Corning Cell-Tak cell tissue adhesive solution (100 μL) by mixing 3.34 μL of 1.5 mg/mL of Cell-Tak tissue adhesive, 93 μL of 0.1 M sodium bicarbonate, and 1.73 μL of 1 M NaOH (Figure 2A3).
Dilute perfringolysin O in HBS to a final concentration of 20 µM and keep at room temperature.
Passivating the electron microscope (EM) grid with Cell-Tak (0.5 h)
Pick up a Carbon Type B electron microscope grid with reverse action tweezers and place them onto the Pelco easiGlow TEM grid holder block with the carbon (dark) side facing up.
Insert the grid holder block into the Pelco easiGlow 91000 Discharge Cleaning System and glow discharge the grid on AUTO setting.
Apply 5 μL of the Cell-Tak adhesive solution to a glow-discharged EM grid on the carbon (dark) side of the grid and invert the grid on a layer of parafilm so that the grid floats upside down. Alternatively, a drop of Cell-Tak solution can be placed onto parafilm followed by inverting the grid onto the drop for incubation.
Incubate the Cell-Tak on the EM grid for 5 min (Figure 2B).
Negative staining of viral particles (0.5 h)
Prepare viral particle solution by mixing 9.5 μL of concentrated viral particles, 0.25 μL of IP6 (4 mM), and 0.25 μL of PFO (20 µM). The final concentration of PFO is 500 nM and of IP6 is 1 mM. This is sufficient for the preparation of two grids.
Note: The IP6 is prone to precipitation in the presence of divalent cations. If necessary, the IP6 concentration can be lowered to 0.1 mM, or it can be replaced by mellitic acid (hexacarboxybenzene) to stabilize the capsids.
Incubate the viral particle solution in a water bath (37 °C) for 10 min for PFO to form pores on the membrane (Figure 2C1).
Wick dry a Cell-Tak-coated EM grid with a small piece of filter paper.
Apply 5 μL of the incubated viral particle solution to the side coated with Cell-Tak and incubate at room temperature for 1 min (Figure 2C2).
Wick dry the sample using filter paper.
Apply 5 μL of uranyl formate (1%, supernatant, free from aggregates) and wick dry immediately with filter paper (Figure 2C3).
Repeat step 6 twice. Allow the sample to air dry and store at room temperature in a 100 mm bacterial Petri dish lined with a filter paper for 10 min; then, transfer the grid to the EM grid box.
Load sample onto the FEI Tecnai G2 and image at condenser aperture of 3 and objective aperture of 1 or 3, at 19,500× magnification (Figure 2C4).
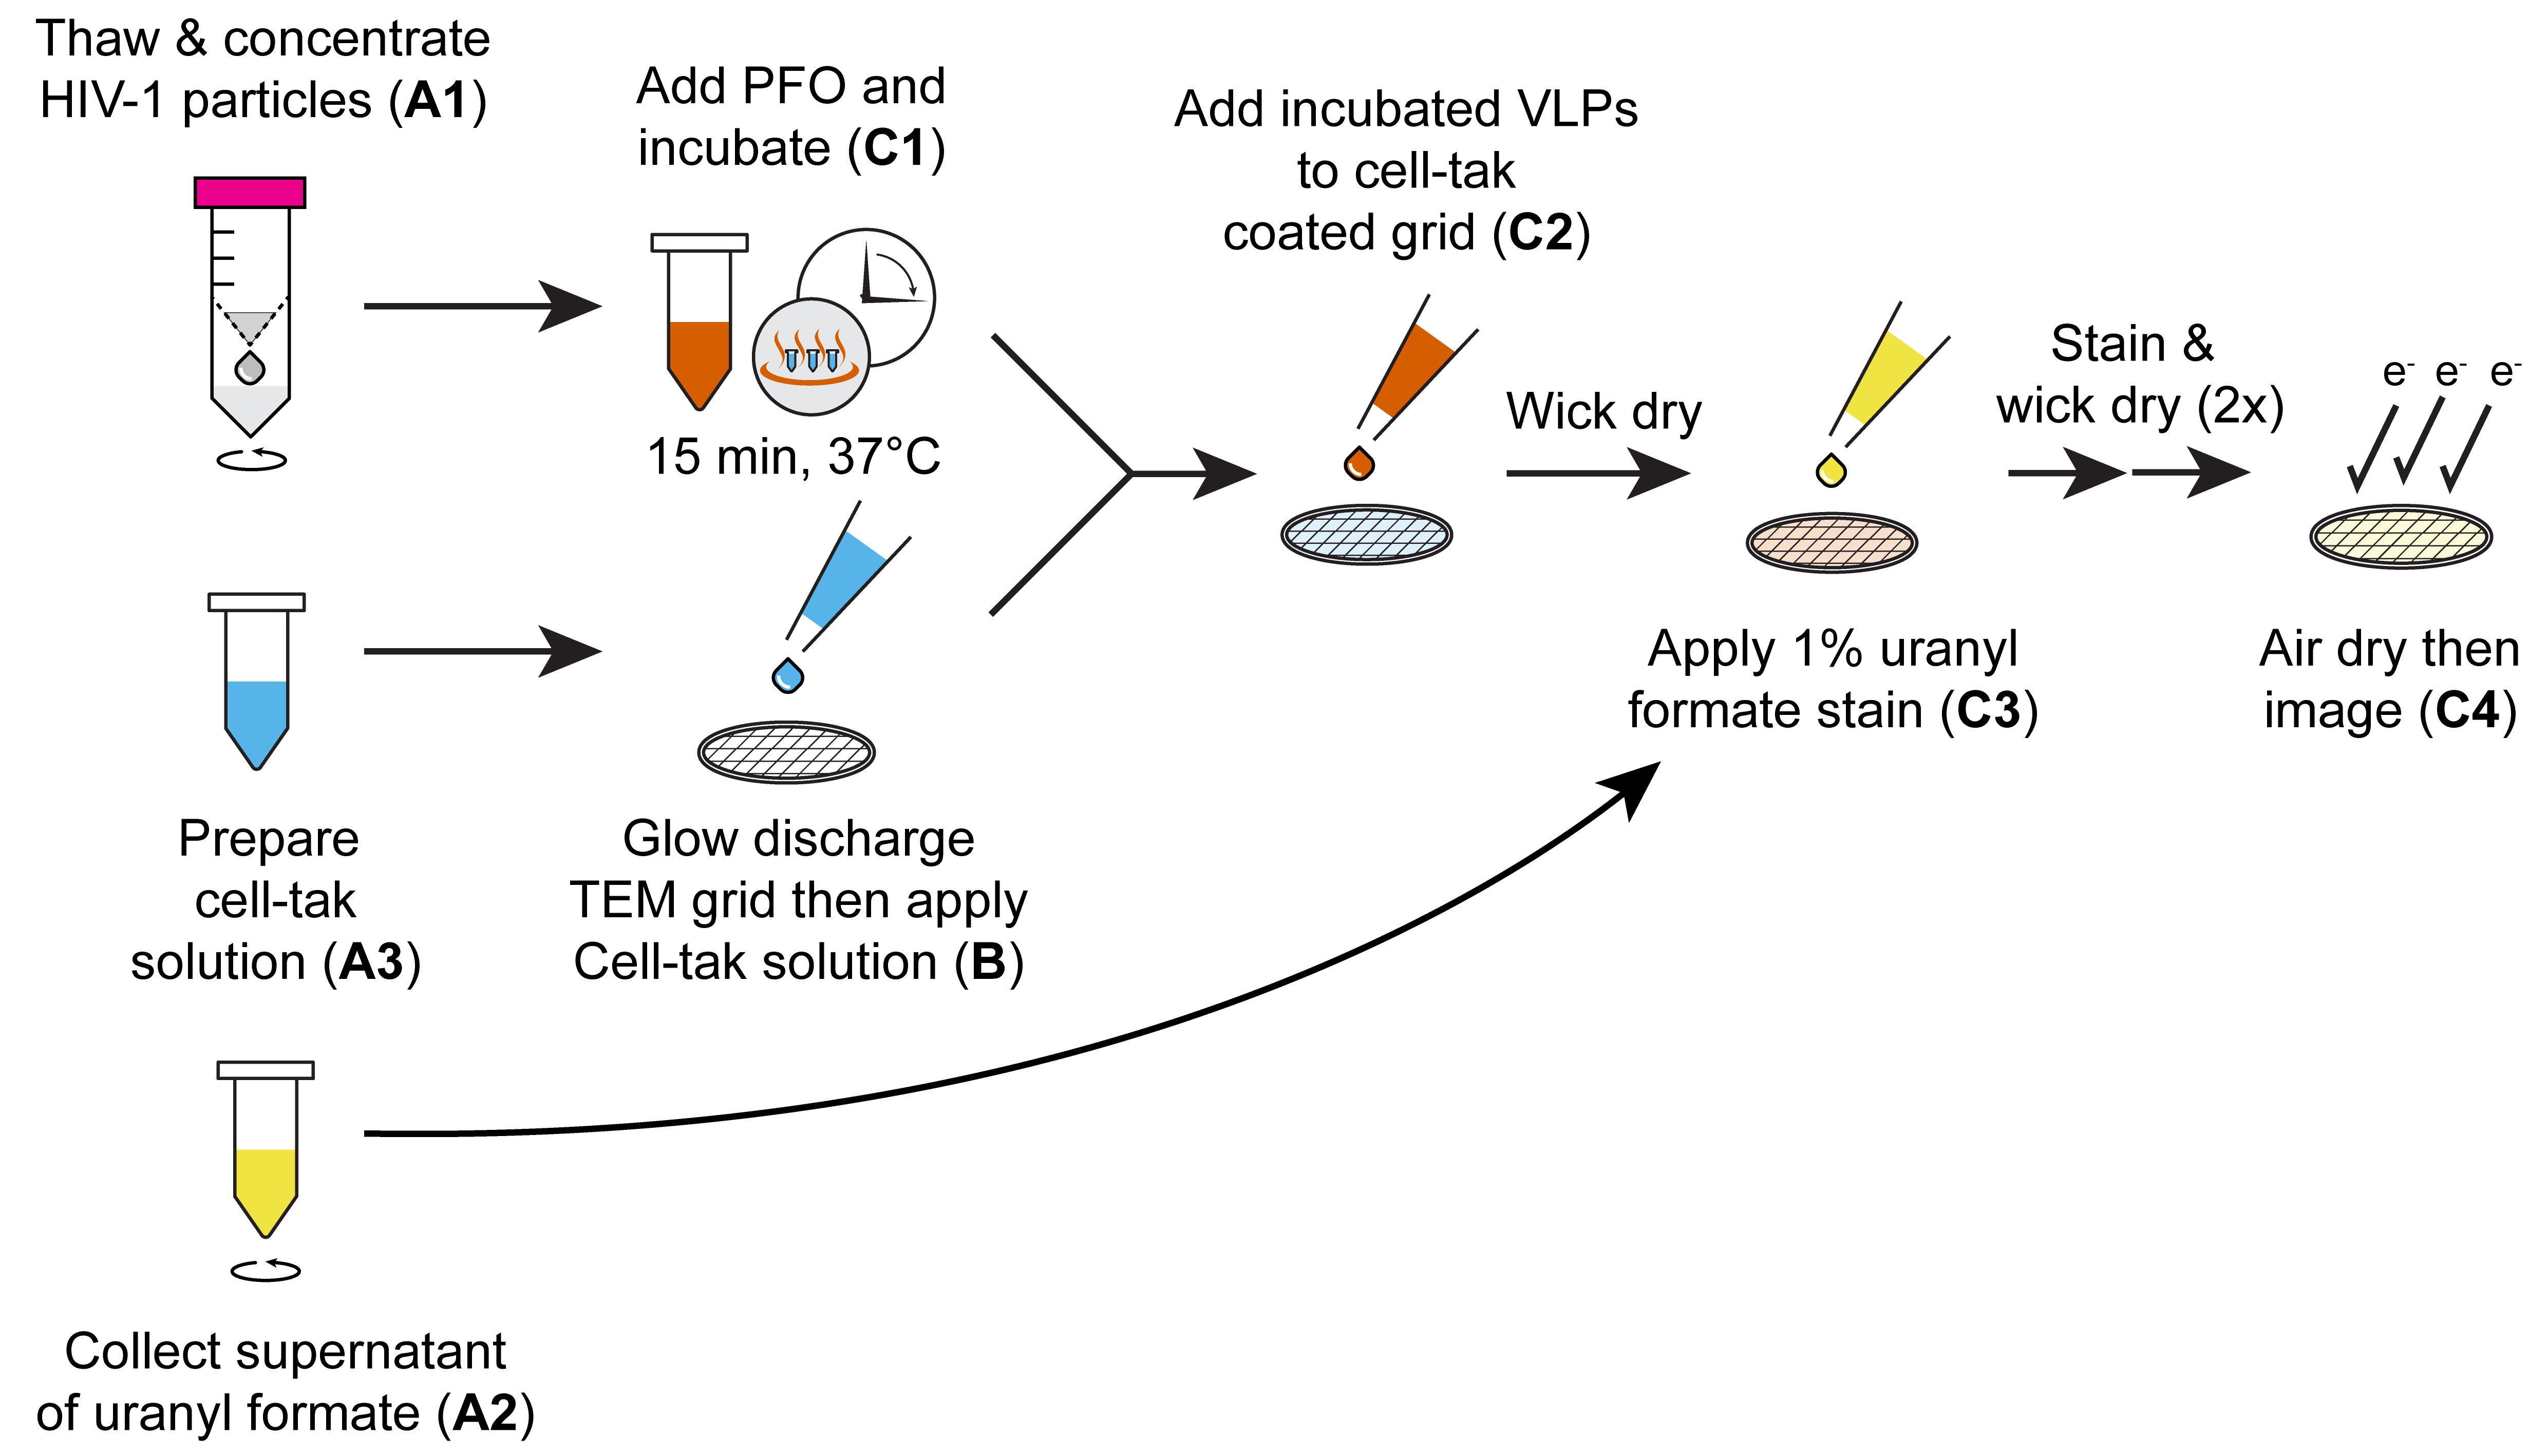
Figure 2. Schematic of the negative staining procedures. (A1) Concentrate HIV-1 particles. (A2) Prepare uranyl formate stain. (A3) Mix and prepare the Cell-Tak solution. (B) Coat the TEM grid with Cell-Tak solution. (C1) Incubate HIV-1 particles with PFO to induce membrane permeabilization. (C2) Apply permeabilized HIV-1 particles to Cell-Tak-coated TEM grid. (C3) Negative staining of the TEM grid with uranyl formate stain. (C4) Air dry and image on the electron microscope.
Data analysis
Quantitative analysis, such as measuring the diameter of particles, length of objects, or distance between two features, can be performed as follows:
Capture all images from the microscope using the same magnification. Include the scale bar in each image if this option is available.
Download and install the Fiji (distribution of ImageJ) image analysis software package (Schneider et al., 2012) from https://imagej.net/software/fiji/downloads.
Open a TEM image in the Fiji application by dragging the corresponding file from your folder to the menu bar (Figure 3A). Alternatively, the image can be opened from the menu bar using File > Open and selecting the file for the TEM image.
Adjust the image contrast using the B & C tool (Figure 3A, available from the menu bar under Adjust > Brightness/Contrast). Use Auto or adjust Minimum and Maximum values by dragging the corresponding sliders, or use the Set button to define minimum and maximum intensity values for the TEM image.
Select the Line Drawing tool (Figure 3A) and drag the mouse cursor while holding the left mouse button to draw a straight line from one end of the scale bar to the other.
Note: Holding the shift key on the keyboard ensures that a horizontal line is drawn.
Set the scale of the image after drawing the straight line by selecting Analyze > Set scale. The Distance in pixels is defined by the straight line that was drawn in the previous step. Enter the distance and unit represented by the scale bar into the text boxes labeled Known distance and Unit of length, respectively (500 nm in the example in Figure 3). Tick the checkbox labeled Global if analyzing multiple images with the same magnification and pixel dimensions to avoid the need to define the scale for every TEM image.
Note: Use the +/- keys on the keyboard to zoom in and out; left click and hold to navigate around the image.
To measure the length of an object in the TEM image, use the Line Drawing tool to draw a straight line along the object. Open the ROI Manager (Analyze > Tools > ROI Manager) and click the Add button to add the particle to the list (Figure 3B). Repeat this step until all features of the image are added. Particles selected for analysis will have a yellow line displayed on the particle. Particle numbers are displayed when the checkboxes labeled Show All and Labels are ticked in the ROI Manager.
Select all the particles in the ROI Manager by clicking one of the particles and pressing Control + A on the keyboard. Press Measure to display the length values for the selected ROI in the panel labeled Results (Figure 3B). Copy and paste these measurements into other software (e.g., Excel, GraphPad Prism, or Origin) for further analysis and to generate histograms. The diameter of the non-permeabilized virus-like particles and the diameter of PFO pores are plotted in Figure 3C–D.
Note: The result panel columns can be customized in Results, and then Set measurements.
In the original paper (Márquez et al., 2018), TEM characterization was used to confirm the presence of intact viral capsids and to determine the diameter of the PFO pores. Before permeabilization, negatively stained viral particles appeared as shiny spheres (Figure 4A-B) with an average diameter of approximately 150 nm, consistent with previous measurements (Briggs et al., 2003). Upon incubation with PFO, viral particles were no longer spherical, and PFO pores with an average diameter of approximately 35 nm (Figure 3D) were observed on the membrane. The pores allowed the entry of uranyl formate into the particle to stain the conical viral capsid. In the presence of IP6, a higher fraction of particles contained a capsid, as expected for the IP6-mediated stabilization of the capsid lattice (Figure 4C–D).
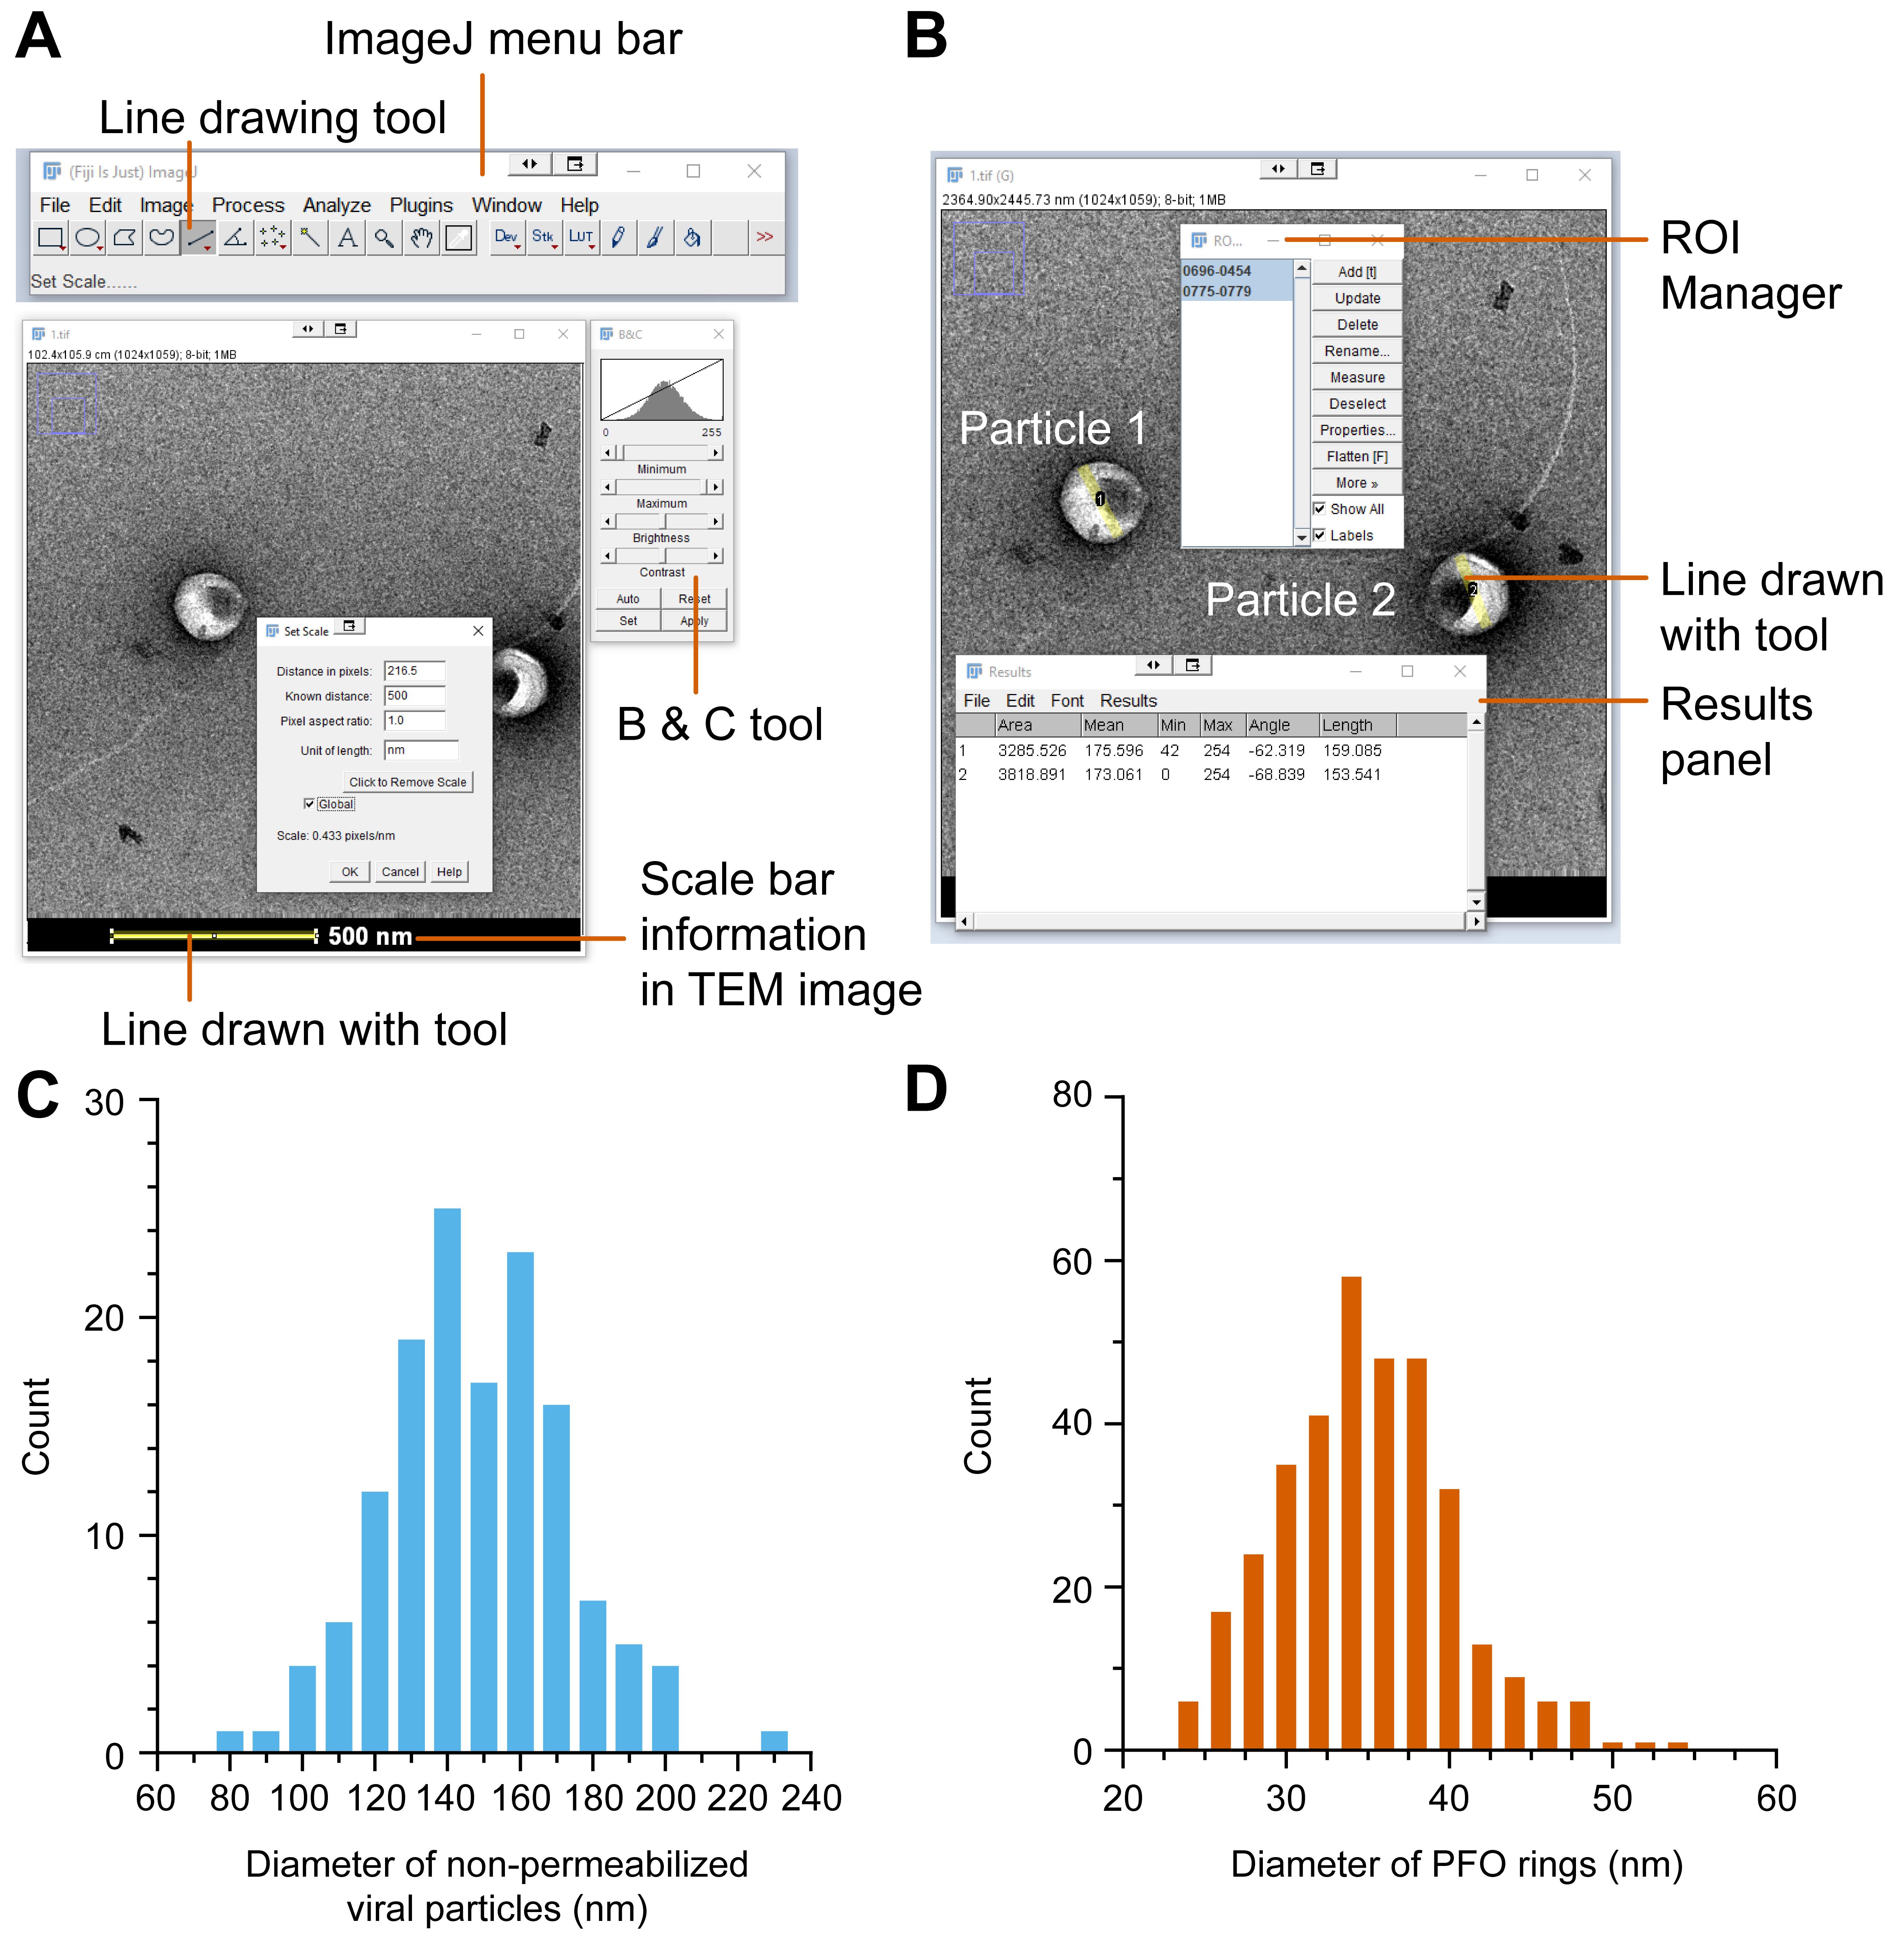
Figure 3. Analysis of virus-like particles in TEM images using Fiji. (A) The contrast of the image can be adjusted using the B & C tool. The straight line drawn along the scale bar with the Line Drawing Tool is used to calibrate the scale of the image. (B) Particle selection using the ROI tool. (C) Diameters of viral-like particles in the absence of PFO [148 ± 25 nm (µ ± SD), N = 141]. (D) Diameters of PFO pores [35.0 ± 5.4 nm (µ ± SD), N = 346] (Márquez et al., 2018).

Figure 4. Representative electron micrographs of negatively stained HIV particles. (A-B) A typical field of view at 19,500× magnification of HIV particles negatively stained in the absence of PFO (A) or treated with PFO and IP6 (B). (C) Selected HIV particles in the absence of PFO. (D) Selected HIV-1 particles following incubation with PFO and IP6. The particles are no longer spherical after treatment with PFO. Ring- and arc-shaped PFO pores are visible on the viral membrane (small arrows). The HIV-1 capsid (long arrow) inside the permeabilized viral particle is stabilized by IP6.
Recipes
Cell culture media
DMEM supplemented with 10% FBS.
HEPES buffered saline pH 7.5
HBS, 50 mM HEPES, pH 7.5, 100 mM NaCl
Weigh out 11.9 g of HEPES.
Weigh out 5.8 g of NaCl.
Dissolve HEPES and NaCl in 800 mL of Milli-Q water with a stir bar in a beaker.
Adjust the pH of the solution to 7.5 using a pH probe (Thermo Fisher Scientific Eutech pH 5+) and a solution of HCl (3 M).
Adjust volume to 1 L with Milli-Q water.
Acknowledgments
We acknowledge Nicholas Ariotti and all technical staff at the UNSW Electron Microscope Facility for the training and maintenance of the FEI G2 Tecnai transmission electron microscope. We thank Sara Lawrence (St. Vincent’s Institute) for the expression and purification of recombinant PFO. This protocol is a detailed version of the original research paper published in Márquez et al. (2018). The authors acknowledge the National Health and Medical Research Council (NHMRC APP110071 and APP1194263), Australian Research Council (ARC DP DP160101874), Australian Centre for HIV and Hepatitis Virology Research, where this work was derived from the original paper.
Competing interests
The corresponding author declares that there were no financial or non-financial competing interests on behalf of all authors. CM and DL received an Australian Government Research Training Program Scholarship.
References
- Aggarwal, A., Iemma, T. L., Shih, I., Newsome, T. P., McAllery, S., Cunningham, A. L. and Turville, S. G. (2012). Mobilization of HIV spread by diaphanous 2 dependent filopodia in infected dendritic cells. PLoS Pathog 8(6): e1002762.
- Briggs, J. A., Wilk, T., Welker, R., Kräusslich, H. G. and Fuller, S. D. (2003). Structural organization of authentic, mature HIV-1 virions and cores.EMBO J 22(7): 1707-1715.
- Dang, T. X., Hotze, E. M., Rouiller, I., Tweten, R. K. and Wilson-Kubalek, E. M. (2005). Prepore to pore transition of a cholesterol-dependent cytolysin visualized by electron microscopy. J Struct Biol 150(1): 100-108.
- Hübner, W., Chen, P., Del Portillo, A., Liu, Y., Gordon, R. E. and Chen, B. K. (2007). Sequence of human immunodeficiency virus type 1 (HIV-1) Gag localization and oligomerization monitored with live confocal imaging of a replication-competent, fluorescently tagged HIV-1. J Virol 81(22): 12596-12607.
- Márquez, C. L., Lau, D., Walsh, J., Faysal, K. M. R., Parker, M. W., Turville, S. G. and Böcking, T. (2019). Fluorescence Microscopy Assay to Measure HIV-1 Capsid Uncoating Kinetics in vitro. Bio-protocol 9(13): e3297.
- Márquez, C. L., Lau, D., Walsh, J., Shah, V., McGuinness, C., Wong, A., Aggarwal, A., Parker, M. W., Jacques, D. A., Turville, S. and Böcking, T. (2018). Kinetics of HIV-1 capsid uncoating revealed by single-molecule analysis. Elife 7: e34772.
- Schneider, C. A., Rasband, W. S. and Eliceiri, K. W. (2012). NIH Image to ImageJ: 25 years of image analysis. Nat Methods 9(7): 671-675.
文章信息
版权信息
![]() Lau et al. This article is distributed under the terms of the Creative Commons Attribution License (CC BY 4.0).
Lau et al. This article is distributed under the terms of the Creative Commons Attribution License (CC BY 4.0).
如何引用
Readers should cite both the Bio-protocol article and the original research article where this protocol was used:
- Lau, D., Márquez, C. L., Parker, M. W. and Böcking, T. (2022). Negative Staining Transmission Electron Microscopy of HIV Viral Particles Permeabilized with PFO and Capsid Stabilized with IP6. Bio-protocol 12(20): e4536. DOI: 10.21769/BioProtoc.4536.
- Márquez, C. L., Lau, D., Walsh, J., Shah, V., McGuinness, C., Wong, A., Aggarwal, A., Parker, M. W., Jacques, D. A., Turville, S. and Böcking, T. (2018). Kinetics of HIV-1 capsid uncoating revealed by single-molecule analysis. Elife 7: e34772.
分类
微生物学 > 微生物生物化学
生物科学 > 生物技术 > 微生物技术
生物物理学 > 显微技术
您对这篇实验方法有问题吗?
在此处发布您的问题,我们将邀请本文作者来回答。同时,我们会将您的问题发布到Bio-protocol Exchange,以便寻求社区成员的帮助。