- Protocols

- Articles and Issues
- For Authors
- About
- Become a Reviewer

K+ Release Assay and K+ Measurement in Oocyte Assay
Published: Vol 10, Iss 21, Nov 5, 2020 DOI: 10.21769/BioProtoc.3802 Views: 4222
Reviewed by: Dheeraj Singh RathoreAnonymous reviewer(s)
Original research article
The authors used this protocol in:
Aug 2017
Advertisement


Protocol Collections
Comprehensive collections of detailed, peer-reviewed protocols focusing on specific topics


Abstract
The Xenopus oocyte is a powerful system for the exogenous expression and functional characterization of plant membrane transport proteins. Until now, a number of potassium transporters and channels have been identified in oocytes expression system by the two-electrode voltage clamp technology. It is difficult to characterize K+/H+ anti-transporters, especially, electroneutral transporter. The K+ efflux assay system enables easy, fast, large-scale measurement of the transporters activity without two-electrode voltage clamp technology. This protocol describes a technique to measure the efflux activity of potassium transporter in oocytes expressing system.
Keywords: Xenopus oocyteBackground
Xenopus oocytes have accumulated stores of enzymes, proteins and organelles, all of which can be exploited to produce large quantities, correctly post-translation modified, correctly destinated foreign protein (Miller and Zhou, 2000). Thus, oocytes offer an effective expression system to functionally characterize plant membrane proteins by using two-electrode voltage clamp technology. The first plant potassium transport proteins expressed in oocytes were K+ channels (Cao et al., 1992). Since then, a majority of potassium channels and transporters have been studied in oocyte (Schachtman et al., 1994; Véry et al., 1994; Wang and Wu, 2013). But some K+/H+ anti-transporters are electroneutral, the two-electrode voltage clamp technology unable to characterize these transporters. To overcome this problem, we have used a new approach to identify the activity of these transporters by measuring the change of potassium content in medium before and after incubation. The intracellular K+ concentration is about 70-150 mM (Weber, 1999). K+ efflux, mediated by expressed K+ transport-proteins, may cause the changes of both intracellular and extracellular K+ concentrations. To test whether a transporter is able to release K+, measure the changes of intracellular and extracellular K+ concentrations. This K+ efflux measurement system is recognized as an effective assay for studying K+ efflux activity of NRT1.5 (Li et al., 2017). This method is easy, fast, convenient measurement of the transporter activity independent on two-electrode voltage clamp. In this protocol, we describe how to measure the K+ transport activity in oocyte.
Materials and Reagents
Pipette tips (Axygen, catalog numbers: T-300, T-200-Y, T-1000-B )
Scalpel blade (GLOBALMED, catalog number: BD001 )
1.5 ml microcentrifuge tubes (Axygen, catalog number: MCT-150-C )
Petri dish (Nunc, catalog number: 150466 )
24-well plate (Nunc, catalog number: 142475 )
Capillary glass (Sutter Instrument Company, catalog number: B100-58-10 )
Parafilm (Bemis, catalog number: PM-996 )
Micropipette tip (SUTTER, catalog number: BF100-50-10 )
3-ml plastic pipettes dropper ( KEHUA, catalog number: KH145 )
0.22 μm Syringe filter (GREEN MALL, catalog number: RSF02 )
Competent E. coli DH5α (TIANGEN, catalog number: CB101-02 )
pT7TS (provided by Xiaorong Fan, Nanjing Agricultural University)
Plasmid Purification Midi Kit (QIAGEN, catalog number: 12143 )
KOD polymerase (TOYOBO, catalog number: KOD-201B )
Agarose (BIOWEST, catalog number: B21033 )
DNA Gel Extraction Kit (AxyGEN, catalog number: AP-GX-250 )
Restriction enzyme Bgl II (Takara Bio, catalog number: 1021A )
Restriction enzyme Spe I (Takara Bio, catalog number: D1086a )
Restriction enzyme BamH I (Takara Bio, catalog number: 1010 )
T4 Ligase (STRATAGENE, catalog number: M0202V )
Plasmid DNA Extraction Mini Kit (Axygen, catalog number: AP-MN-P-250 )
Plasmid purification Midi (QIAGEN, catalog number: 12145 )
AxyPrep DNA Gel Extraction Kit (Axygen, catalog number: AP-GX-250 )
Isopropanol (SCRC, catalog number: 80109218 )
Sodium acetate (Sigma-Aldrich, catalog number: S2889 )
Proteinase K (Sigma-Aldrich, catalog number: P2308 )
Chloroform (SCRC, catalog number: 100068720 )
mMESSAGE mMACHINE® Kit High Yield Capped RNA Transcription Kit (Ambion, catalog number: AM1344 )
Xenopus (sh-maosheng Co.)
Collagenase (Sigma-Aldrich, catalog number: C0130 )
Trypsin inhibitor (Sigma-Aldrich, catalog number: T2011 )
KCl (Sigma-Aldrich, catalog number: P3911 )
NaCl (Sigma-Aldrich, catalog number: S7653 )
MgCl2·6H2O (Sigma-Aldrich, catalog number: M2670 )
HEPES (Sigma-Aldrich, catalog number: PHR1428 )
CaCl2 (Sigma-Aldrich, catalog number: C1016 )
NaHCO3 (Sigma-Aldrich, catalog number: S5761 )
MgSO4·7H2O (Sigma-Aldrich, catalog number: M2773 )
MES (Sigma-Aldrich, catalog number: M3671 )
Streptomycin (Sigma-Aldrich, catalog number: 5711 )
Ampicillin (Sigma-Aldrich, catalog number: A5345 )
Gentamicin sulfate (Sigma-Aldrich, catalog number: G1914 )
Inorganic salt stock solution (see Recipes)
Antibiotic stock solutions (see Recipes)
LB medium (see Recipes)
LB agar (see Recipes)
ND96 solution (Ca2+-free) (see Recipes)
ND96 solution (see Recipes)
MBS solution (see Recipes)
K+-Free MBS solution (see Recipes)
Oocytes isolation solution (see Recipes)
Equipment
Pipettes (Eppendorf, model: Research® plus , 0.5-10 μl, 10-100 μl, 100-1,000 μl)
Centrifuge (Eppendorf, model: Centrifuge 5242R )
Thermal Cycler (Eppendorf, model: Mastercycler® nexus gradient)
Water Bath Shaker (BIOER, model: N1-13S )
Micropipette Puller (Sutter Instrument Company, model: P-2000 )
Microinjection (Harvard Apparatus, model: PLI-100 )
Nano Photometer (Implen, model: P-360 )
pH Meter (Mettler Toledo, model: FE20K )
ICP-AES (Agilent, model: 4100MP-AES )
Dissecting microscope (Olympus, model: SZX16 )
Software
Microsoft Excel (Microsoft)
DNAMAN
Procedure
Construction of pT7TS plasmid
Design primers including specific nucleotides (nt) and appropriate restriction site for cloning into pT7TS vectors. The typically used restriction sites are Bgl II, EcoR V, Spe I.
Note: More information about pT7TS vector is available at the website.
Amplify targets genes by PCR using KOD polymerase. The thermal cycle conditions are as follows: After heating at 95 °C for 5 min; process 35 cycles of 95 °C for 30 s, 55 °C for 30 s, and 68 °C for elongation (1 kb/min).
After electrophoresis, cut the target band from agarose gel with scalpel blade.
Purify the PCR product by AxyPrep DNA Gel Extraction Kit.
Digest the PCR product and pT7TS vector using corresponding restriction enzyme, and then purify the digested PCR product and liner pT7TS by AxyPrep DNA Gel Extraction Kit, following the manufacturer’s instructions.
Clone the digested PCR product into the linear pT7TS using T4 ligase, following the manufacturer’s instructions.
Add the reaction mixture into the competent cells of E. coli. DH5α under sterile conditions, and incubate on ice for 30 min.
Heat shock the cells in water batch at 42 °C for 90 s, immediately incubate on ice for 2 min, and add 1 ml of LB medium.
Incubate the suspension of E. coli. DH5α transformants at 37 °C for 1 h.
Spread 500 μl of the suspension of the transformants onto the LB agar with 50 Ampicillin mg/ml, and then incubate the agar plate at 37 °C overnight.
Verify these clones by PCR with the specific primers. The thermal cycle conditions are as follows: After heating at 95 °C for 5 min; process 35 cycles of 95 °C for 30 s, 55 °C for 30 s, and 72 °C for elongation (1 kb/min); then elongate at 72 °C for 5 min.
After PCR verification, inoculate the candidate clones into 2 ml LB broth with 50 mg/ml Ampicillin in a 10-ml sterile tube at 37 °C with shaking (200 rpm) overnight.
Following manufacturer's guideline, extract the plasmid from the inoculate mixture by Plasmid DNA Extraction Mini Kit.
Digest the plasmid using corresponding restriction enzyme.
Sequence the positive clones for further verification in company (Sangon Biotech).
Plasmid isolation and purification a for In vitro transcription (QANGEN)
Pick a single colony from selective plate and inoculate into 2 ml LB medium with 50 mg/ml ampicillin in a 10-ml sterile tube at 37 °C with shaking (120 rpm) overnight.
Transfer the starter culture and inoculate in 50 ml LB medium with 50 mg/ml ampicillin in a 250 ml sterilized flask, and inoculate at 37 °C with shaking (200 rpm) overnight.
Transfer 50 ml bacterial culture to collect the bacterial cells in centrifuge tube by centrifugation at 6,000 x g for 15 min at 4 °C.
Add 5 ml Buffer P1 into the centrifuge tube, and resuspend completely the bacterial pellet by vortexing.
Add 5 ml Buffer P2, mix thoroughly by vigorously inverting the sealed tube 6 times, and incubate at room temperature for 5 min.
Add 6 ml chilled Buffer P3, mix thoroughly by vigorously inverting the sealed tube 6 times, and incubate on ice for 15 min.
Centrifuge at 12,000 x g for 30 min at 4 °C. Transfer supernatant to a new tube.
Centrifuge the supernatant again at 12,000 x g for 15 min at 4 °C.
Equilibrate a QIAGEN-tip by applying 5 ml Buffer QBT, and allow the column to empty by gravity flow.
Add the supernatant from Step B8 to the QIAGEN-tip and allow it to enter the resin by gravity flow.
Wash the QIAGEN-tip with 2 x 10 ml Buffer QC.
Elute DNA with 5 ml Buffer QF, and collect the elute in 1.5 ml microcentrifuge tubes.
Add 0.7 volumes of isopropanol to precipitate DNA. Mix thoroughly by vigorously inverting the microcentrifuge tube 6 times, and incubate on ice for 10 min.
Centrifuge at 13,000 x g for 30 min in a microcentrifuge. Carefully decant the supernatant.
Wash DNA pellet with 1 ml of 70% ethanol and centrifuge at 12,000 x g for 10 min. Carefully decant the supernatant without disturbing the pellet.
Dry the pellet for 10 min, and resuspend the DNA in 50 μl distilled water.
Determine the yield of DNA by UV spectrophotometry at 260 nm.
Store the plasmid at -20 °C.
Preparation of template for In Vitro transcription
Linearize the template
Note: The restriction enzyme (Pst I, Sal l, Xba l, BamH I, EcoR I and Sac I) could been chose to cut downstream of the insert. Chose the appropriate enzyme, which couldn’t cut the insert sequence.
Prepare the mixture by adding the components to a sterile microcentrifuge tube at room temperature, in the following order:
Double distilled water up to 400 μl 10× K Buffer 40 μl Plasmid 20 μg BamH I 4 μl Centrifuge briefly to collect contents in the bottom of the tube and mix gently, and incubate at 30 °C for 20-24 h.
Add 100 μl H2O, 100 μl sodium acetate (3 M), and 600 μl isopropanol to the mixture from step b, mix completely and incubate at -20 °C for 30 min.
Centrifuge at 4 °C for 30 min (13,000 x g) in a microcentrifuge. Carefully decant the supernatant.
Wash DNA template with 700 μl of 70% ethanol and centrifuge at 12,000 x g for 10 min at 4 °C. Carefully decant the supernatant without disturbing the pellet.
Open the tube cap and dry the template for 10 min, and dissolve the DNA with 100 μl distilled water.
Determine the yield of DNA by UV spectrophotometry at 260 nm.
Digest RNase
Add 200 μl Proteinase K to the template, mix gently, and incubate in 37 °C for 30 min.
Add 400 μl RNase-free H2O, 600 μl chloroform, and mix completely and incubate in room temperature for 10 min.
Centrifuge at 4 °C for 30 min (12,000 x g) in a microcentrifuge.
Carefully transfer the supernatant into new RNase-free microcentrifuge tube.
Add 100 μl sodium acetate (3 M) and 600 μl isopropanol to the tube, mix completely and incubate at -20 °C for 30 min.
Centrifuge at 4 °C for 30 min (12,000 x g) in a microcentrifuge. Carefully decant the supernatant.
Wash linear DNA pellet with 700 μl of 70% ethanol and centrifuge at 12,000 x g for 10 min at 4 °C. Carefully decant the supernatant without disturbing the pellet.
Dry the linear DNA pellet for 10 min, and dissolve the DNA with 8 μl RNase-free water.
Determine the concentration of linear DNA by UV spectrophotometry at 260 nm.
In Vitro transcription
Prepare the transcription mixture by adding the components to a RNase-free microcentrifuge tube, in the following order:
Nuclease-free water add to 20 μl linear template DNA 1 μg 2× NTP/CAP 10 μl 10× reaction buffer 2 μl RNA polymerase Enzyme Mix 2 μl Mix gently, and incubate at 37 °C for 2 h.
Electrophoresis 0.5 μl to test whether the transcript is expected length.
Add 1 μl TuBRO DNase, mix gently and incubate at 37 °C for 30 min.
Electrophoresis 0.5 μl to test whether the template DNA is digested completly.
Add 580 μl RNase-free H2O, 600 μl chloroform, and mix completely and incubate in room temperature for 10 min.
Centrifuge at 4 °C for 30 min (12,000 x g) in a microcentrifuge. Carefully transfer the supernatant into new microcentrifuge tube.
Add 100 μl sodium acetate (3 M) and 600 μl isopropanol to the tube, mix completely and incubate at -20 °C for 30 min.
Centrifuge at 4 °C for 30 min (12,000 x g) in a microcentrifuge. Carefully decant the supernatant.
Wash the product with 700 μl of 70% ethanol and centrifuge at 12,000 x g for 10 min at 4 °C. Carefully decant the supernatant without disturbing the pellet.
Dry the cDNA pellet for 10 min, and dissolve the DNA with 8 μl RNase-free water.
Determine the concentration of cDNA by UV spectrophotometry at 260 nm.
Dilute transcription product into 1 μg/μl. Store at -80 °C.
- Surgical removal of ovary tissue from Xenopus
Preparation for survival surgery: arrange ice-filled bucket for surgical operation; sterile surgical instruments, including forceps, scalpel, and scissors; surgical suture; 95% ethanol; ice-filled box for anaesthetizing Xenopus; ND96 medium; Petri dish.
Catch a healthy frog with a net. Put the frog into the middle of the ice-filled box for hypothermic anaesthesia until the limb movement disappear.
Gently lift the frog out of the box, clean with water, lay it on its back on the ice surface with the feet toward you.
Note: Make sure the frog is anaesthesia and the skin surface is moist during the whole operation.
Place the index and middle fingers of your left hand in a V-shape on belly horizontally, pressing to make skin taut. Cut a 1-cm long incision with scalpel in the right or left lower quadrant of abdomen. Gently draw the ovary tissue out (Figure 1A).
Cut off part of ovary tissue with the scissors, incubate in ND96 medium (Figure 1B).
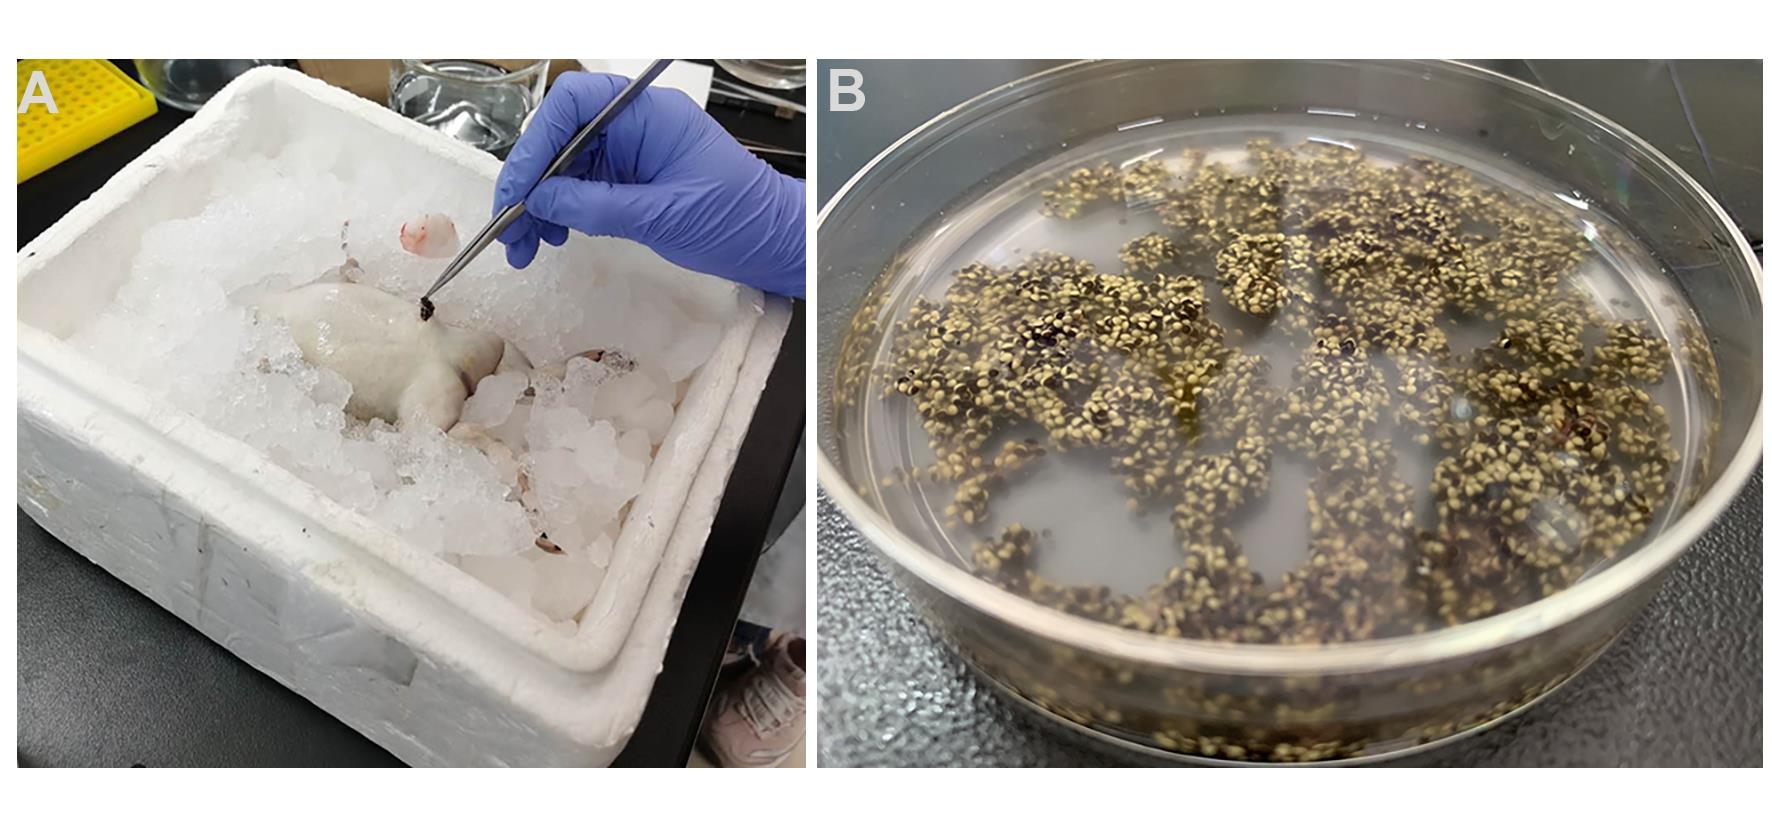
Figure 1. Removal of ovary tissue. A. Surgical removal of ovary; B. Ovary tissue incubate in ND96 medium.Sew up the incision with surgical and forceps from muscle layer to skin layer.
Clean the skin surface with water.
Place the frog in container, and leave the nose of frog out of water.
After recovering consciousness, the frog was returned to its tank.
Release oocytes (Figure 2)
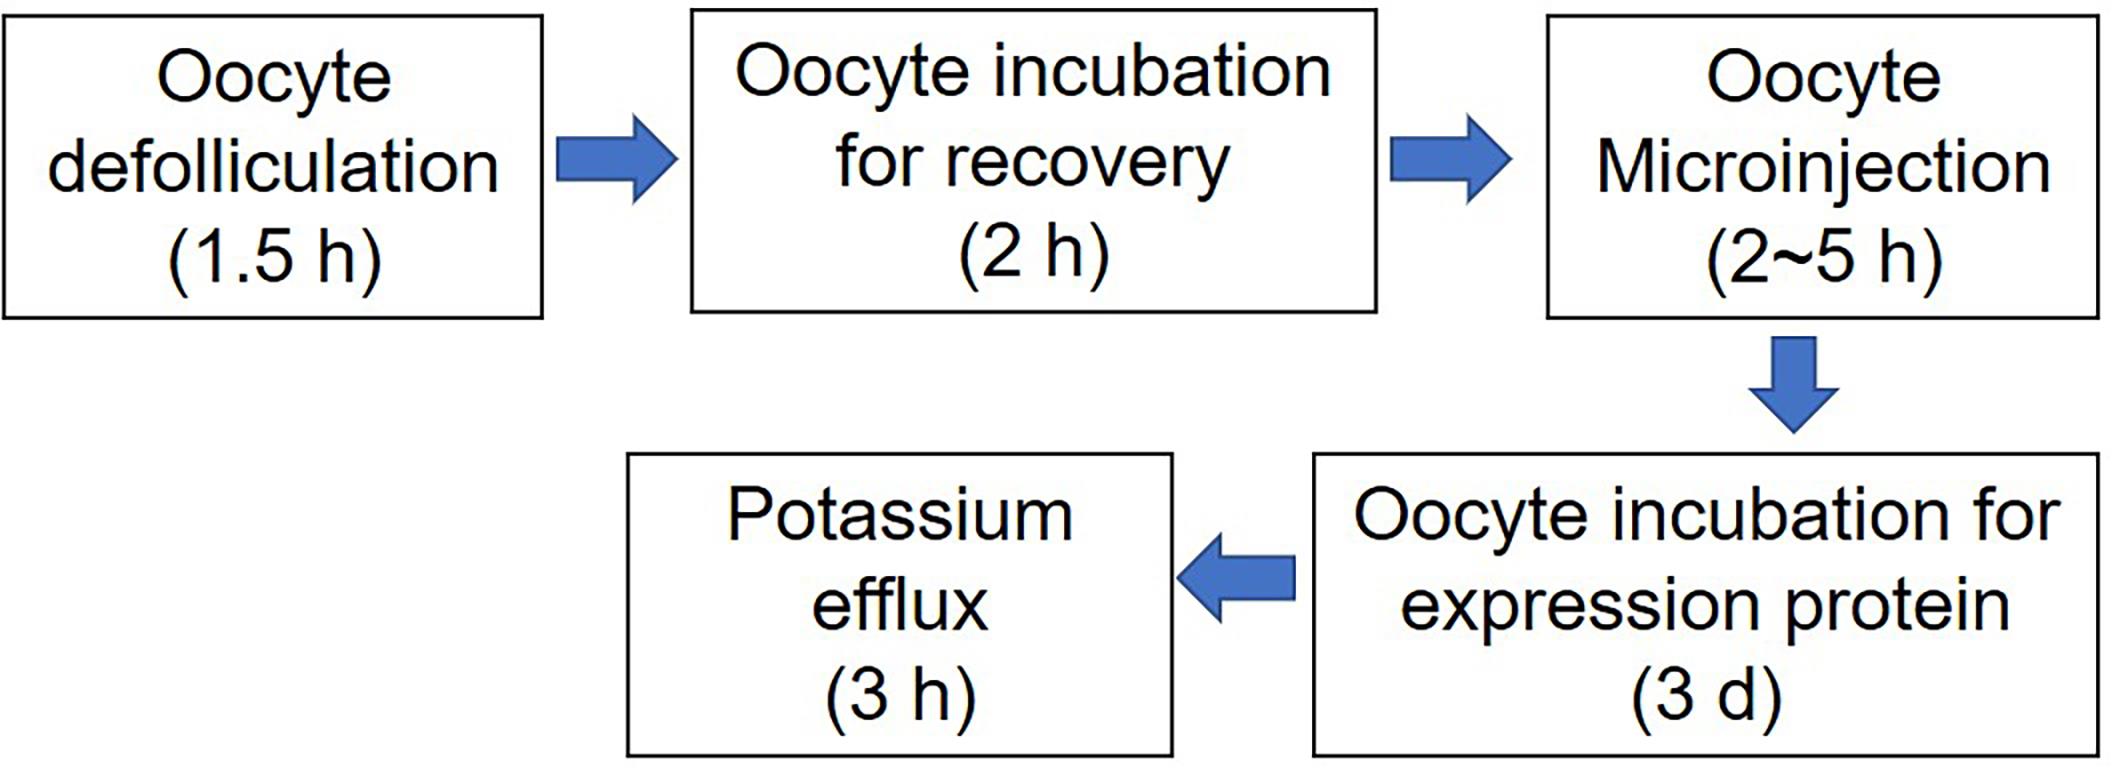
Figure 2. Flow chart and time considerations of presented protocols
Separate the ovary into smaller pieces with forceps in the Petri dish (10 cm diameter). Make sure each piece contains dozens of oocytes (Figure 3A).
Rinse the ovary pieces 3 times with 10 ml ND96 (Ca2+-free).
Add 25 ml ND96 (Ca2+-free), containing 43 mg collagenase and 12.5 mg trypsin inhibitor, to 100 ml flask. Transfer the oocytes the flask.
Place the flask on the water bath shaker. Gently shake for 90 min (60 rpm) at 23 °C (Figure 3B).
Gently wash the oocytes with 20 ml ND96 medium 3 times (Figure 3C).
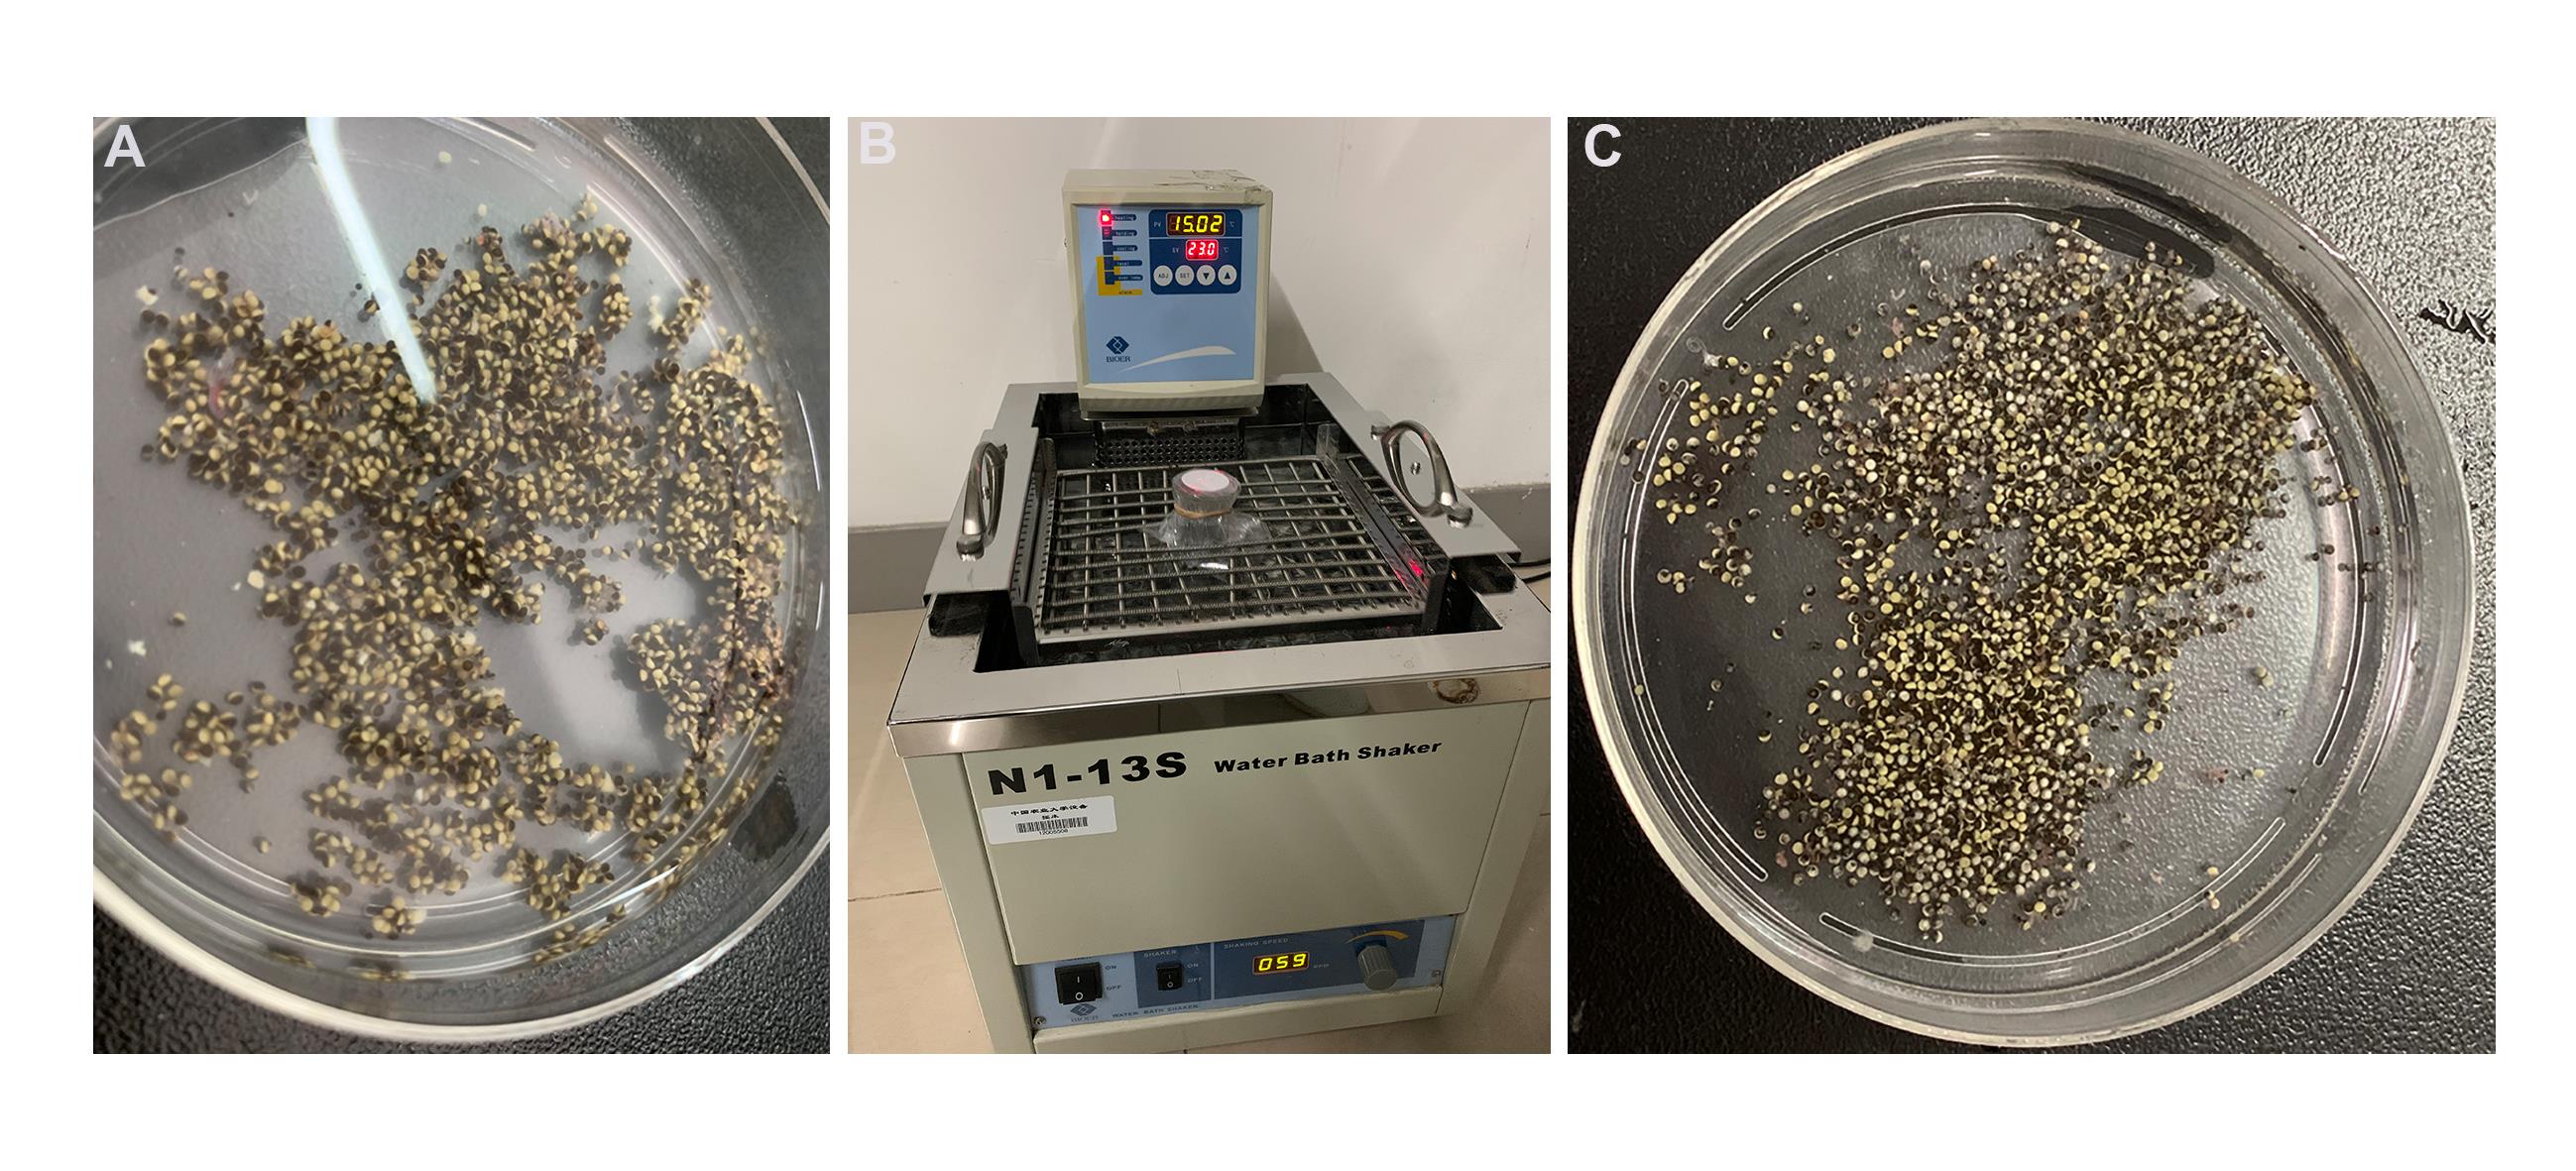
Figure 3.Release oocytes with collagenase. A. Separated ovary into smaller pieces before digestion; B. Digestion of follicle cell in water bash shaker; C. The oocytes after digestion.Under a microscope, move the healthy, separated oocytes to one side with glass pipet. Transfer these good oocytes to clean Petri dish containing 20 ml ND96 medium. And incubate in incubator at 18 °C for 2 h.
Oocyte microinjection
Preparation injecting micropipettes: Determine the settings for the pipette puller. Fix capillary on the pipette and press the “start” button.
Place the micropipettes in a drying oven at 180 °C for 5 h.
Turn on the microinjection and connect to the air pump. And open the main valve of nitrogen cylinder, adjust pressure to 0.4 MP.
Insert the micropipette in holder. Fasten the holder in the arm on the micromanipulator.
Break the tip to a diameter of 10 μm with flame-sterilized forceps under the dissecting microscope.
Determine the settings for the microinjection: the inject time is 20 ms, the inject pressure is 180 kPa, the clear pressure is 300 kPa, the balance pressure is 1-5 kPa.
Place a Petri dish lid covered with a piece of sterile parafilm on the work region.
Adjust the micropipette angle to make sure the micropipette tip touching the plate and viewed through the dissecting microscope.
Place 1 μl RNase-free water on to the parafilm. Use the micromanipulator to adjust micropipette tip into the water drop without breaking it (Figure 4A).
Press “Full” on the microinjector to draw the water into the micropipette as much as possible.
Adjust the pressure of the microinjector so that the injection volume is ~30 nl/oocyte.
Remove and discard the parafilm. Cover new parafilm on the Petri dish lid.
Pipette a 1-μl of cRNA (or RNase-free water as negative control) on the parafilm.
Note: The oocytes injected water and homologous protein and were served as negative controls.
Repeatedly adjust the micropipette tip into the cRNA drop, and press “fill” to take up the drop.
Raise the micropipette as quickly as possible. Remove the Petri dish lid, and replace it with Petri dish with mesh containing ND96 medium.
Place the oocytes in the middle of the Petri dish.
Adjust the focus of the microscope and the position of the micropipette tip, such that both the tip and the oocyte surface can be observed (Figure 4B).
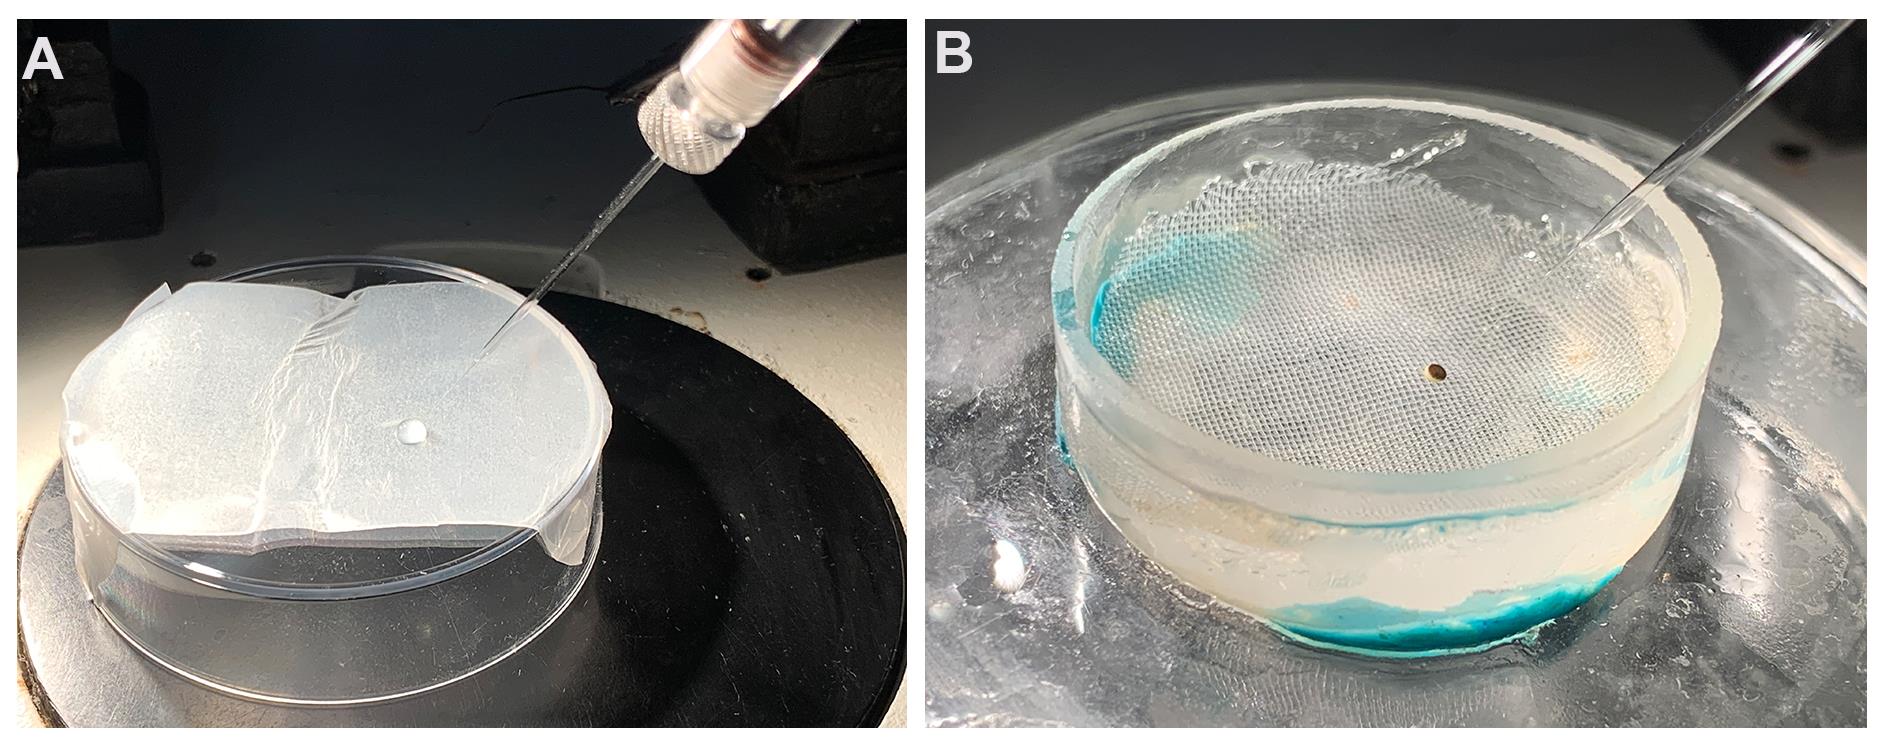
Figure 4. Oocyte microinjection. A. Draw RNA into the micropipette; B. Inject RNA into oocyte.Impale the oocyte, and touch the footrest of the microinjector to inject the cRNA into oocyte.
Gently remove the micropipette tip, and repeat with the remaining oocytes.
After all the oocytes injected, move the injected oocytes in MBS Solution.
Press “empty” on the microinjector to pour off the remaining cRNA in the micropipette.
Incubate oocytes in MBS solution in incubator at 18 °C for 30 h for expressing protein.
K+ release assays
Discard the unhealthy, dead, swollen oocytes with glass pipet.
Note: Oocytes without clear division line are dead or unhealthy.
Wash the good oocytes five times with K+-Free MBS solution.
Gently pipette 5 oocytes into 1.5-ml microcentrifuge (5 oocytes each microcentrifuge, represents one sample) for measuring the K+ concentration in oocytes before K+ release.
Fill 24-well plates with 1 ml K+-Free MBS solution in each well.
Gently pipette 5 oocytes in grass pipet, and gently adjust all the 5 oocytes to the tip.
Place the 5 oocytes in a well without carrying solution into well (Figure 5). Each well represents one sample. Incubate at 18 °C for 3 h.
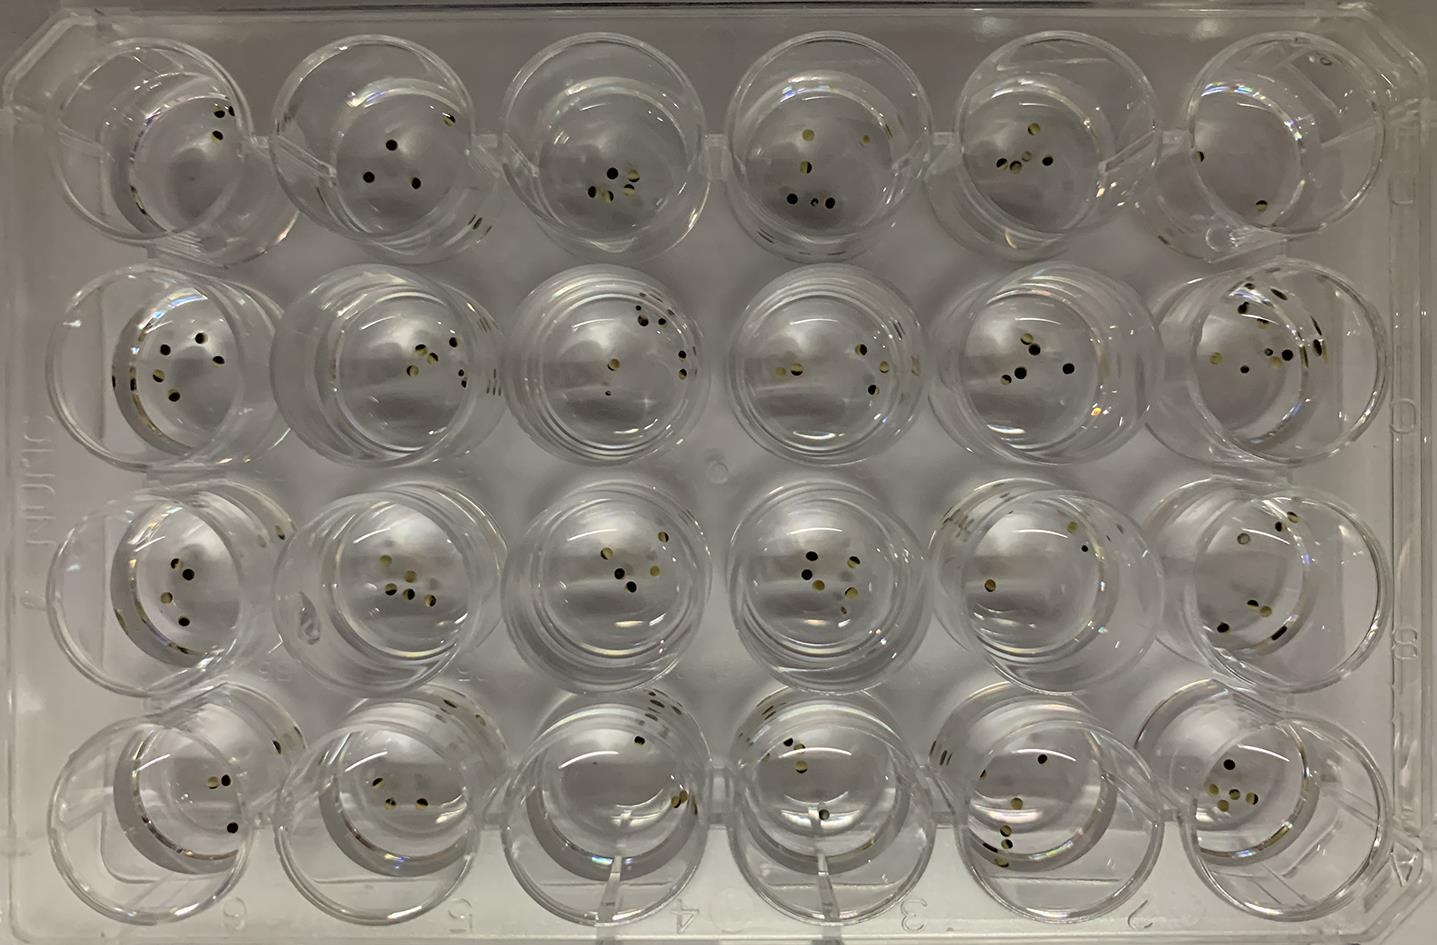
Figure 5. Potassium release. Incubate oocytes in K+-Free MBS solution for potassium release.Use a 3-ml plastic pipet dropper with an enlarged and blunt orifice to gently mix the solution in each well without hurting oocytes (Video 1).
Transfer all solution in each well into 1.5-ml microcentrifuge tube. The solutions were used for analysis K+ concentration in medium (Video 1).
Transfer the oocytes in each well into a new well with 3 ml K+-Free MBS solution (Video 1).
Gently wash the oocytes, and then transfer into a new well with 3 mL K+-Free MBS solution for second wash (Video 1).
 Video 1. Collect solution and oocytes after K+ release
After washing for 5 times, gently pipette 5 oocytes in grass pipet, and gently adjust all the 5 oocytes to the tip. Place the 5 oocytes in 1.5-ml microcentrifuge (5 oocytes each microcentrifuge, represents one sample) for measuring the K+ concentration in oocytes after K+ release.
Homogenize oocytes (from Step G3 and Step G9) in 1 ml 0.1 N HCl by pipetting up and down.
Filtered the suspensions using Millipore filters (0.22 μm).
These samples, which are used for measuring the K+ concentration in oocytes, are diluted with 0.1 N HCl in 1:2.
Measure K+ concentration in solution using the 4100-MP AES or 4210 MP-AES system.
K+ concentration measurement
Prepare standard samples with different concentrations KCl (0 μM, 10 μM, 20 μM, 40 μM, 60 μM, 80 μM, 100 μM)
Note: Add (0 μl, 10 μl, 20 μl, 40 μl, 60 μl, 80 μl, 100 μl) 100 mM KCl into 10 ml 0.1 N HCl.
Open MP Expert software, and select New Folder.
Click Element sub-menu to select the tested element and its absorption wavelength.
Click Measurement condition sub-menu to set detection position, atomization pressure, detection time, pump speed etc.
Click Standard sample sub-menu to set the number of standard samples.
Click Order sub-menu to set the number and name of samples.
After all the set, click Save.
Click Run option in Analysis sub-menu to measure. Measure standard samples and the sample one-by-one.
Data analysis
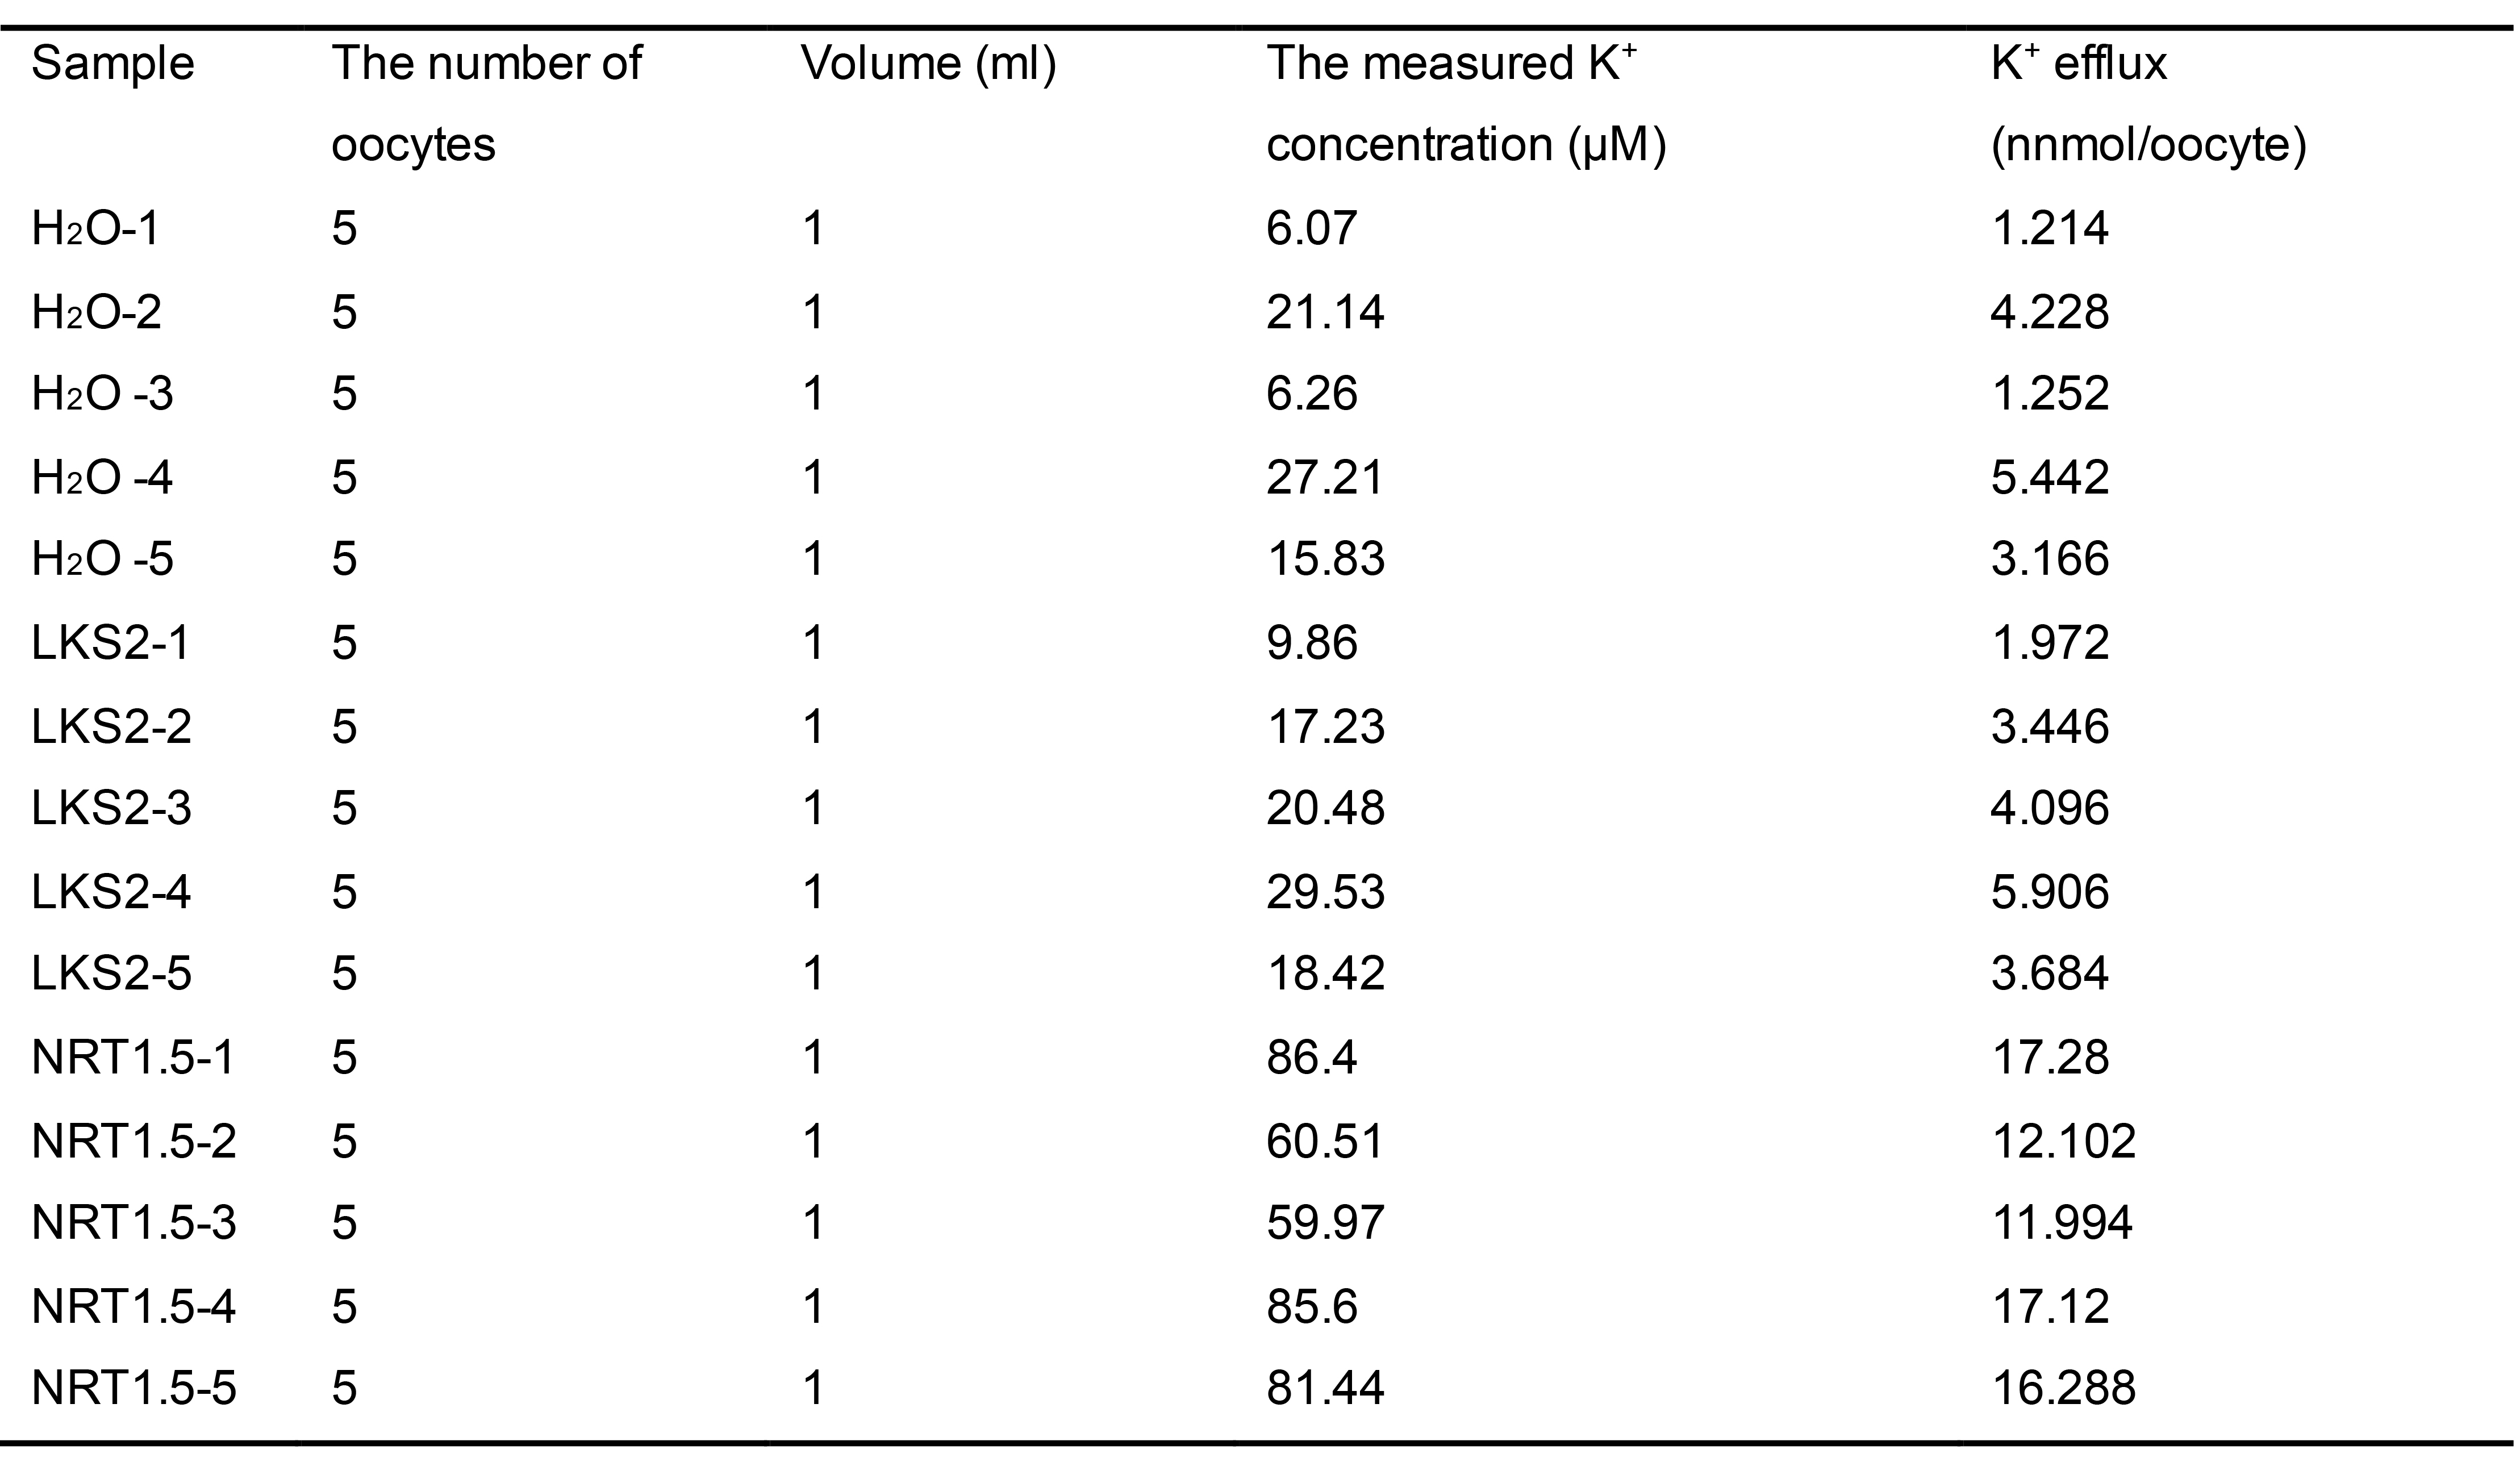
Extract raw data of the values of K+ content as a text from 4100-MP (Table 1).
Open the text containing the raw data in Microsoft EXCEL.
Calculate the K+ efflux of each oocyte by the following formula:
C/N, unit: nmol/oocyte. C represents the measured values, the unit is μmol/L; N represents the number of oocytes in each sample. Average the K+ efflux of quintuplicate with standard deviation.
Table 1. The measured K+ concentration in solution for K+ efflux ability measurement
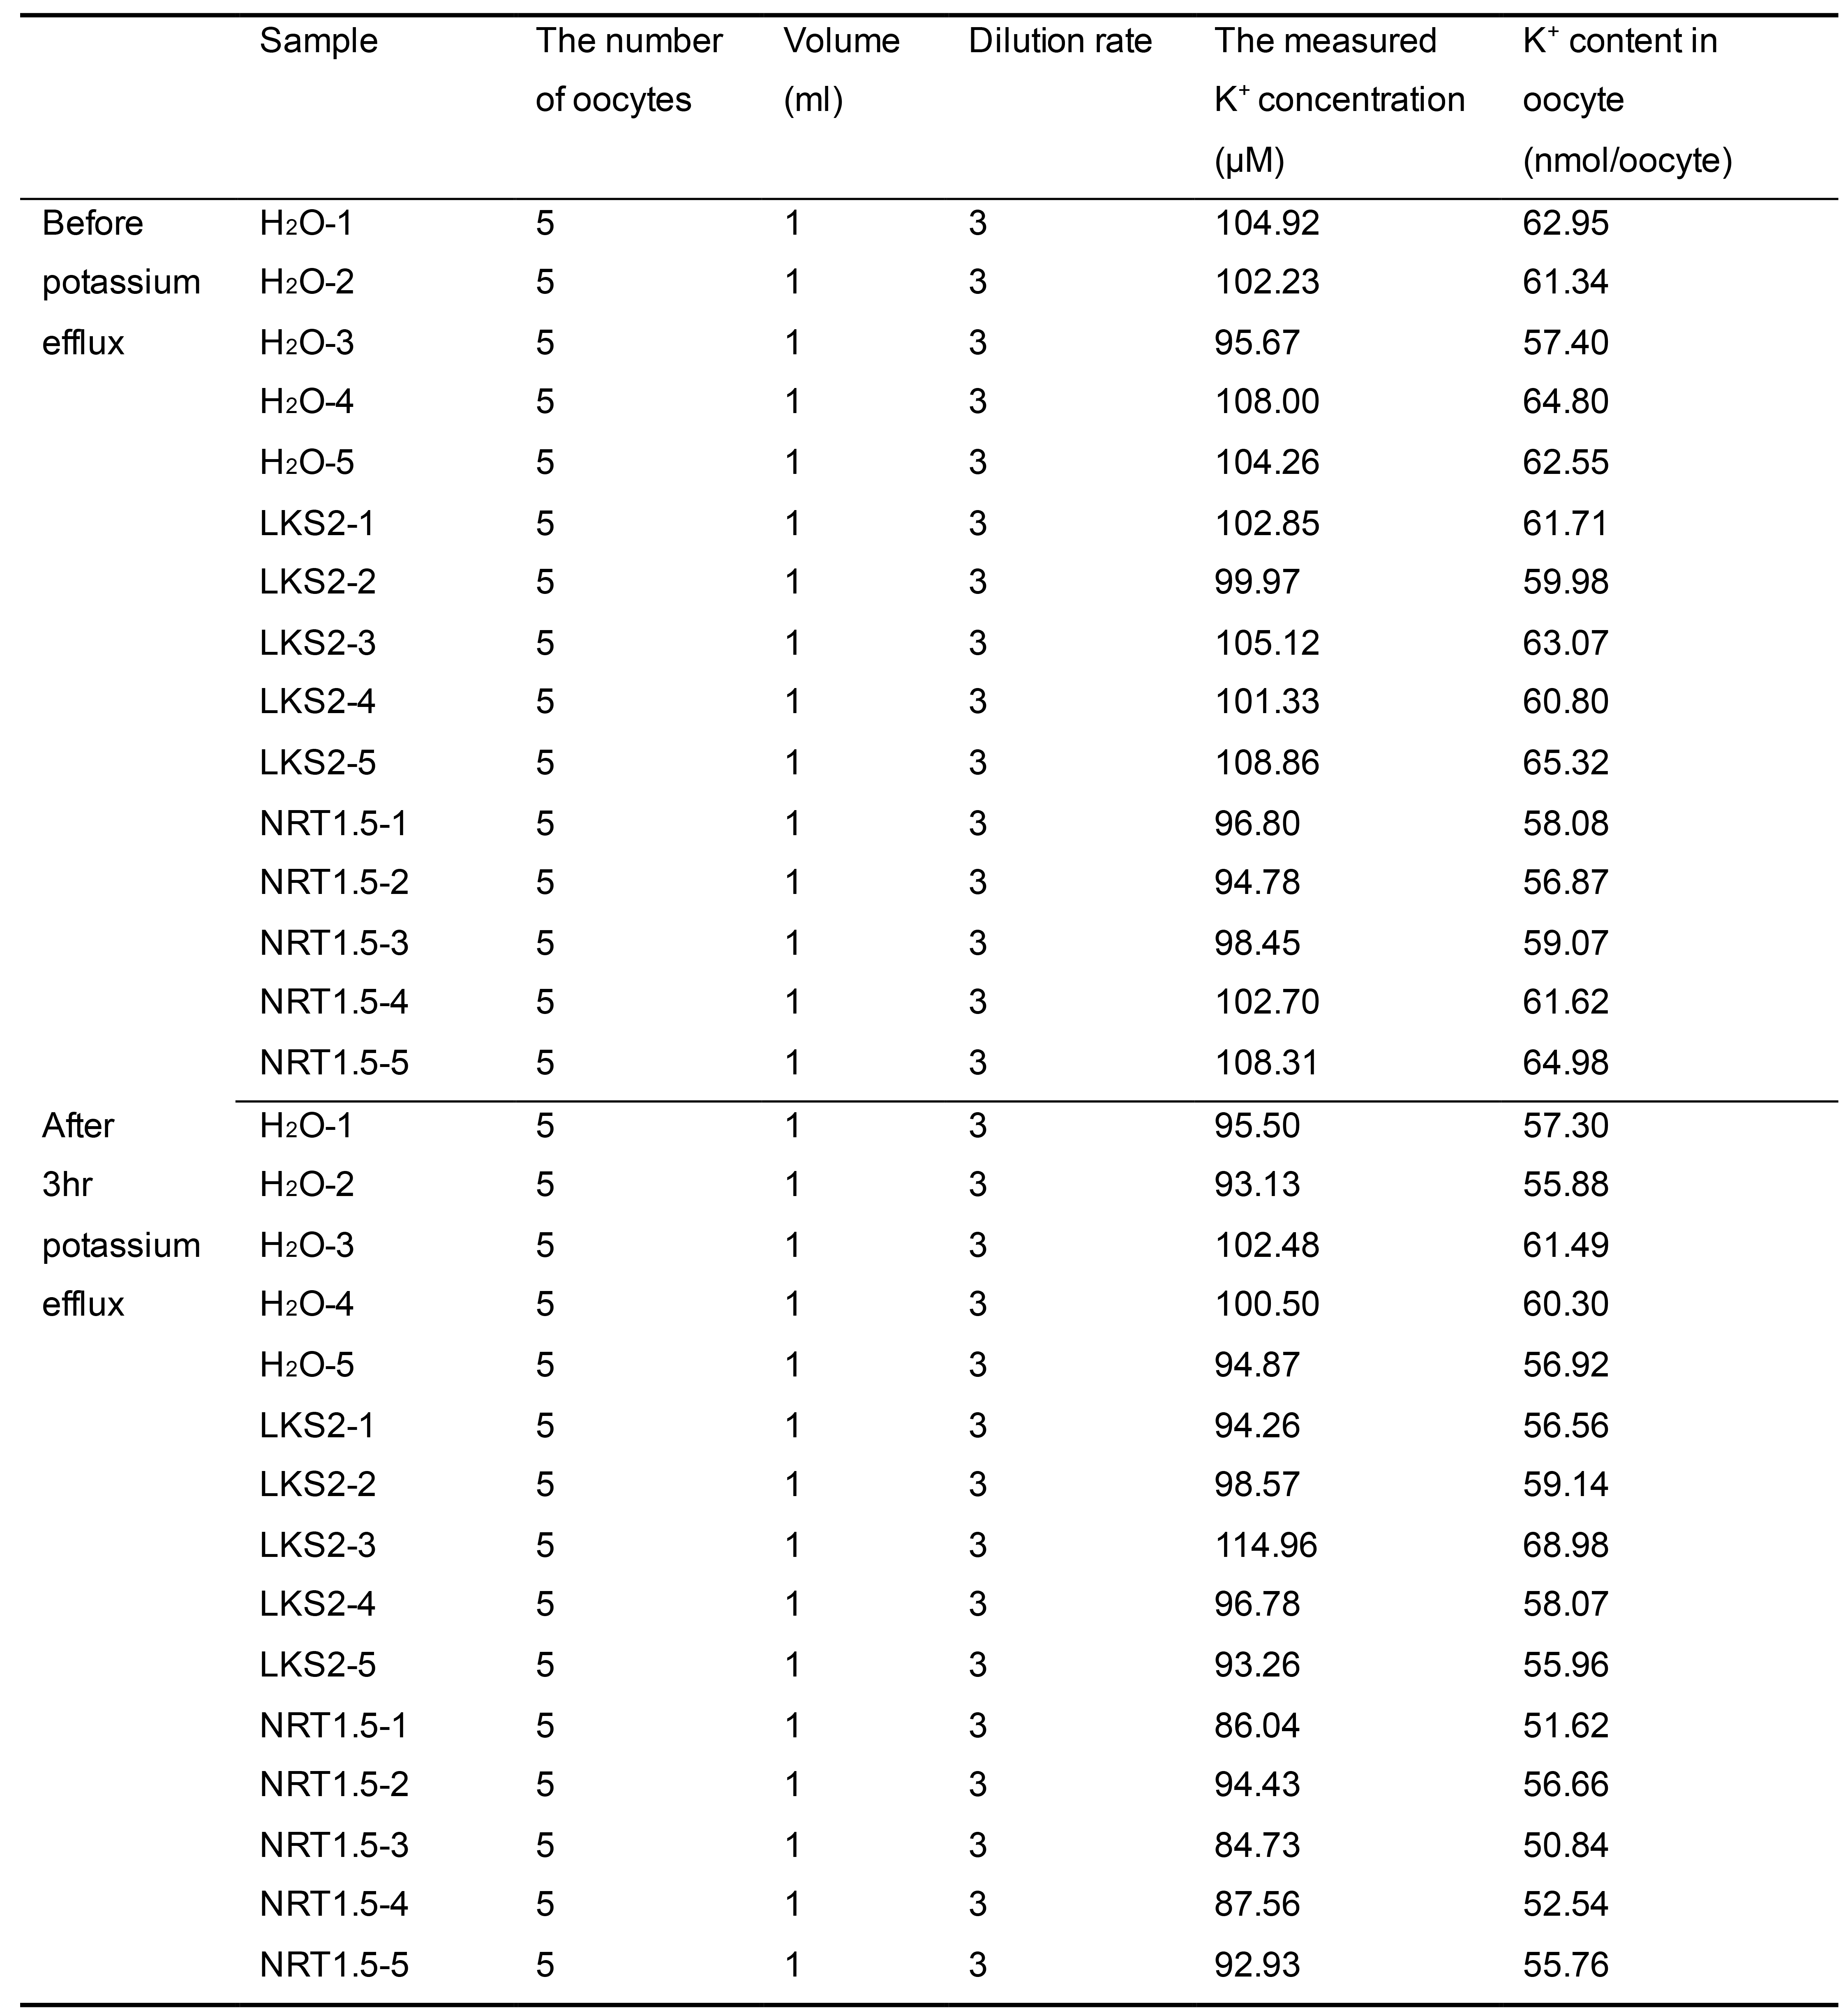
H2O and LKS2, which are negative controls, represent water-injected and mutated-NRT1.5-injected oocytes, respectively.
Calculate the K+ amount in each oocyte by the following formula:
CxR/5, unit: nmol/oocyte. C represents the measured values, the unit is μmol/L; N represents the number of oocytes in each sample; R represents dilution rate.
Average the K+ amount of quintuplicate with standard deviation (Table 2).
Table 2. The measured K+ content in oocytes before and after K+ efflux
H2O and LKS2, which are negative controls, represent water-injected and mutated-NRT1.5-injected oocytes, respectively.
Recipes
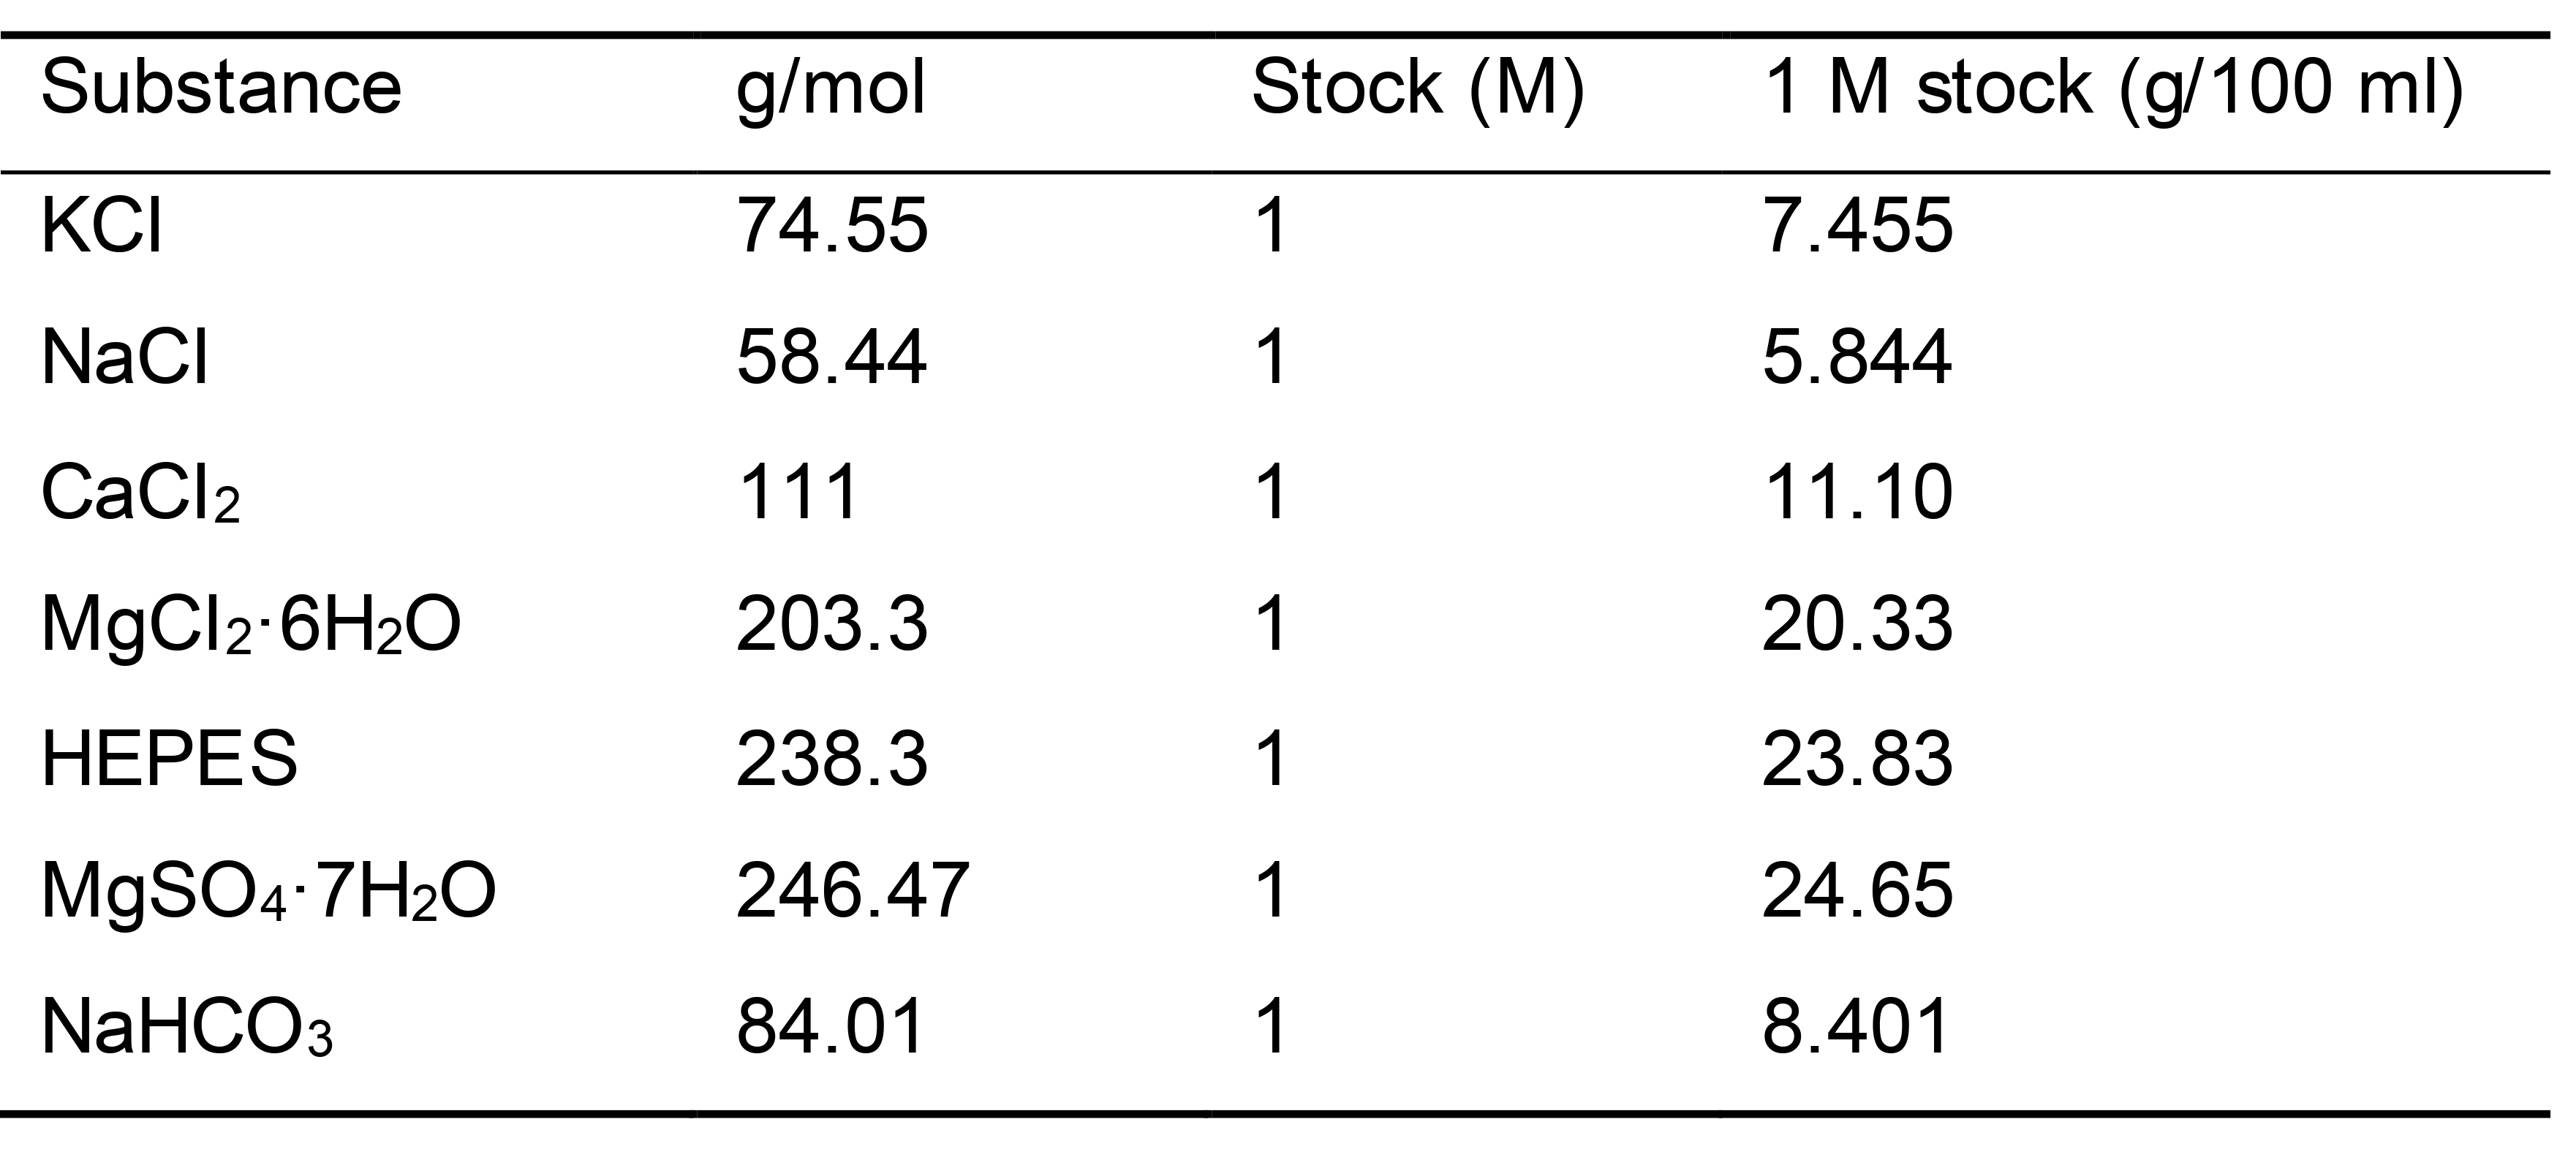
Inorganic salt stock solution
Prepare each inorganic salt stock solution with deionized water for 100 ml, and store at room temperature (Table 3).
Table 3. Stock solutions
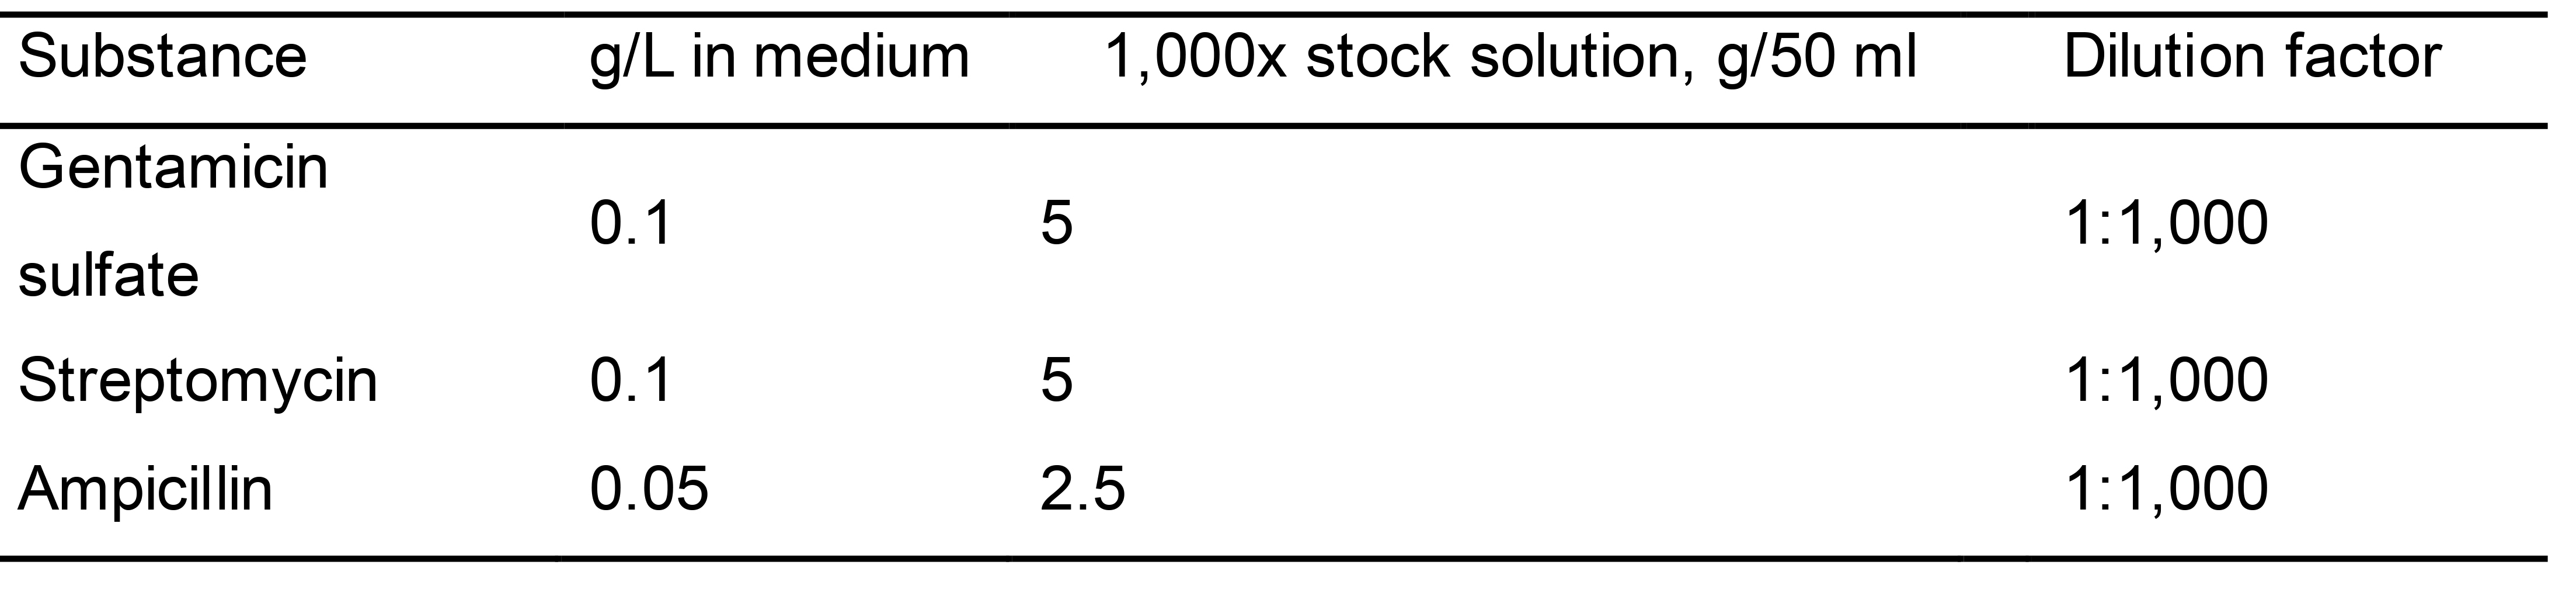
Antibiotic stock solutions
Prepare the antibiotic stock solutions with sterilized water, and store at -20 °C (Table 4).
Table 4. Antibiotic stock solutions
LB medium
Dissolve 10 g of tryptone, 5 g of yeast extract, and 10 g of NaCl in 900 ml of distilled water
Adjust volume to 1 L with distilled water
Autoclave the solution (at 115 °C for 15 min)
Store the autoclaved LB medium at room temperature
Add ampicillin in the final concentration of 50 mg/L before use
LB agar
Dissolve 10 g of tryptone, 5 g of yeast extract, and 10 g of NaCl in 900 ml of distilled water
Adjust volume to 1 L with distilled water
Add 15 g of agar to LB medium
Autoclave the solution at 115 °C for 15 min
Cool to 50-60 °C and add ampicillin in the final concentration of 50 mg/L
Pour 20 ml of the medium into 10 cm Petri plates using sterile technique. And then fully cool at 4 °C
ND96 solution (Ca2+-free)
Add 2 ml of KCl stock solution (1 M), 1 ml of MgCl2·6H2O stock solution (1 M), 5 ml of HEPES stock solution (1 M), and 5.61 g of NaCl to 900 ml of distilled water
Dissolve and adjust volume to 1 L with distilled water
Adjust pH to 7.5 with NaOH/HCl
Autoclave the solution at 115 °C for 15 min
Store the medium at room temperature
Cool and add gentamicin sulfate and streptomycin in the final concentration of 0.1 mg/ml
ND96 solution
Add 2 ml of KCl stock solution (1 M), 1 ml of MgCl2·6H2O stock solution (1 M), 5 ml of HEPES stock solution (1 M), 1.8 ml of CaCl2 stock solution (1 M), and 5.61 g of NaCl to 900 ml of distilled water. Dissolve and adjust volume close to 1 L with distilled water
Adjust pH to 7.5 with NaOH/HCl
Adjust volume to 1 L with distilled water
Autoclave the solution at 115°C for 15 min
Store the medium at room temperature
Add gentamicin sulfate and streptomycin in the final concentration of 0.1 mg/ml before use
MBS solution
Add 0.82 ml of MgSO4·7H2O stock solution (1 M), 15 ml of HEPES stock solution (1 M), 0.71 ml of CaCl2 stock solution (1 M), 2.4 ml of NaHCO3 stock solution (1 M), 1 ml of KCl stock solution (1 M), and 5.14 g of NaCl to 900 ml of distilled water. Dissolve and adjust volume close to 1 L with distilled water
Adjust pH to 7.4 with NaOH/HCl
Adjust volume to 1 L with distilled water
Autoclave the solution at 115 °C for 15 min
Store the medium at room temperature
Add gentamicin sulfate and streptomycin in the final concentration of 0.1 mg/ml before use
K+-free MBS solution
Add 0.82 ml of MgSO4·7H2O stock solution (1 M), 15 ml of HEPES stock solution (1 M), 0.71 ml of CaCl2 stock solution (1 M), 2.4 ml of NaHCO3 stock solution (1 M), and 5.2 g of NaCl to 900 ml of distilled water. Dissolve and adjust volume close to 1 L with distilled water
Adjust pH to 7.4 with NaOH/HCl
Adjust volume to 1 L with distilled water
Autoclave the solution at 115 °C for 15 min
Store the medium at room temperature
Add gentamicin sulfate and streptomycin in the final concentration of 0.1 mg/ml before use
Oocytes isolation solution
Dissolve 43 mg of collagenase and 12.5 of mg trypsin inhibitor in 25 ml of ND 96 (Ca2+-free) medium
Acknowledgments
I thank Xiaorong Fan (Nanjing Agricultural University) for providing us with the pT7TS vector. I also thank Yi Wang (China Agricultural University) for discussions and help. This work is supported by the National Natural Science Foundation of China (31800198), the Natural Science Foundation of Jiangsu Higher Education Institutions (18KJB180010), and the Priority Academic Program Development of Jiangsu Higher Education Institutions. The adapted protocol for oocytes isolation and injection described in that manuscript has used by Dascal (1987).
Competing interests
There are no conflicts of interest or competing interest.
References
- Cao, Y., Anderova, M., Crawford, N. M. and Schroeder, J. I. (1992). Expression of an outward-rectifying potassium channel from maize mRNA and complementary RNA in Xenopus oocytes. Plant Cell 4(8): 961-969.
- Dascal, N., (1987). The use of Xenopus oocytes for the study of ion channels. CRC Crit Rev Biochem 22317-387.
- Li, H., Yu, M., Du, X. Q., Wang, Z. F., Wu, W. H., Quintero, F. J., Jin, X. H., Li, H. D. and Wang, Y. (2017). NRT1.5/NPF7.3 Functions as a Proton-Coupled H+/K+ Antiporter for K+ Loading into the Xylem in Arabidopsis. Plant Cell 29(8): 2016-2026.
- Miller, A. J. and Zhou, J. J. (2000). Xenopus oocytes as an expression system for plant transporters. Biochim Biophys Acta 1465(1-2): 343-358.
- Schachtman, D. P. and Schroeder, J. I. (1994). Structure and transport mechanism of a high-affinity potassium uptake transporter from higher plants. Nature 370(6491): 655-658.
- Véry, A. A., Bosseux, C., Gaymard, F., Sentenac, H. and Thibaud, J. B. (1994). Level of expression in Xenopus oocytes affects some characteristics of a plant inward-rectifying voltage-gated K+ channel. Pflügers Arch 428(3-4): 422-424.
- Wang, Y. and Wu, W. H. (2013). Potassium transport and signaling in higher plants. Annu Rev Plant Biol 64451-476.
- Weber, W. M., (1999). Ion currents of Xenopus laevis oocytes: state of the art. Biochim Biophys Acta 1421213-233.
Article Information
Copyright
© 2020 The Authors; exclusive licensee Bio-protocol LLC.
How to cite
Li, H. (2020). K+ Release Assay and K+ Measurement in Oocyte Assay. Bio-protocol 10(21): e3802. DOI: 10.21769/BioProtoc.3802.
Category
Plant Science > Plant physiology > Nutrition
Biochemistry > Other compound > Ion
Cell Biology > Cell-based analysis > Transport
Do you have any questions about this protocol?
Post your question to gather feedback from the community. We will also invite the authors of this article to respond.