- Protocols

- Articles and Issues
- For Authors
- About
- Become a Reviewer

Preparation, FPLC Purification and LC-FT-ICR-MS of Proteins
Published: Vol 10, Iss 7, Apr 5, 2020 DOI: 10.21769/BioProtoc.3570 Views: 5137
Reviewed by: David PaulAnonymous reviewer(s)
Original research article
The authors used this protocol in:
May 2019
Advertisement


Protocol Collections
Comprehensive collections of detailed, peer-reviewed protocols focusing on specific topics


Abstract
High magnetic field Fourier transform ion cyclotron resonance (FT-ICR) mass spectrometers provide extremely high mass resolution (resolving power of ~200,000 at 400 m/z) protein detection across a broad mass range, enabling analysis of fine structure of isotopic peak clusters that is missed in other types of mass spectrometers. The protocol detailed here describes preparation of cellular extracts for purification of DNA-binding proteins using multiple chromatographic chemistries via fast protein liquid chromatography (FPLC), and identification and quantitation of the protein isoforms and their post-translational modifications by liquid chromatography coupled to Fourier transform ion cyclotron resonance mass spectrometry (LC-FT-ICR-MS). This protocol benefits from selectively purifying proteins for identification and quantitation by high resolution FT-ICR, which has the resolution to definitively distinguish between acetylation and trimethylation post-translational modification (PTM) additions.
Keywords: FT-ICRBackground
Post-translational modifications (PTMs) of proteins play very important roles in regulation of cellular processes and function. The characterization of PTMs is challenging because of the large number of potential modifications and number of amino acid residues that can be modified. This can be particularly true for proteins with a limited number of proteolytic sites that cannot be analyzed in proteolytically digested forms and require an intact protein MS analysis. To achieve this goal, this protocol describes a combination of protein separation by HPLC and high accuracy/resolution mass spectrometry. The HPLC separation helps to; 1) eliminate various salts and other interfering molecules from the protein of the interest, 2) separate various PTM isoforms of the protein, and 3) improve ionization of the protein. A high accuracy/resolution MS instrument is, on the other hand, necessary to identify specific charge envelopes and isotope pattern distribution that are the important features essential for an accurate PTM determination. Although results of the intact protein MS analysis depend on many factors including a molecular mass, amino acid composition and tertiary structure of proteins, usually it can only be achieved by two types of MS instruments: Fourier transform ion cyclotron resonance mass spectrometer (FT-ICR-MS) or recently developed generations of the Orbitrap-based mass spectrometer. Of those, FT-ICR-MS is preferred as data can be acquired at higher resolution and accuracy. On the other hand, this instrument requires liquid helium to keep the magnet temperature low which increases maintenance cost. Electrospary Ionization (ESI) used in mass spectrometry of intact proteins generates many different charge states of the protein. This represents a potential problem in detection of PTMs of the protein as peaks corresponding to individual proteoforms must be resolved. Therefore, only mass spectrometers with high resolving power such as FT-ICR-MS can be used. Depending on a magnetic field, they can have the resolving power at 1,000,000 and still accuracy between 0.05 and 1 ppm.
Materials and Reagents
- Nitrile gloves
- 15-ml Amicon centrifugal filter units 3 kDa MWCO (Millipore Sigma, catalog number: UFC900308 )
- Pipette tips 1,000 µl, 200 µl, 20 µl, 2 µl
- Serological pipets
- 1.5 ml Microcentrifuge tubes
- 1.7 ml low retention microtubules (PHENIX Research Products, catalog number: MAX-715L )
- 15 ml conical tubes
- Disposable borosilicate glass tubes (Fisher Scientific, catalog number: 14-961-29 )
- 30 ml syringe
- 10 ml syringe
- 60 ml syringe
- 0.45 µm filtration apparatus
- 0.45 µm mixed cellulose ester gridded filters (Millipore Sigma, catalog number: HABG04700 )
- 1-ml HiTrap SP HP prepacked columns (GE Healthcare, catalog number: 17115101 )
- 1-ml HiTrap Heparin HP prepacked columns (GE Healthcare, catalog number: 17040601 )
- Spectra/Por 3 RC Dialysis Membrane Tubing 3500 Dalton MWCO (Spectrum, catalog number: 132724 )
- Reverse phase HPLC column (Thermo Scientific, ProSwift RP-10R 1 mm x 50 mm, catalog number: 164586TS )
- 20% ethanol
- Sodium phosphate, monobasic (NaH2PO4)
- 0.5 M EDTA
- DL-dithiothreitol, anhydrous (DTT) (Millipore Sigma, catalog number: D9779 )
- Potassium chloride (KCl) (Millipore Sigma, catalog number: 31248 )
- HPLC-grade water (Millipore Sigma, catalog number: 270733 )
- 0.1% formic acid in water (Millipore Sigma, catalog number: 576913 )
- 0.1% formic acid in acetonitrile (CH3CN) (Millipore Sigma, catalog number: 576956 )
- Ammonium sulfate ((NH4)2SO4)
- Sodium hydroxide (NaOH) (Millipore Sigma, catalog number: 1.06462 )
- Hydrochloric acid (HCl) (Millipore Sigma, catalog number: H1758 )
- 4-20% Mini-PROTEAN TGX Precast Protein Gels (Bio-Rad, catalog number: 4561096 )
- 50 mM Ammonium bicarbonate (NH4HCO3) pH 8.0
- Buffer A (see Recipes)
- Buffer B (see Recipes)
Equipment
- Pipettes (P1000, P200, P20, P2)
- Sonicator (Qsonica, Q500 sonicator, catalog number: Q500-110 )
- Centrifuge (Sorvall RC-6+)
- ÄKTA pure FPLC system (or similar liquid chromatography system) https://www.gelifesciences.com/en/gb/shop/chromatography/chromatography-systems/akta-pure-p-05844
- High pressure liquid chromatography capillary pump (Agilent, 1100 Series HPLC, model: CapPump/G1376A )
- Autosampler (Agilent, 1200 Series, model: MicroWPS/G1377A )
- Degasser (Agilent, 1200 Series, model: Degasser/G1379B )
- Fourier-transform ion cyclotron resonance mass spectrometer (Bruker, 7T solariX 70 Hybrid FTMS System, model: 277070 )
Software
- UNICORN 7 control software for ÄKTA pure FPLC system
- HyStar 3.4 software (Bruker)
- Compass SolariXcontrol (Bruker) software
- Compass Data Analysis software version 4.0 (Bruker, https://www.bruker.com/service/support-upgrades/software-downloads/mass-spectrometry.html)
- IDCalc software (MacCoss Lab, https://proteome.gs.washington.edu/software/IDCalc/)
Procedure
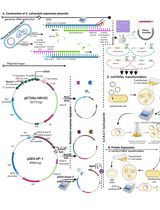
A workflow of the protocol from preparation of cellular extracts to identification and quantitation of the protein isoforms and their post-translational modifications by FT-ICR-MS is shown in Figure 1.
Figure 1. Schematic workflow of the steps of this protocol
- Protein sample preparation
- Following culturing and harvesting of desired cell line, resuspend cells in 10 ml of Buffer A in conical tube.
- Place cells on ice and lyse cellular suspension by sonication, alternating on/off pulses at 30 s (30 s on/30 s off) until cells are fully lysed as indicated by their appearance using a light microscope.
- Clarify lysates by centrifugation at 10,000 x g for 15 min at 4 °C.
- Transfer supernatant to a separate conical tube and add ammonium sulfate to final concentration of 70%.
Note: A useful calculator for determining volume can be found at https://www.encorbio.com/protocols/AM-SO4.htm. - Incubate solution with constant agitation at 4 °C for at least one hour.
- Pellet precipitated protein via centrifugation at 10,000 x g at 4 °C.
- Resuspend pellet in 10 ml Buffer A and filter through 0.45 µm filter.
- Store at 4 °C until ready to inject into sample loop for purification or until mass spectrometry if purification is not being pursued.
Note: If going straight to mass spectrometry, resuspend the suspension in 50 mM ammonium bicarbonate pH 8.0 (or MS compatible buffer of your choosing) instead of Buffer A.
- FPLC method creation and setup
- Machine Pre-startup
- Check all the volumes of all buffers being used during FPLC run to ensure no air enters lines/pumps during run.
Note: All buffers must be a minimum of 300 ml.
50-ml Falcon tube with 20% ethanol for back-rinsing solution (lower right corner of ÄKTA machine)
Filtered nano-pure water
20% ethanol
Buffer A/B - Make sure the correct lines are in the correct buffers.
A1 = Purification Buffer A
A2 = Nano-pure water (filtered)
B1 = Purification Buffer B
B2 = 20% ethanol (filtered) - Empty waste container prior to each run to prevent over filling and back pressure on the system.
- Check all the volumes of all buffers being used during FPLC run to ensure no air enters lines/pumps during run.
- Priming inlets and purging pump heads
- Turn on ÄKTA Pure FPLC and Allow a short time for pumps and lamp to initialize for ~30 s.
- Make sure that all inlet tubing that is to be used during the method run is placed in the correct buffer.
- In the Process Picture of the Open System Control module:
- Click on the buffer inlets.
- Select the position of the inlet to be filled. Select the positions in reverse alphabetical order and start with the highest number. For example, if all the four inlets in the Inlet valve AB are to be filled, fill them in the following order B2, B1, A2, A1.
- Connect a 60 ml syringe to the purge valve of one of the pump heads of the pump that is being prepared (see page 91 in ÄKTA Pure Operating Instructions guide). Make sure that the syringe fits tightly into the purge connector.
- Open the purge valve by turning it counter-clockwise about three quarters of a turn. Draw liquid slowly into the syringe until the liquid reaches the pump.
- Close the purge valve by turning it clockwise. Disconnect the syringe and discard its contents.
- Repeat Steps B2c-B2d for each piece of inlet tubing that is to be used during the run.
- Creating a custom method in Method Editor
- Open the Method Editor window.
- Click [Create New Method] → Select [Machine Number] → Check [Predefined Application] and choose application for affinity, ion exchange, etc. chromatography or [Empty Method] if you prefer to define your own parameters from scratch → Click [OK]. Predefined Application is the suggested choice for method creation.
- Method Settings:
- Choose column from list or leave as “any”.
If set at “any” make sure to determine the column pressure limits and set in this window accordingly. - Choose the correct column position that you will be using in the column valve.
This is usually set as “1” unless using multiple chromatographies. - Choose correct buffer inlets
A1 and B1 are default and typically used for buffers A and B.
- Choose column from list or leave as “any”.
- Equilibration:
- Choose total volume (Column volume = CV) or condition for equilibration.
Set equilibration to 10 CV buffer A or stable UV for 15 s, either method is fine. - Choose the % buffer B for equilibration.
Set at 0%
- Choose total volume (Column volume = CV) or condition for equilibration.
- Sample Application:
- Choose loop type (i.e., Superloop or Capillary loop).
- Choose loop position on loop valve (1-5).
- Set total sample volume that will be injected (1-99 ml).
- Choose fractionation desired:
Fraction collector for collection of elution fractions. - If fraction collector is chosen set the volume of fractionation desired.
- Column Wash:
Wash column either by volume or condition stable UV.
Stable UV is preferred to ensure that all unbound proteins are washed from the column. - Elution
- Set Elution method to Gradient elution.
Linear = set target %B and length of gradient in CV
Target %B should be set to 100 and CV set to 25 - Set fractionation to fraction collector.1)Set type of fractionation to fixed volume.2)Set fractionation volume to 1 ml.
- Optional: Up-flow elution can be selected if you wish the sample to be eluted from the bottom of the column to the top.
- Set Elution method to Gradient elution.
- Equilibration:
Standard set to equilibrate the system and column back to buffer A.
- FPLC Run Initialization
- Connecting a column (see page 109 in ÄKTA Pure Operating Instructions guide):
- Connect a suitable tubing to a Column valve port (Example: 1A).
- Open the System Control module.
- In the Process Picture:1)Click on the [Column] → Select [Column down flow].2)Click on the [Pumps] → Enter a low System flow (e.g., 0.25 ml/min.) → Click [Set flow rate].3)When buffer leaves the tubing in a continuous mode and the top part of the column is filled with buffer, connect the tubing to the top of the column.Note: Make sure that the column location matches the location set in the method that was created for the run.4)When buffer leaves the tubing at the bottom of the column in a continuous mode, connect the column to the Column valve. Use the port opposite to the one already connected to the column, in this example port 1B if 1A is used.
- Sample injection:
- Sample injection using a Superloop (see page 122 in ÄKTA Pure Operating Instructions guide):1)Attach the Superloop to the instrument using a Column holder.2)In the Process Picture, click the [Injection valve] → Select [Manual Load].3)In the Process Picture, click the [Loop valve] → Select the position the loop is connected to, for example [Position 2].4)Fill a syringe with your filtered protein sample from Step A7.5)Approximately 0.5 μg of protein sample was used.6)Connect the syringe to Injection valve port (Syr on V9-Inj of ÄKTA machine).7)Load sample into the Superloop by emptying the syringe into the injection valve.
Note: Leave the syringe connected to the Syr port until the end of the run. - Open the Method Editor module and open the method you will be using for the elution run.1)In Method settings, make sure to set column position that you have your column connected to, e.g., 1.2)In Sample Application, set your total sample volume for injection and the loop type and position.3)Select the method to run and click the [Run] icon.
- Collect fractions utilizing fraction collector filled with disposable glass tubes
- Sample injection using a Superloop (see page 122 in ÄKTA Pure Operating Instructions guide):
- Connecting a column (see page 109 in ÄKTA Pure Operating Instructions guide):
- Machine Pre-startup
- Sample preparation for subsequent chromatographic runs
- Combine peak fractions together and transfer to 15-ml Amicon centrifugal filtration units with molecular weight cut-off of 3.5 kDa.
Note: Spin samples based on manufacturer’s guidelines until sample is concentrated. - Fill filtration column with Buffer A and repeat centrifuge step as above.
Note: Repeat this step 5-10 times. - Pipet out protein sample from on top of the filter, transfer to a new collection tube and add enough volume of Buffer A to fill your chosen sample loop for additional chromatography runs.
10 ml if using the 10 ml Superloop. - Optional: Perform second round of cation exchange chromatography this time using a shallow gradient
Note: Create identical method except elute over 45 ml as opposed to 25 as completed for first round of Cation exchange chromatography for better separation of elution peaks. - Repeat Steps C1-C3 for following elution of protein for final round of Heparin chromatography.
- Run the same Elution method that was used for round 1 cation exchange chromatography (e.g., 25 CV elution gradient).
See Figure 2 for representative chromatograph from heparin affinity run.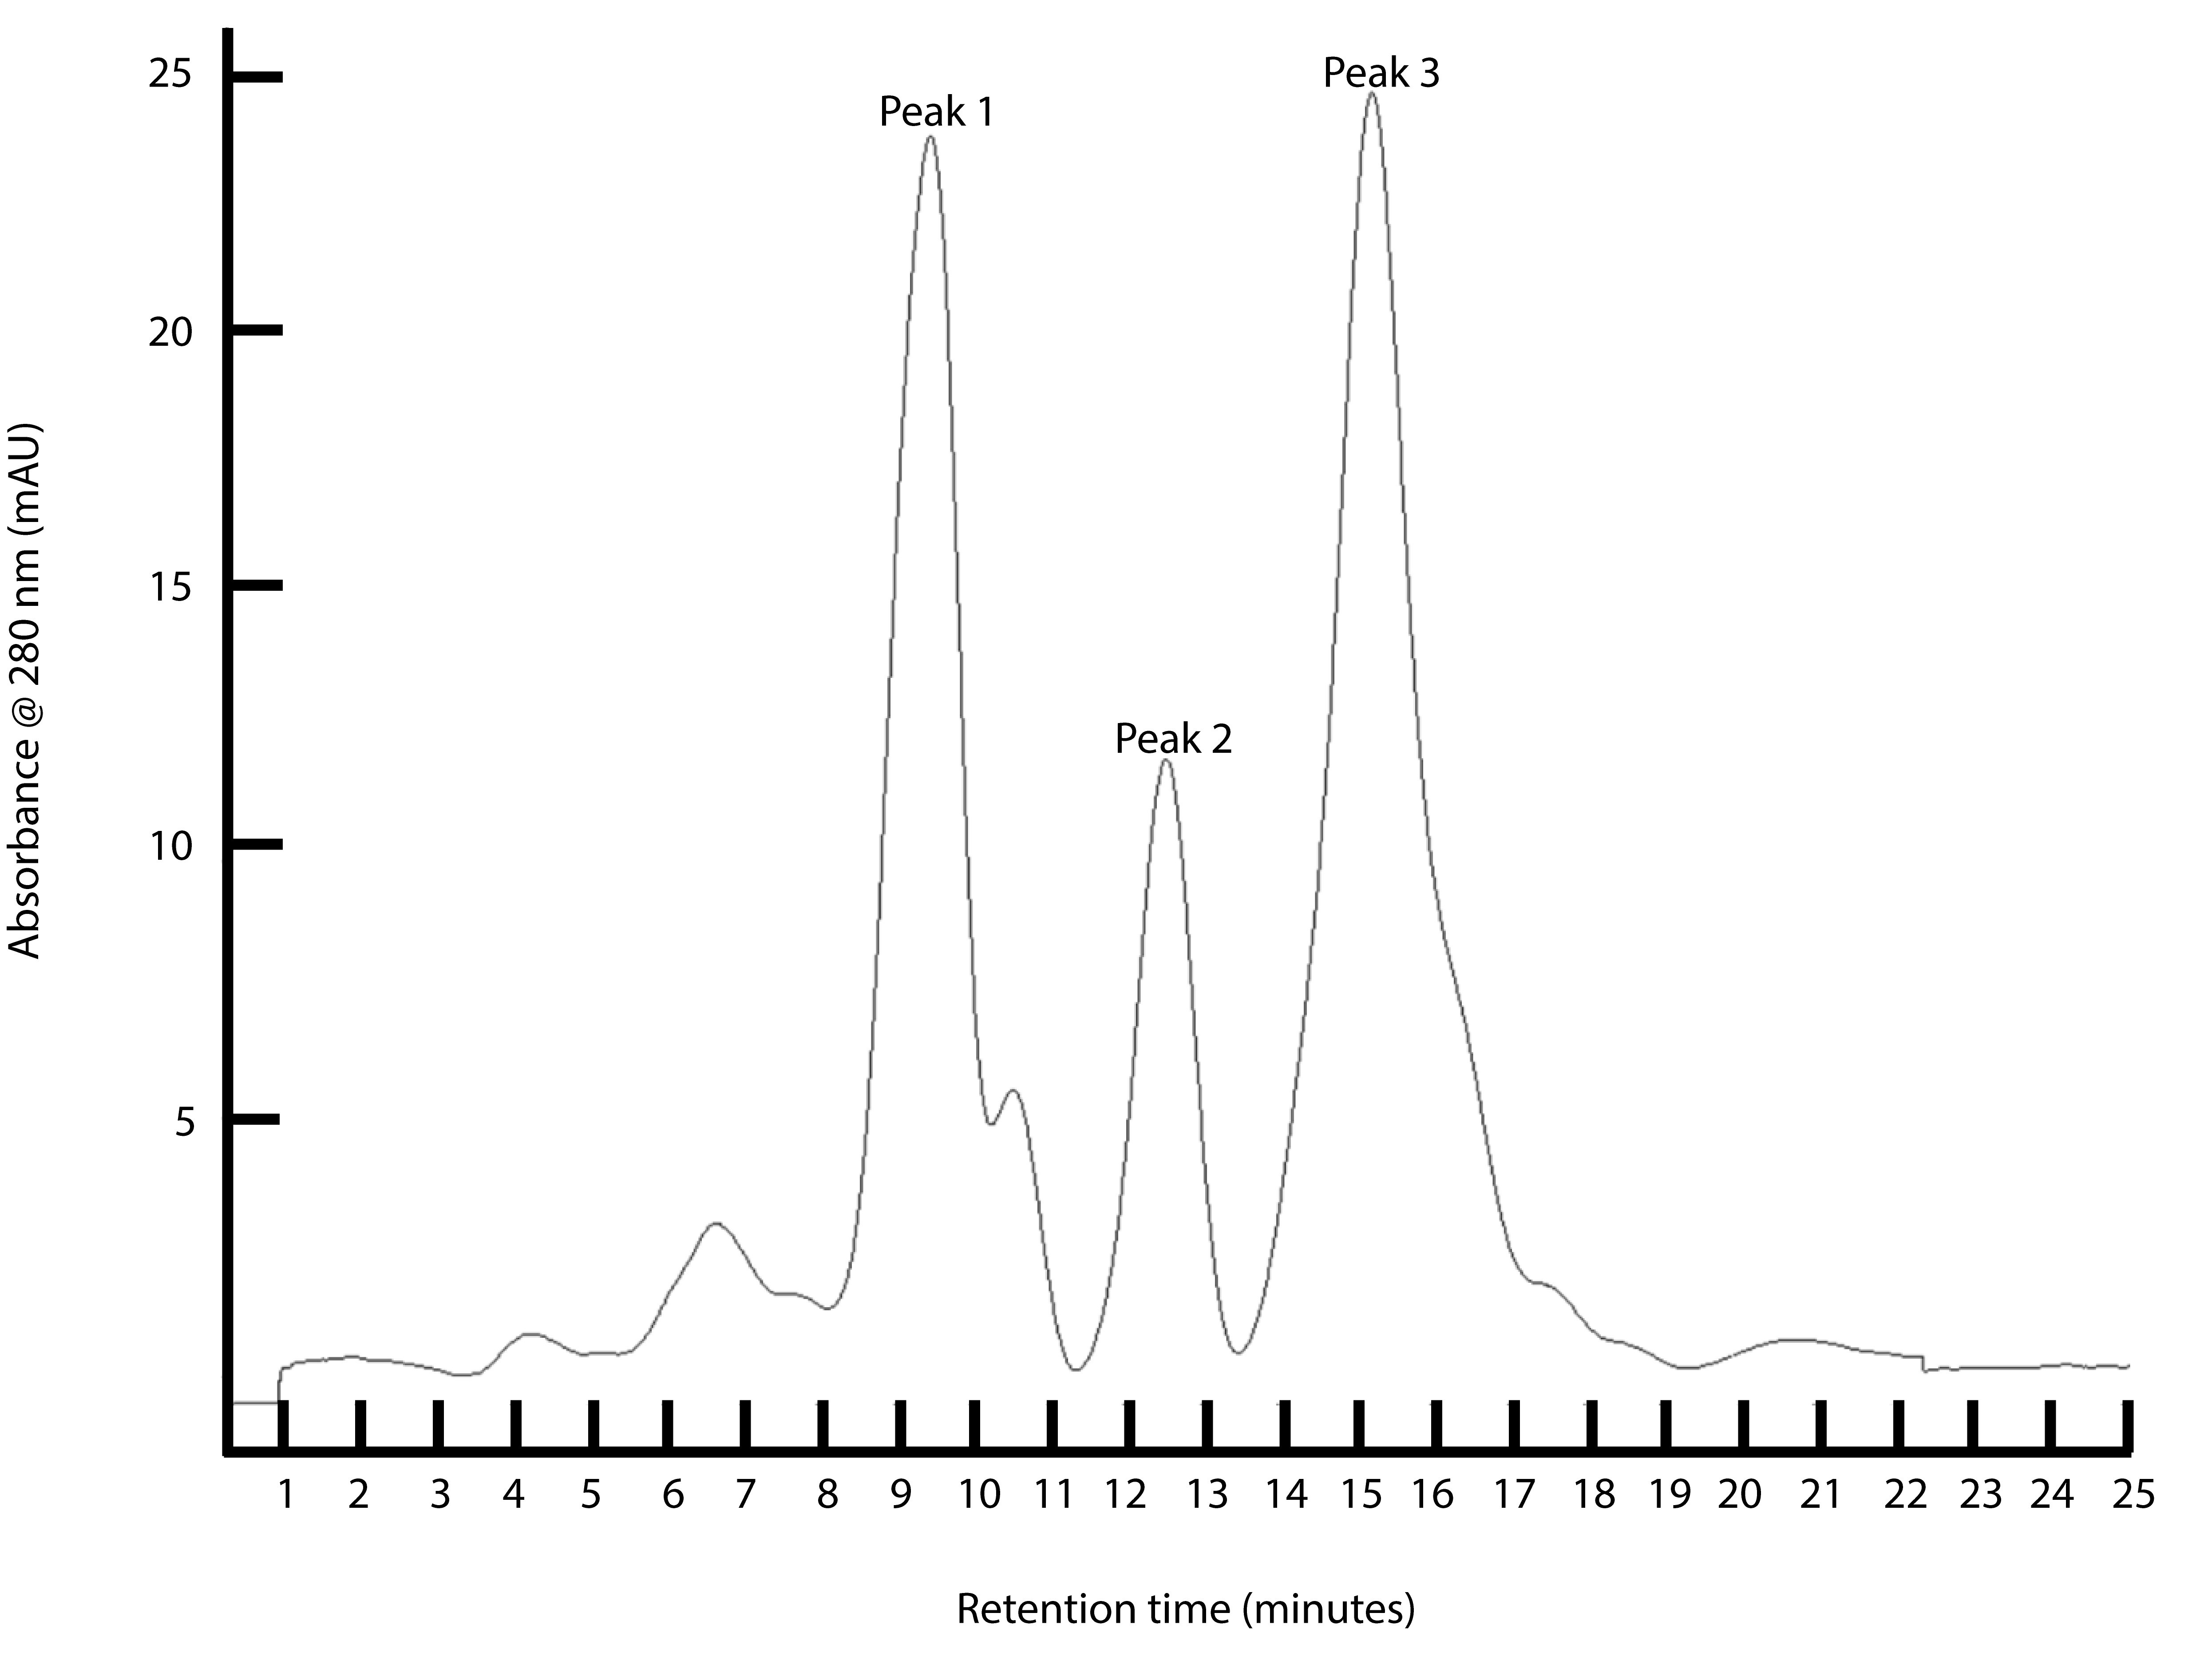
Figure 2. FPLC separation of chromatin proteins by heparin affinity chromatography. Proteins are fractionated by heparin affinity chromatography and elution is monitored by absorbance at 280 nm. - Save individual peak fractions for MS analysis of intact protein via FT-ICR-MS.
You may choose to concentrate fractions to higher protein concentrations to accommodate mass spectrometry methods.- Repeat Step C1-C3 for following elution of protein from heparin to exchange buffer into a MS-compatible buffer (i.e., 50 mM ammonium bicarbonate).
- Optional: You may choose to vacuum dry protein samples for reconstitution into buffer of choice as an alternative to diafiltration. It may, however, be necessary to remove salts prior to vacuum drying to prevent salt crystal formation.
- Analyze the protein composition of the via SDS-PAGE to determine respective masses of purified proteins in individual FPLC peaks.
See Figure 3 for representative image of protein content in peaks in Figure 2.
Note: In-gel analysis is for qualitative evaluation of protein content in respective peaks. All peaks are analyzed as intact, undigested proteins in-solution for subsequent FT-ICR-MS analysis.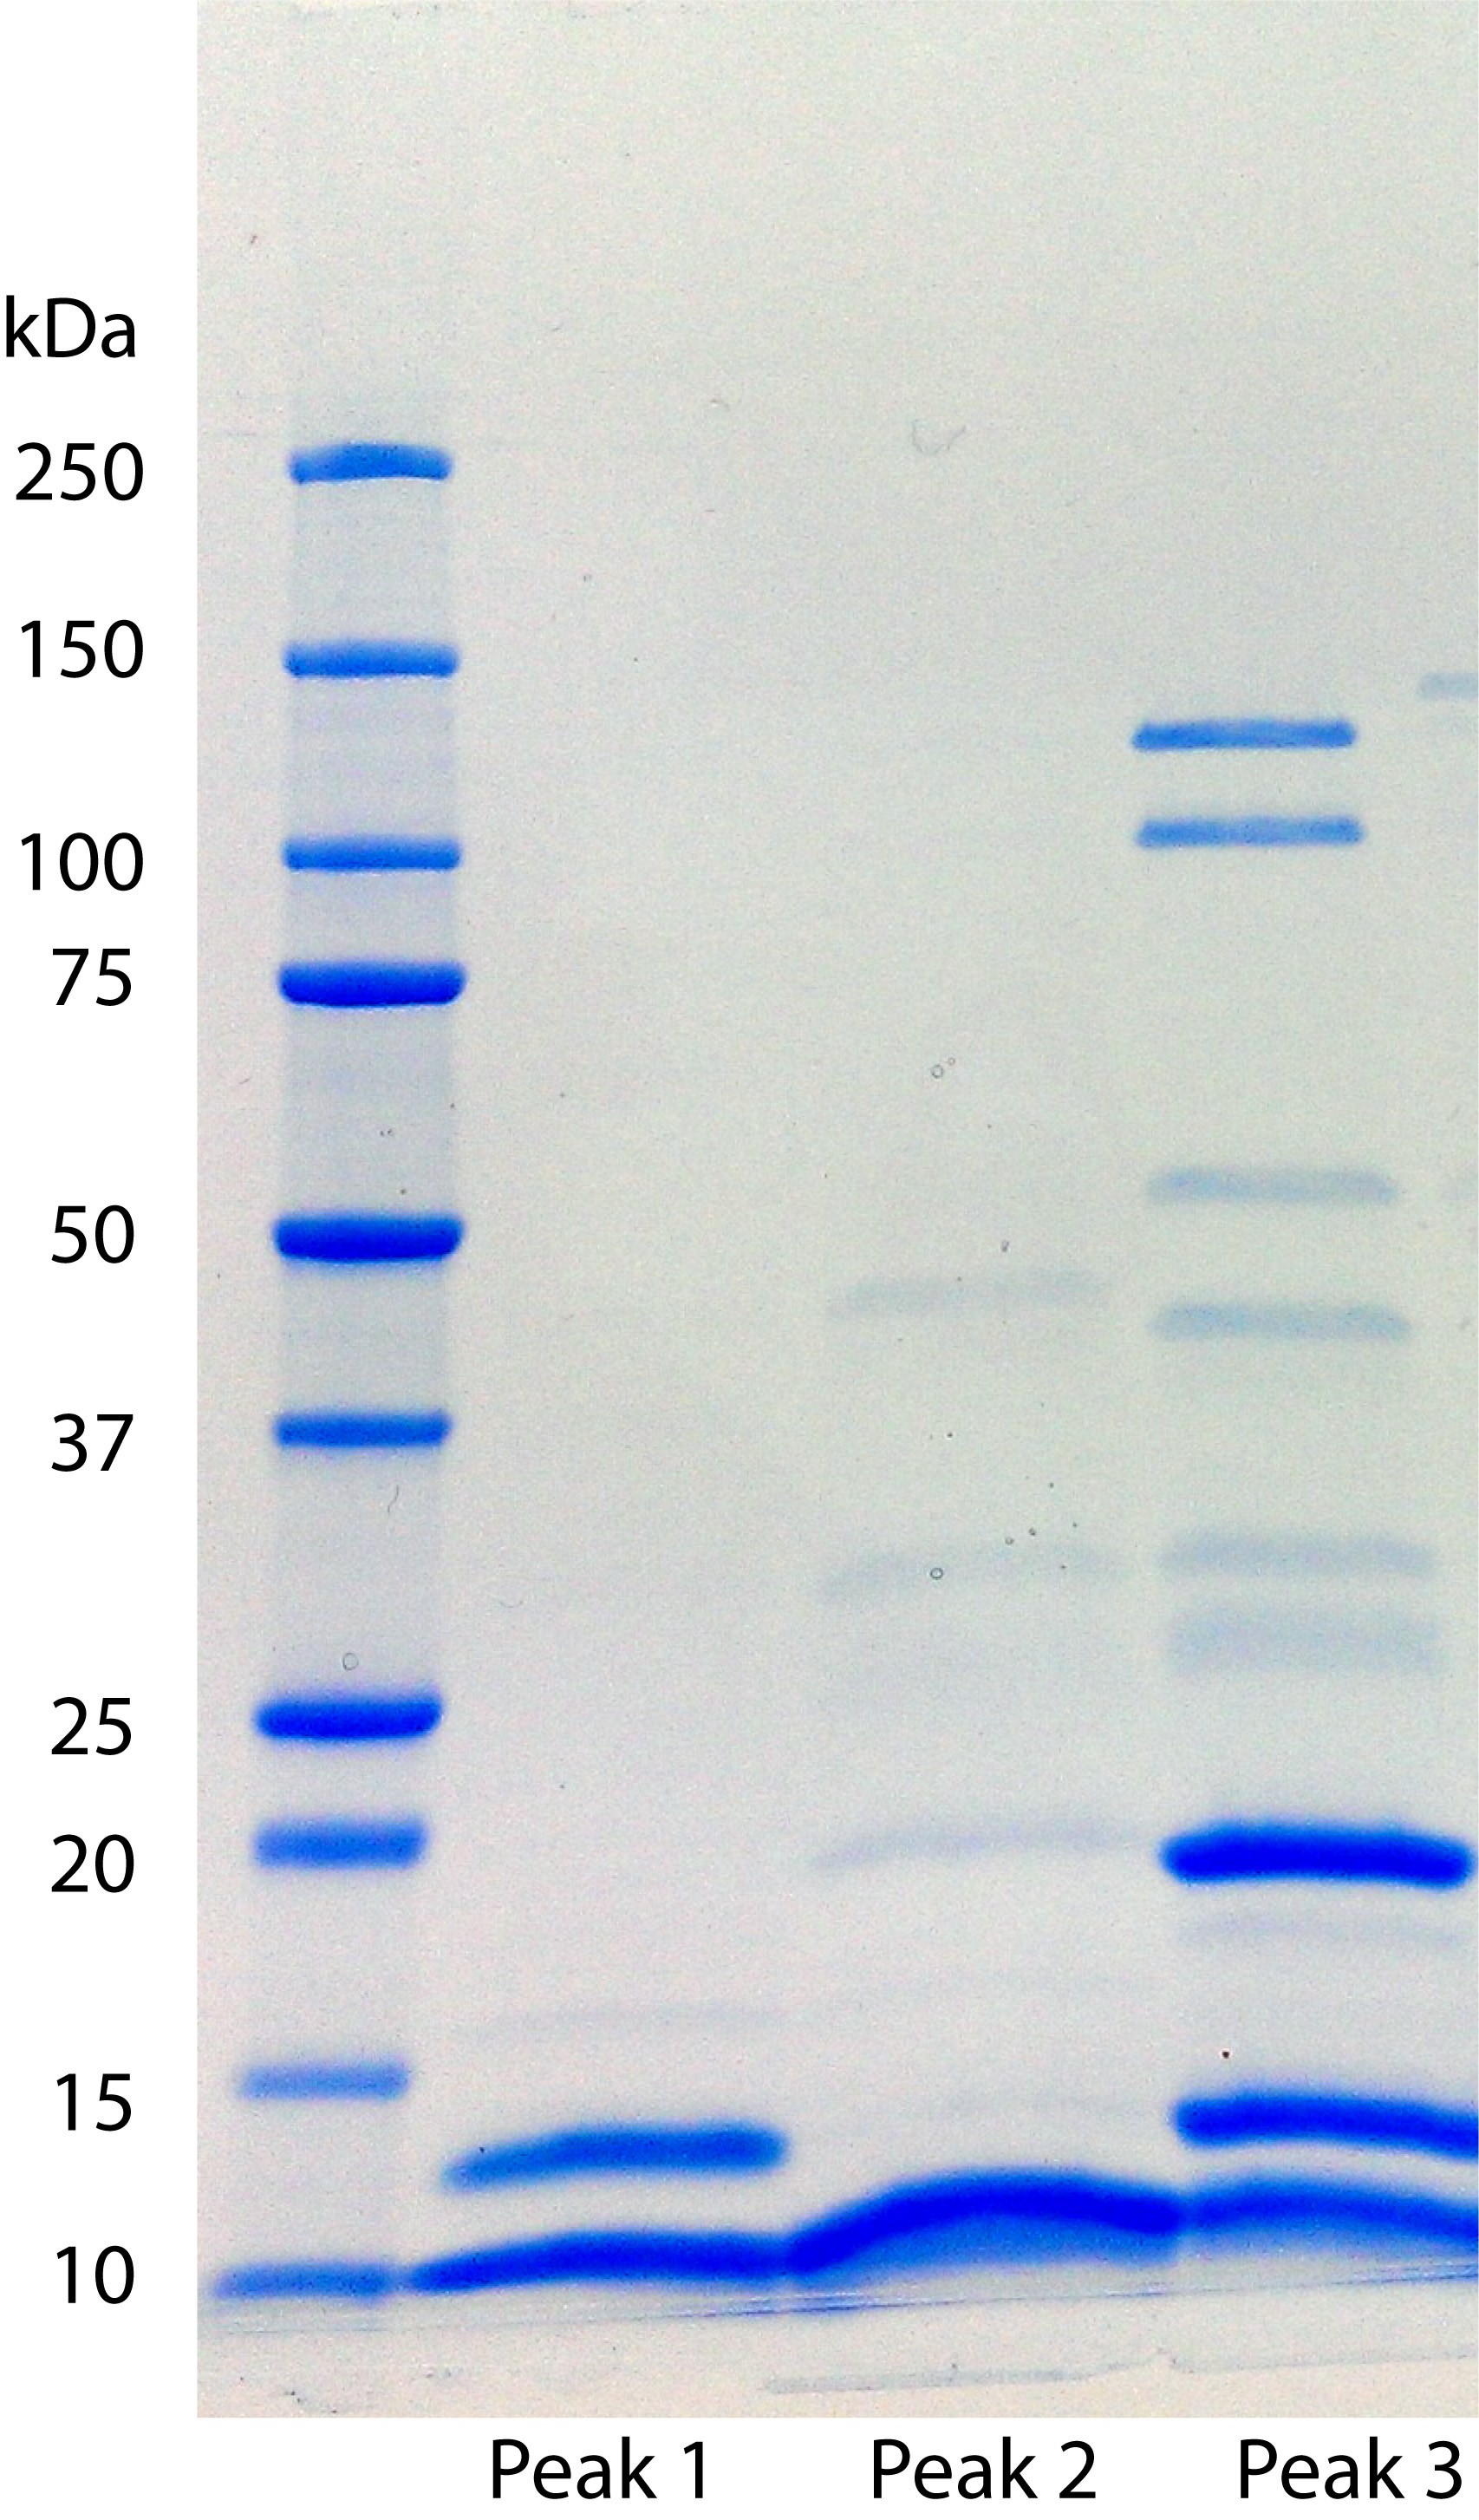
Figure 3. SDS-PAGE analysis of purified native chromatin extracts following heparin affinity chromatography. Eluted individual peak fractions from heparin resins were analyzed for protein identity prior to MS identification.
- Combine peak fractions together and transfer to 15-ml Amicon centrifugal filtration units with molecular weight cut-off of 3.5 kDa.
- LC-FT-ICR Mass Spectrometry
- Creating a Mass Spectrometry custom method in Method Editor.
- Turn on computer and open Compass SolariXcontrol software.
- Software will upload the last method used by the instrument.
- Open [Method Editor] window.
- In the Method Editor window click [Ion Transfer].
- In [Source Optics] set parameters to:
Capillary Exit to 180 V
Deflector Plate to 280 V
Funnel 1 to 110 V
Skimmer 1 to 30 V
Funnel RF Amplitude to 210 Vpp - In [Octopole] set parameters to:
Frequency to 5 VMHz
RF Amplitude to 150 Vpp - In [Quadrupole] parameters set:
Q1 mass to 250 m/z - In [Collision Cell] set parameters to:
Collision Voltage to -1.5 V
DC Extract Bias to 0.6 V
RF Frequency 2 MHz
Collision RF Amplitude to 1,500 Vpp - In [Transfer Optics] set parameters to:
Time of Flight to 1 ms
Frequency 4 MHz
RF Amplitude to 440 Vpp - In [Gas Control] set parameters to:
Flow 15%
Check [Enable] box
- In [Source Optics] set parameters to:
- In the Method Editor window click [API Source].
- In [API Source] set parameters to:
Source type to ESI
Capillary is set to 4,500 V
End Plate Offset to -500 V - In [Source Gas Tune] set parameters to:
Check [Dry Gas Flow] box
Check [Dry Gas Heater] box
Check [Nebulizer Gas Flow] box - In [Divert Valve] parameters set:
Check [Position] to Waste
- In [API Source] set parameters to:
- In the Method Editor window click [Mode].
- In [Acquisition Mass Control] set parameters to:
Detection Mode to Broadband
TD (Acquisition) to 2 M
Low Mass to 150.59 m/z
High Mass to 3,000.00 m/z - In [Accumulation] set parameters to:
Average Spectra to 1
Source Accumulation to 0.010 s
Ion Accumulation Time to 0.800 s
Ion Cooling Time to 0.010 s
Time of Flight to 1 ms
- In [Acquisition Mass Control] set parameters to:
- In the Method Editor window click [Analyzer].
Set parameters to:
Transfer Exit Lens to -16 V
Analyzer Entrance to -10 V
Side Kick to 7 V
Side Kick Offset to -1.5 V
Front Trap Plate to 1 V
Back Trap Plate to 0.9 V
Sweep Excitation Power to 15% - Save method as [nameMS].
- Turn on computer and open Compass SolariXcontrol software.
- Creating a Chromatography custom method in Method Editor
- Turn on computer and open HyStar 3.4 software.
- Click [Method] → Select [New Method] if you prefer to define your own parameters from scratch → Click [OK] or open any Method and Click [Edit].
- In the Method Editor window click [General].
- In [Author] write your name
- In [Description] describe your method
- In the Method Editor window click [LC Parameters].
- In [Total Runtime] set parameters to:
Total Runtime to 90 min - In [Data Acquisition] set parameters to:
Start delay to 0 min
Runtime to 90 min
Check [Dry Gas Heater] box - In [LC Pump] set parameters to:
Flow Rate 0.02 ml/min
Pressure limits to Min 0 and Max 400 bar
Solvent to 7
Solvent A1 to 100%
Solvent B1 to 0%
- In [Total Runtime] set parameters to:
- In the Method Editor window click [LC Timetable].
- In [Device] drop down menu select [Pump-Agilent G1376A Micro].
Set [Time] to 0 min - In [Function] drop down menu select [Flow Rate].
Set Flow Rate to 0.02 ml/min - In [Device] drop down menu select [Pump-Agilent G1376A Micro].
Set [Time] to 0 min - In [Function] drop down menu select [Solvent Mix].
Set Solvent Mix to 100% A1 and 0% B1 - In [Device] drop down menu select [Pump-Agilent G1376A Micro].
Set [Time] to 1 min - In [Function] drop down menu select [Solvent Mix].
Set Solvent Mix to 100% A1 and 0% B1 - In [Device] drop down menu select [Pump-Agilent G1376A Micro].
Set [Time] to 75 min - In [Function] drop down menu select [Solvent Mix].
Set Solvent Mix to 20% A1 and 80% B1 - In [Device] drop down menu select [Pump-Agilent G1376A Micro].
Set [Time] to 78 min - In [Function] drop down menu select [Solvent Mix].
Set Solvent Mix to 0% A1 and 100% B1 - In [Device] drop down menu select [Pump-Agilent G1376A Micro].
Set [Time] to 79 min - In [Function] drop down menu select [Solvent Mix].
Set Solvent Mix to 0% A1 and 100% B1 - In [Device] drop down menu select [Pump-Agilent G1376A Micro].
Set [Time] to 80 min - In [Function] drop down menu select [Solvent Mix].
Set Solvent Mix to 100% A1 and 0% B1 - In [Device] drop down menu select [Pump-Agilent G1376A Micro].
Set [Time] to 90 min - In [Function] drop down menu select [Solvent Mix].
Set Solvent Mix to 100% A1 and 0% B1
- In [Device] drop down menu select [Pump-Agilent G1376A Micro].
- In the Method Editor window click [Signals 1-8]
- From [Signal No. 1] select MS (apex series) MS and Interval BPC, All
- From [Signal No. 2] select MS (apex series) MS and Interval TIC, All
- Save method as [nameLC]
See Figure 4A for representative HPLC spectrum.
- LC-FT-ICR-MS data acquisition
- Turn on computer and open Compass SolariX Control and HyStar 3.4 software.
- Open [nameMS] Method in Compass SolariX Control software.
- Open [nameLC] Method in HyStar 3.4 software.
- Check all the volumes of all buffers being used during HPLC run to ensure no air enters lines/pumps during run.
Note: All solvents must be a minimum of 100 ml. - Make sure the correct lines are in the correct solvents
A1 = Solvent A (0.1% formic acid in water)
B1 = Solvent B (0.1% formic acid in acetonitrile) - Empty waste container prior to each run to prevent over filling and back pressure on the system.
- Initializing Agilent 1100 HPLC system.
- Turn on the Agilent 1100 HPLC system (right hand side).
- Allow a short time for pumps and lamp to initialize (~30 s).
- Ensure that the machine and computer are communicating.
- Priming inlets and purging pump heads.
- Open the System Control module.
- In the Process Picture at the bottom of the window:1)Click on [Purge].2)Select the position of the inlet to be filled. Select the positions in reverse alphabetical order and start with the highest number. For example, if all the four inlets in the Inlet valve AB are to be filled, fill them in the following orderL B2, B1, A2, A1.3)Click on [Start Purge].
- Connect a ProSwift column (1 x 50 mm) between Agilent LC system outlet and MS instrument inlet.
- Place sample into a correct position in Agilent 1200 serie Autosampler (e.g., 1-B,1).
- Add sample to Sample Table.
- Click [Sample Table] in HyStar 3.4 software.
- Click on [Add new sample].1)In [Vial] box define position of your sample in the Autosampler (e.g., 1-B,1).2)In [Sample ID] define name of your sample.3)Set [Injection] to 1.4)Set [Volume] to 5 µl.5)In [Data path] define where results will be stored.6)For [LC Method Part] box select [nameLC].7)For [Autosampler Method Part] box select [Standard].8)For [MS Method Part] box select [nameMS].
- In the sample table check the line with your sample and click [Start].
- Following the analytical run, close all software.
- For representative m/z spectrum at different retention times see Figures 4B and 4C.
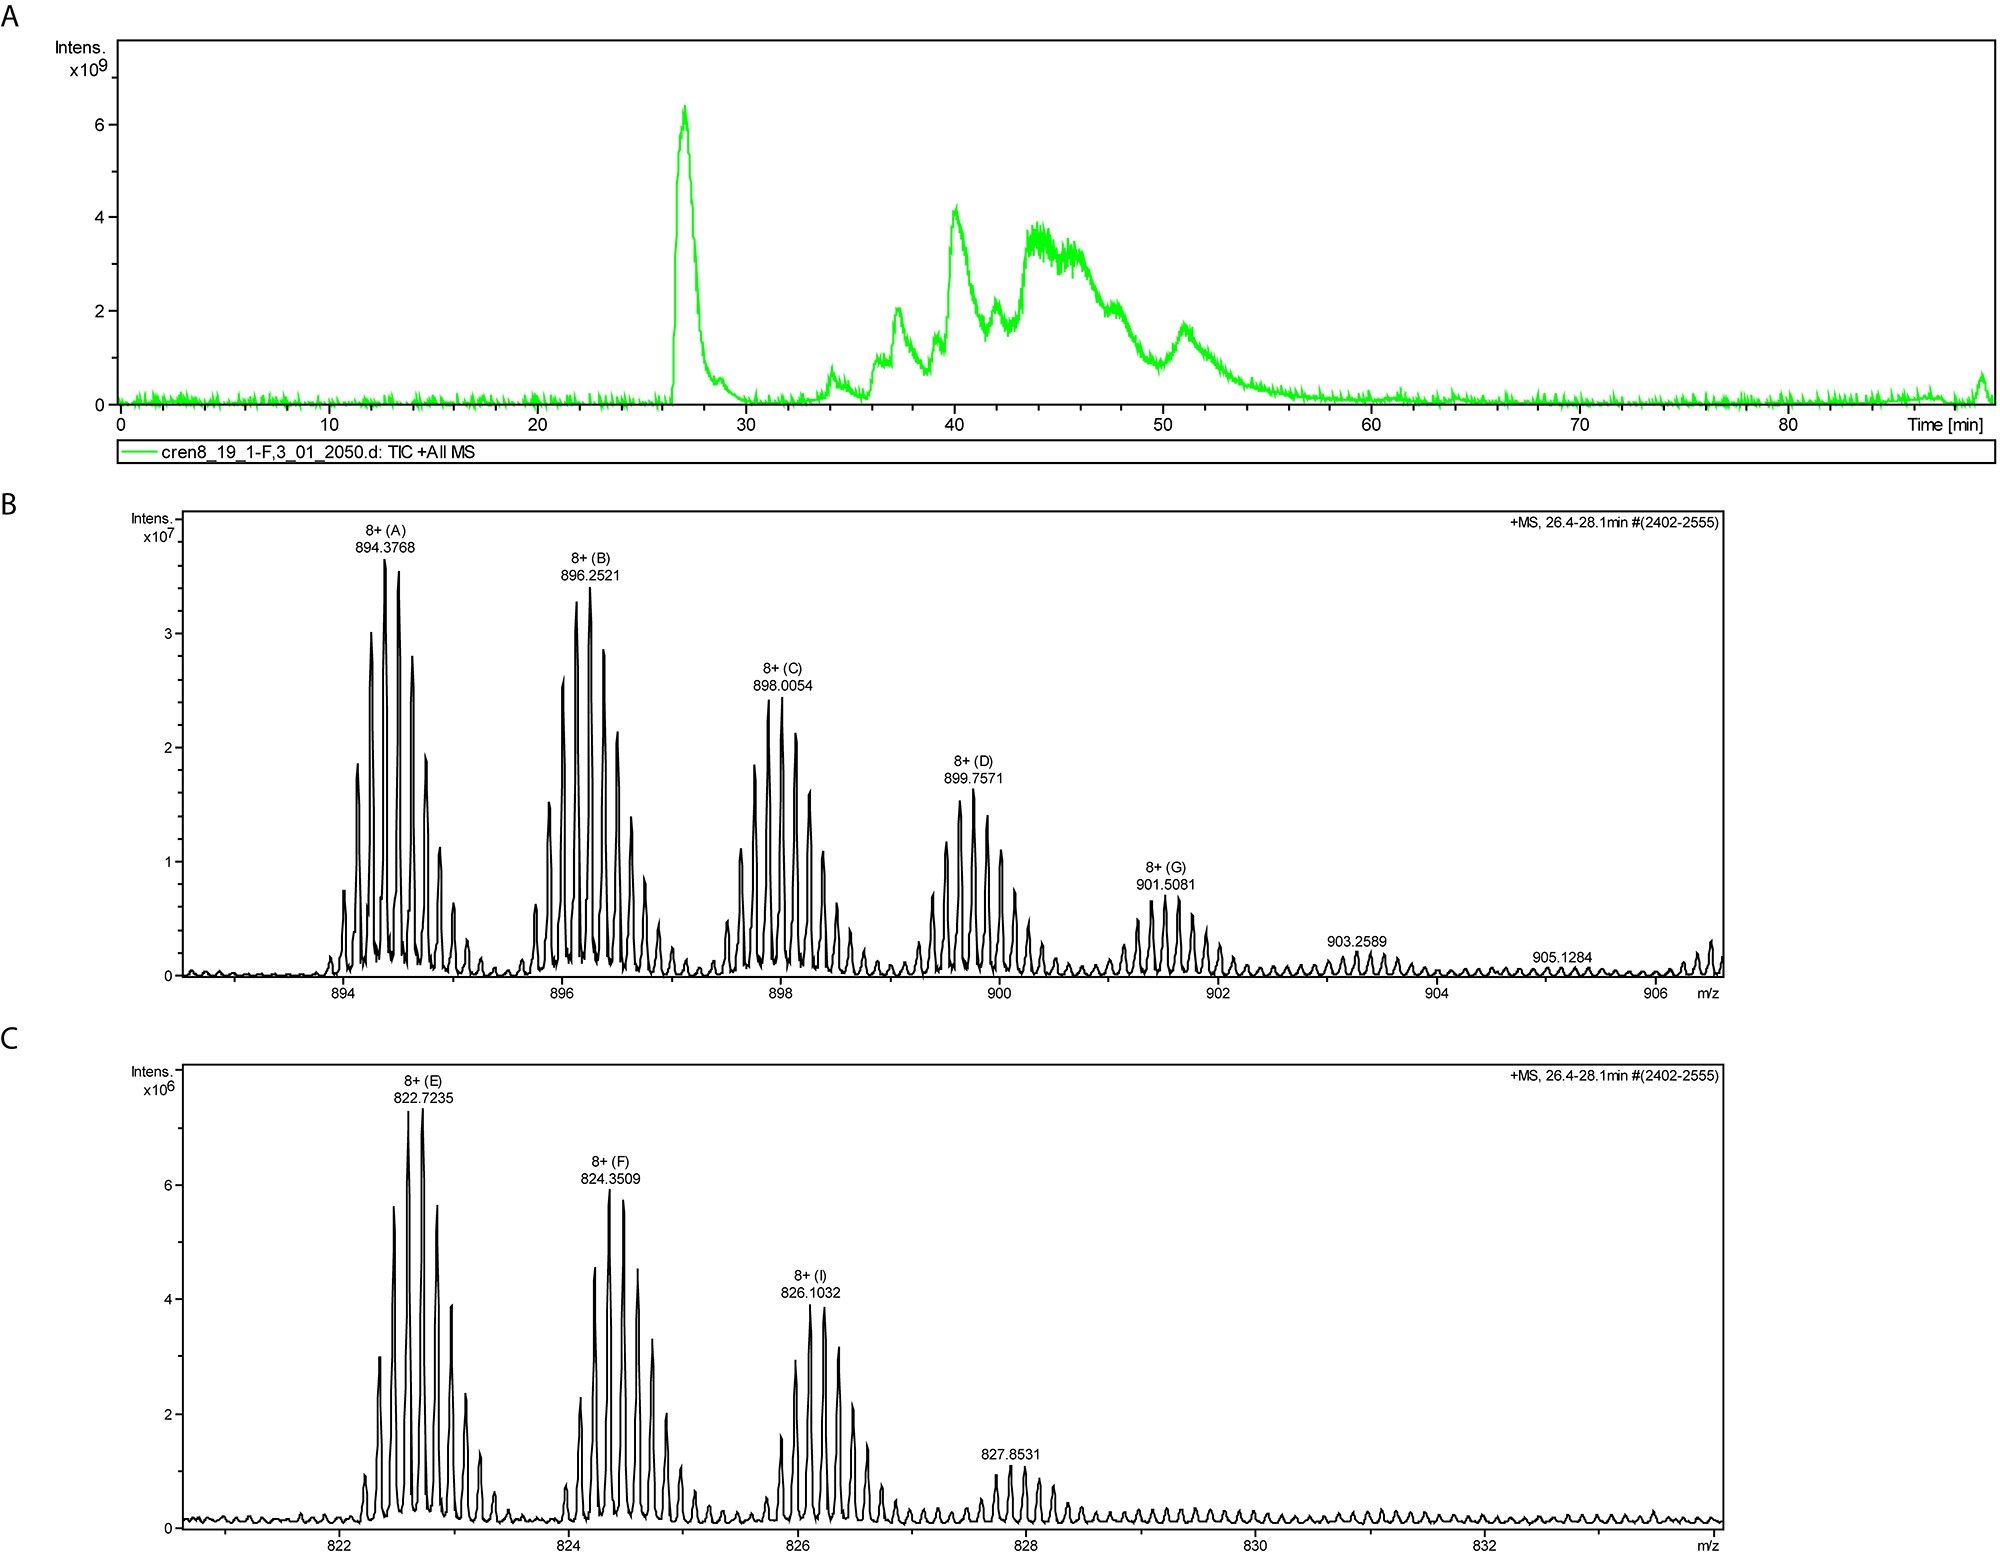
Figure 4. FT-ICR-MS chromatograpm and mass spectra of intact proteins. A. HPLC chromatograph following reverse phase purification. B-C. Intact mass of 26.4-28.1 min retention time corresponding to Cren7 protein isoforms B and Sso7D isoforms C. All peak m/z shifts correspond to +14 Da indicating variable degrees of methylation.
- Creating a Mass Spectrometry custom method in Method Editor.
Data analysis
FT-ICR-MS data analysis can be found in Johnson et al., 2019, materials and methods: FT-ICR-MS section. Data analysis must be determined on a protein-by protein basis as many parameters may play role for specific results depending on protein(s) and PTM(s) of interest.
Notes
- All buffers must be a minimum of 300 ml.
- If the instrument is turned off or disconnected from the network it will appear dimmed and cannot be connected.
- During the system preparation run watch the system pressure tracing on the chromatogram pane in the system control window. If you see a very erratic fluctuation in system pressure there is air in the system buffer lines. All of the buffer pumps will need to be purged to fix this problem before your elution run (see Step B2: Priming inlets and purging pump heads).
- Watch for any buffer leaks in the system during the system preparation run and tighten any loose connections to rectify the problem.
- Some general parameters, however, should be set as follows:
Signal to noise ratio (S/N) to 3. Minimum and maximum mass of the expected protein (including any known PTMs including truncation and processing). Maximum Charge State also depends on the mass of expected protein and should be set between 20 (small proteins) and 150 (large proteins). Precursor/fragment errors to 10 ppm.
Recipes
- Buffer A
30 mM sodium phosphate
0.1 mM EDTA
1 mM DTT
pH 6.6 - Buffer B
30 mM sodium phosphate
0.1 mM EDTA
1 mM DTT.
0.75 M KCl
pH 6.6
Acknowledgments
The protocol described above was adapted from work described in a recent publication (Johnson et al., 2019).
Competing interests
The authors declare no competing interests.
References
- Johnson, T., Payne, S., Grove, R., McCarthy, S., Oeltjen, E., Mach, C., Adamec, J., Wilson, M. A., Van Cott, K. and Blum, P. (2019). Methylation deficiency of chromatin proteins is a non-mutational and epigenetic-like trait in evolved lines of the archaeon Sulfolobus solfataricus. J Biol Chem 294(19): 7821-7832.
Article Information
Copyright
© 2020 The Authors; exclusive licensee Bio-protocol LLC.
How to cite
Readers should cite both the Bio-protocol article and the original research article where this protocol was used:
- Johnson, T. B., Adamec, J. and Blum, P. (2020). Preparation, FPLC Purification and LC-FT-ICR-MS of Proteins. Bio-protocol 10(7): e3570. DOI: 10.21769/BioProtoc.3570.
- Johnson, T., Payne, S., Grove, R., McCarthy, S., Oeltjen, E., Mach, C., Adamec, J., Wilson, M. A., Van Cott, K. and Blum, P. (2019). Methylation deficiency of chromatin proteins is a non-mutational and epigenetic-like trait in evolved lines of the archaeon Sulfolobus solfataricus. J Biol Chem 294(19): 7821-7832.
Category
Biochemistry > Protein > Posttranslational modification
Biochemistry > Protein > Isolation and purification
Molecular Biology > Protein > Detection
Do you have any questions about this protocol?
Post your question to gather feedback from the community. We will also invite the authors of this article to respond.